Are you wondering about how to increase the WordPress memory limit?
WordPress memory limit is the maximum memory allocated for your WordPress website.
However, as you reach the maximum limit, you’ll come across an error that reads “Fatal error: Allowed memory size of xxxxxxxx bytes exhausted,” which means you will no longer be able to add any content.
To overcome this, you’ll have to expand your WordPress memory limit.
Here, in this article, we’ll look at how you can expand the memory limit of your WordPress website.
Now, without further ado, let’s jump into the various ways to increase the WordPress memory limit.
What is WordPress Memory Limit?
Memory limit in WordPress determines the amount of memory allocated for running a WordPress website and its plugins.
The default memory limit for WordPress is 40MB. However, this limit can vary depending on your hosting environment and the specific configuration settings.
This memory is sufficient for a website with few pages. But as the content and pages increase, you’ll soon reach the maximum memory limit.
When this limit is reached, an error message pops up, and you won’t be able to add any more content or files to your website.
How to Check the Current WordPress Memory Limit
Checking your WordPress memory limit is essential, as you can plan your website accordingly.
The best way to check your memory limit is from the WordPress dashboard.
Head over to your WordPress dashboard. Hover over Tools and click on the Site Health button.
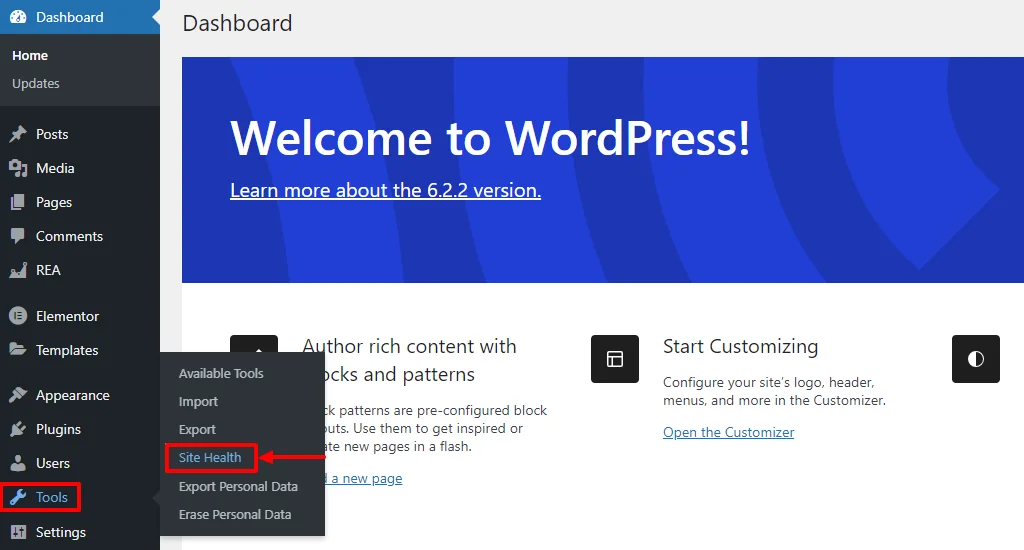
Next, select info to view the WordPress site health info.
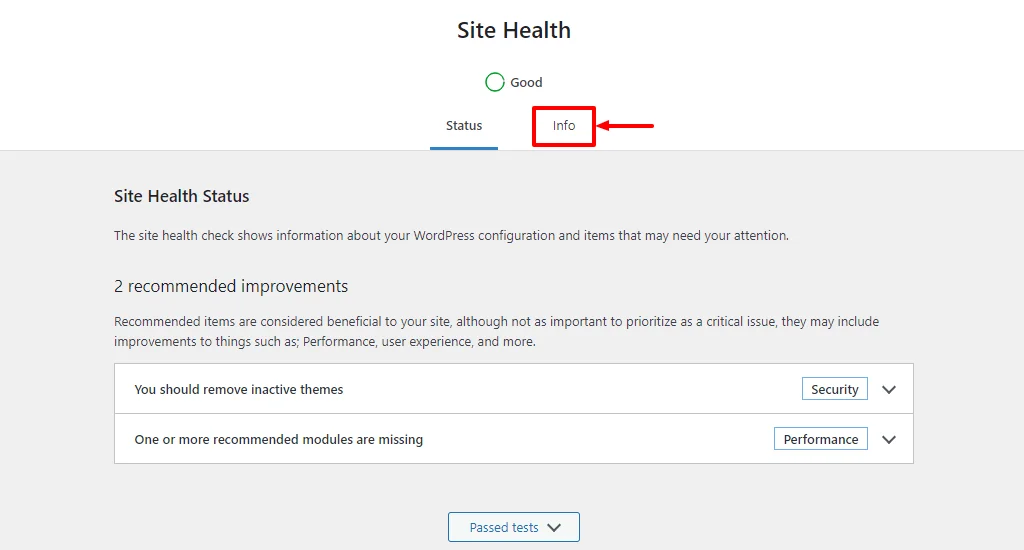
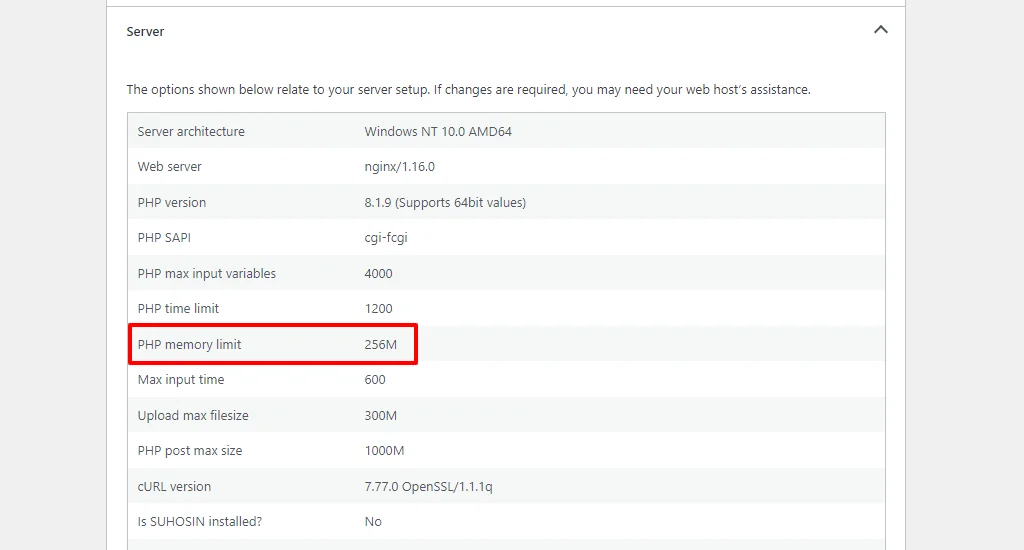
Scroll until you find the Server menu, and click the Drop Down button.

Now, you can view all the information about your site, including the WordPress memory limit.
How to Increase WordPress Memory Limit
There are multiple ways to increase the WordPress memory limit.
Method 1: Increase the WordPress Memory Limit Via wp-config.php File
To increase the memory limit of your WordPress website, follow these simple steps:
Before you edit anything, the first thing is to create a backup.
Head over to your FileZilla FTP client. Access the files in the root directory.
In the next step, identify the file wp-config.php in the root folder of your account. Click on the Edit button.
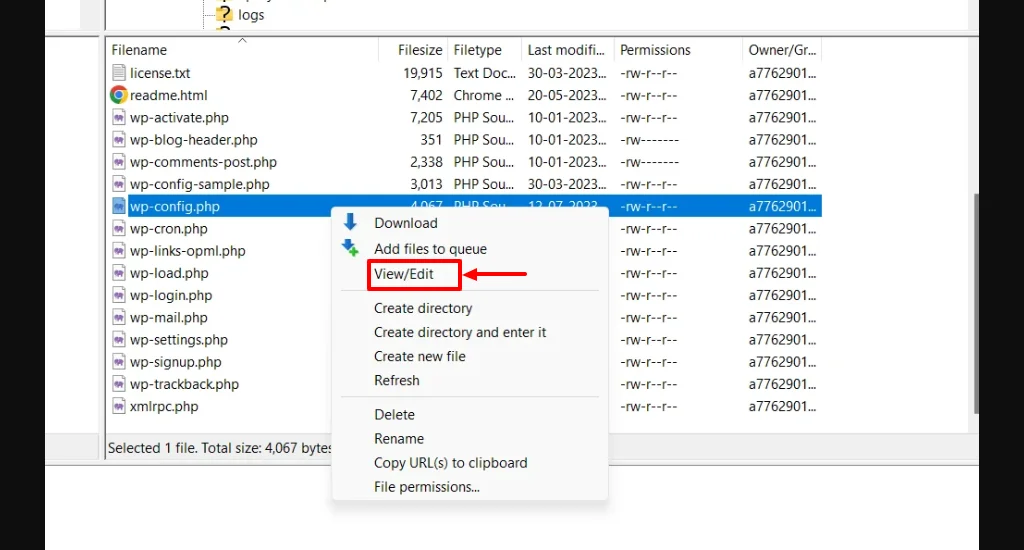
Next, find the line in this file which reads, /* That’s all, stop editing! Happy publishing. */.
Just above this line, add a code line:
define(‘WP_MEMORY_LIMIT,’ ‘256M’);
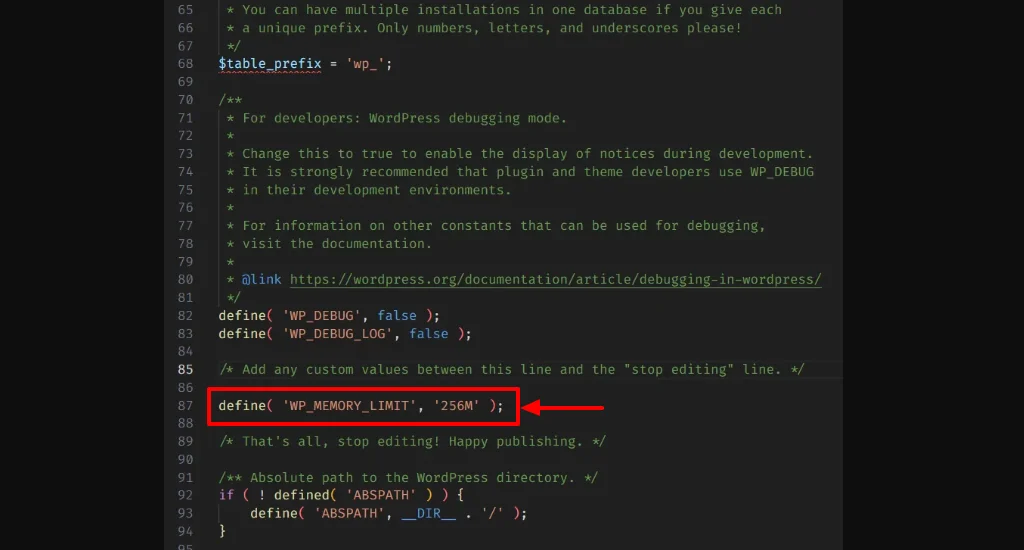
And Save the changes. That’s it, you’ve successfully edited the code. Now, check the WordPress memory limit. In case there are no changes, move to the following method.
Method 2: Increase the WordPress Memory Limit Via PHP.ini File
This method is risky when compared to the above method. It’s highly recommended to create a backup before performing any changes.
Moving with this method, accessing the PHP.ini file is quite a tedious process. In most cases, the hosting providers do not provide you direct access to these files.
If granted access, you can directly make changes to the file. If not, you can create a duplicate PHP.ini file in your directory.
You’ll override the data in the original file with the duplicate PHP.ini files. To do this, locate the PHP.ini in the files and folder structure.
Note: The location of the file may depend on your hosting provide
Now you can increase the memory limit in the code line:
memory_limit=128M

Don’t forget to save the changes.
Well, after making the changes, check your current WordPress memory limit. In case it remains the same, try the following method.
Method 3: Edit the .htaccess File to Increase the Memory Limit
.htaccess is a crucial part of any WordPress site. Changing one thing can cause multiple changes to the whole system.
So this step must be done cautiously under the guidance of an experienced developer.
Create a backup of your WordPress site and follow these steps.
Open the FileZilla FTP client and access the .htacess file from the root directory. Click on the Edit button.
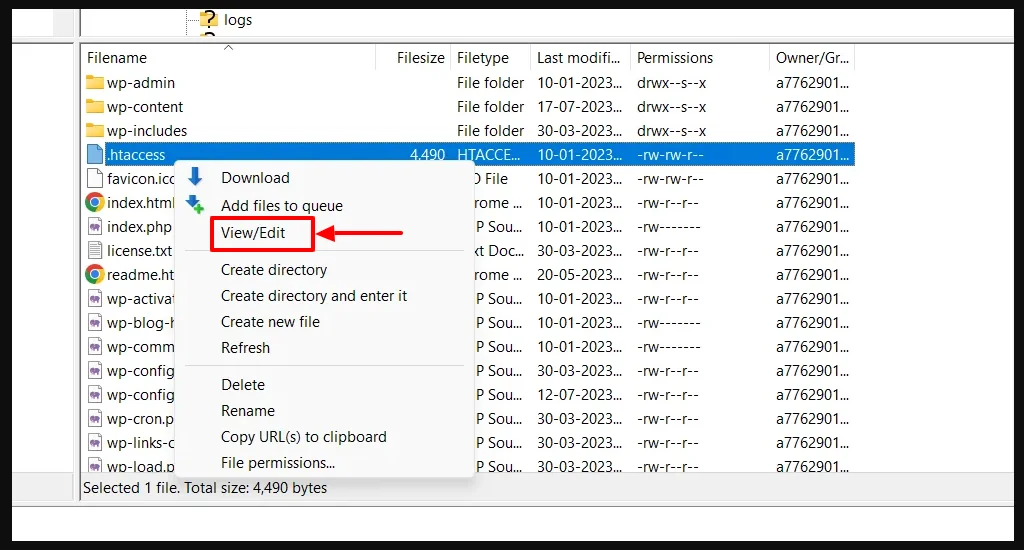
Now, add the following code snippet below the # END WordPress line:
php_value memory_limit 256M
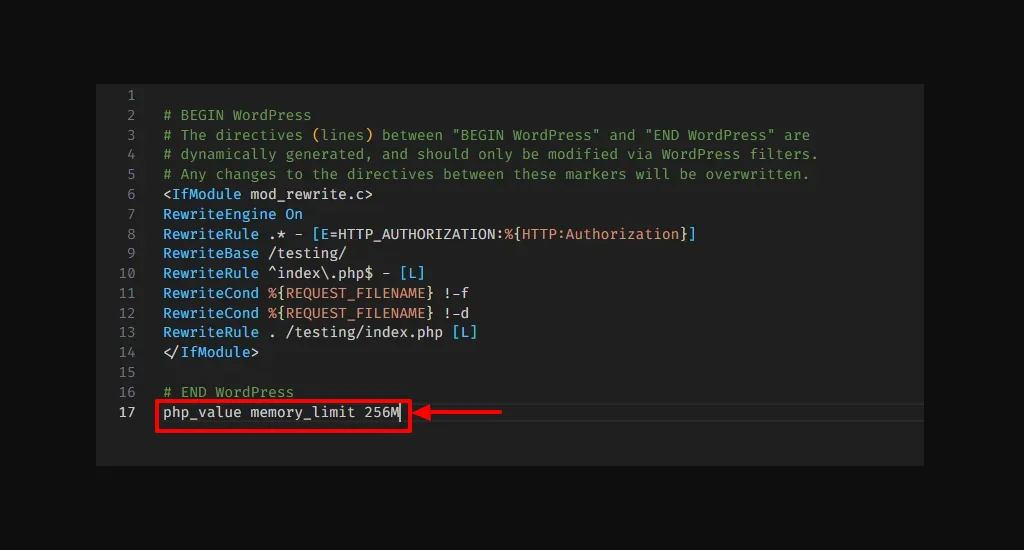
Ensure that the changes are saved.
Once updated, check if the changes are reflected in the WordPress Site information.
Method 4: Contact Your Hosting Provider
If all the above three methods fail, the last thing you should do is contact your hosting provider.
Your host will easily be able to increase the WordPress memory limit.
You need not worry about any risk as you’ll not be required to change any code line. This way, the safest method is to contact your hosting provider.
Tips to Optimize Memory Usage in WordPress
WordPress is a platform that allows you to create a website. When creating a website, you must be aware of the memory limitations. WordPress comes with a default 40Mb size.
You must optimize your usage to create a website within this limit.
Here are the top tips to optimize memory usage in WordPress:
- Choose lightweight themes and plugins for better performance.
- Use a cache plugin, as it reduces the load on the server.
- Clean up your database regularly to improve performance.
- Ensure to update WordPress, themes, and plugins regularly.
- Resize and optimize images and other media files before uploading to the WordPress website.
- Reduce the number of plugins and keep it as limited as possible. Plugins can pull a lot of memory.
- Use a content delivery network (CDN) to offload static content, thereby improving server performance.
- Increase the WordPress memory limit by using the above four methods consecutively.
FAQ’s
Memory limit is the amount of memory allocated for running a WordPress website.
Yes, there is a limit to upload files to a WordPress website. WordPress allows a standard 40Mb size within which you fit your data.
Yes, you can extend the memory limit of your WordPress website.
Steps to extend the size of your WordPress website:
1. Increasing the size in wp-config.php File
2. Editing php.ini File
3. Increasing the size in .htaccess File
4. Contacting the Website hosting provider
To increase the memory limit of your WordPress website, follow these steps:
1. Increase the WordPress size in wp-config.php File
2. Edit the php.ini File
3. Increase the size in .htaccess File
4. Contact the Website hosting provider
To check the memory limit of the WordPress website, follow these simple steps.
1. Head over to your WordPress dashboard. Hover over Tools and click on the Site Health button.
2. Next, select Info to view the WordPress site health info.
3. Scroll until you find the Server menu, and click on the Drop Down button.
4. Now you can view the memory limit of the WordPress website.
Conclusion
When you’re trying to upload some files to your WordPress website, you may come across an error – Fatal error: Allowed memory size of xxxxxxxx bytes exhausted – which will not allow you to upload any more files.
In this case, you’ll need to increase the size of your memory limit. To increase the limit, follow the above four methods consecutively, and you’ll be successful with one.
If you’ve liked reading this content, don’t forget to check our other similar articles:
- How to Install a WordPress Plugin – Step-by-Step Beginner’s Guide
- How to Build a WordPress Website – Ultimate Beginner’s Guide
- How To Enable Or Disable Elementor Widgets In REA Plugin
Don’t have a WordPress website, grab the Responsive theme now!


