
Are you looking to add a testimonial slider to your Elementor website?
Customer testimonials are an integral part of your website. They not only make your website credible but also add interest and engage new users.
However, to add customer testimonials to your website without coding, you will need a testimonial slider widget.
This article will guide you through the process of adding testimonials to your Elementor website. Further, it will break down the essentials and provide a detailed, step-by-step walkthrough.
So let’s get started.
What Is A Testimonial Slider Widget?

Before we dive further, let’s understand what a testimonial slider widget is.
Basically, a testimonial slider widget is a feature you can add to your Elementor website to display reviews and feedback from your users.
It allows you to showcase multiple testimonials in a scrolling or sliding format rather than just displaying them statically.
This tool helps build trust and credibility among new users and attract their interest. In addition, it also boasts social proof of satisfaction that your brand has served several people or organisation.
Things You’ll Need To Make a Testimonial Slider
Well, now that you have a clear understanding of what a testimonial slider is, let’s go deep and understand what you will require to make one.
Various widgets and plugins are available to create a professional, attractive Elementor testimonial slider easily. Elementor itself offers the testimonial slider widget to add testimonials to your website. However, the plugin is not free and offers very limited functionality for style and customization.
Alongside, there are other free third-party plugins available that offer the testimonial slider widget. One of them which we recommend you to use is Responsive Addons for Elementor.
Responsive Addons for Elementorseo is a popular free Elementor addons plugin that offers a wide range of features, including 80+ advanced widgets. It is generally well-received by users, with many praising its ease of use, flexibility, and extensive library of elements.
Alongside various other widgets, the plugin also provides an Elementor testimonial slider widget. It is an intuitive and easy-to-use widget that also allows advanced customization features.
Furthermore, the design options offered by the widget allow you to fully customize the look and feel of the Testimonial Slider to match the branding and style of your website.

How to Add a Testimonial Slider to Your Elementor Website
Let us now deep dive into the step by step guide to understand how to add a testimonial slider to your Elementor website.
[Note: To use the Elementor testimonial slider widget, you must have a website templateweb hosting built with Elementor page builder].
Cyberchimps offers 150+ WordPress Website templates that you might consider using to build your website instantly.
Step 1: Install and Activate Responsive Addons for Elementor
Navigate through your WordPress Admin dashboard and go to Plugins > Add New Plugin.
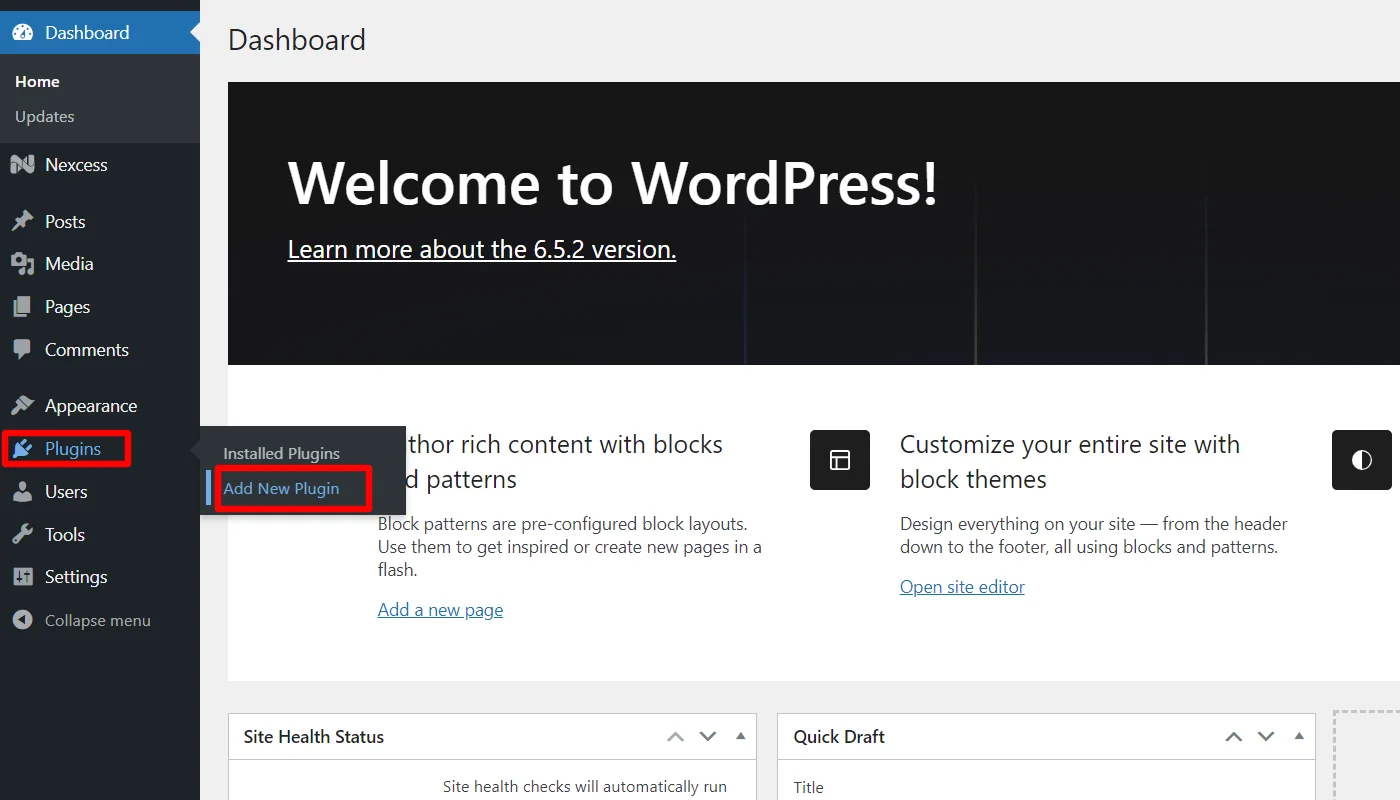
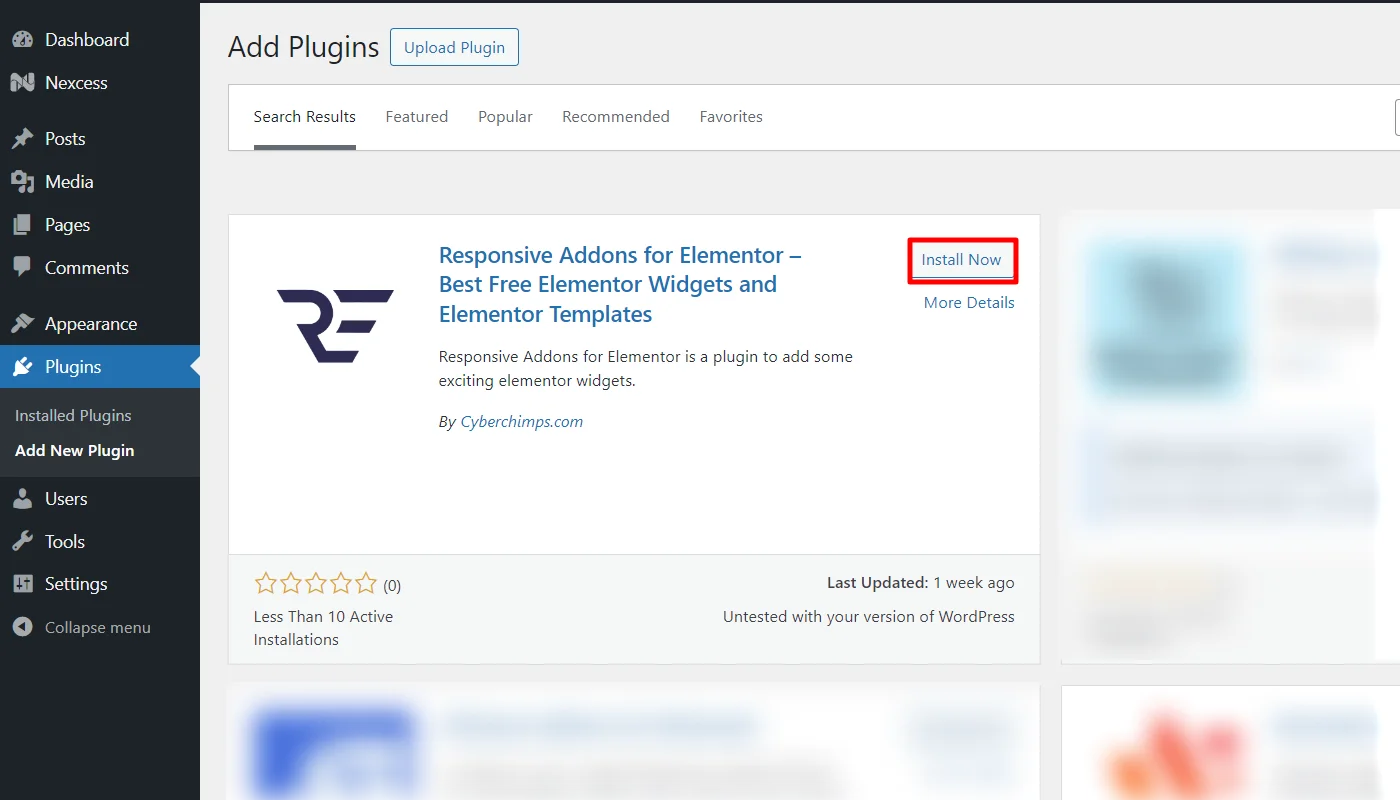
Go to the search bar above and search for responsive addons for elementor.

Next, click on Install Now to download the Responsive Addons for Elementor plugin.
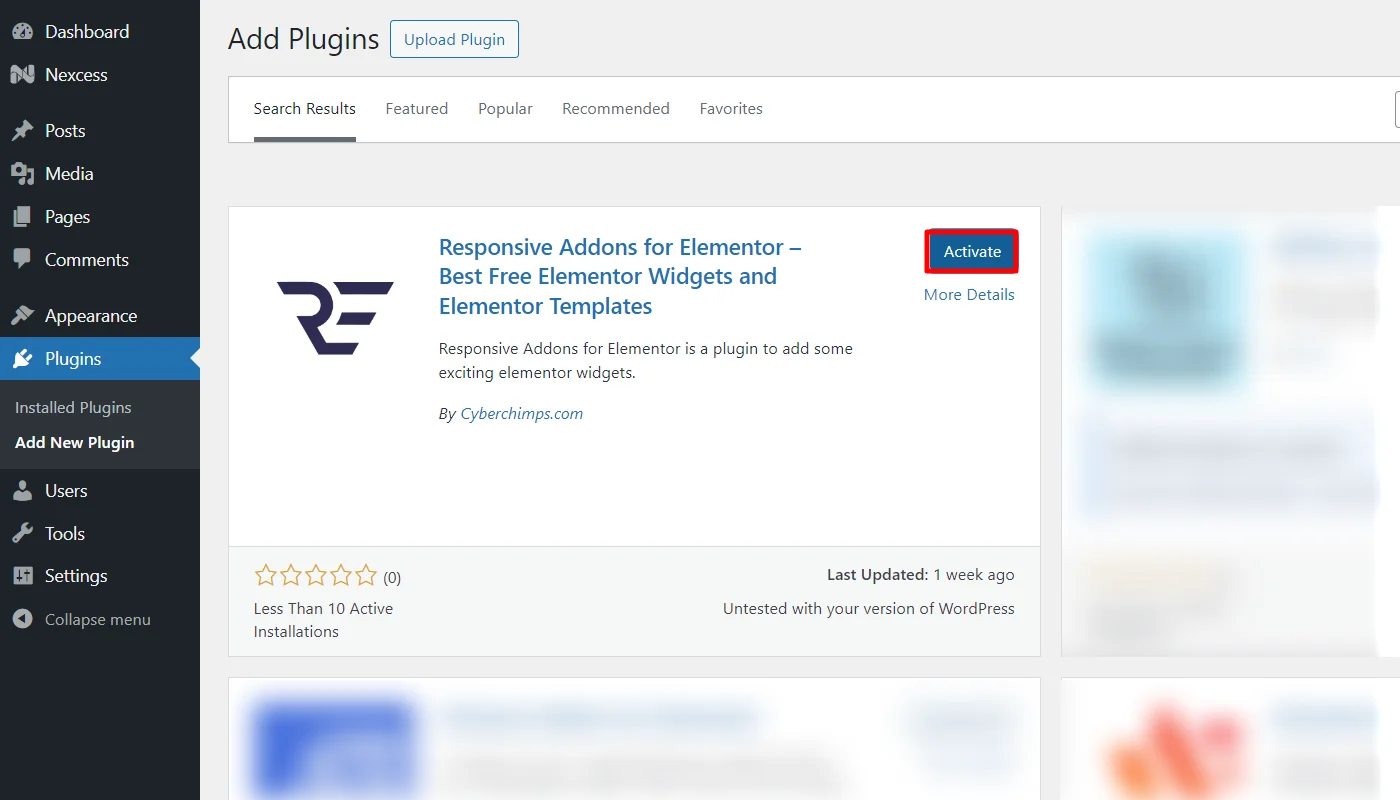
Click on the Activate button to activate the plugin.
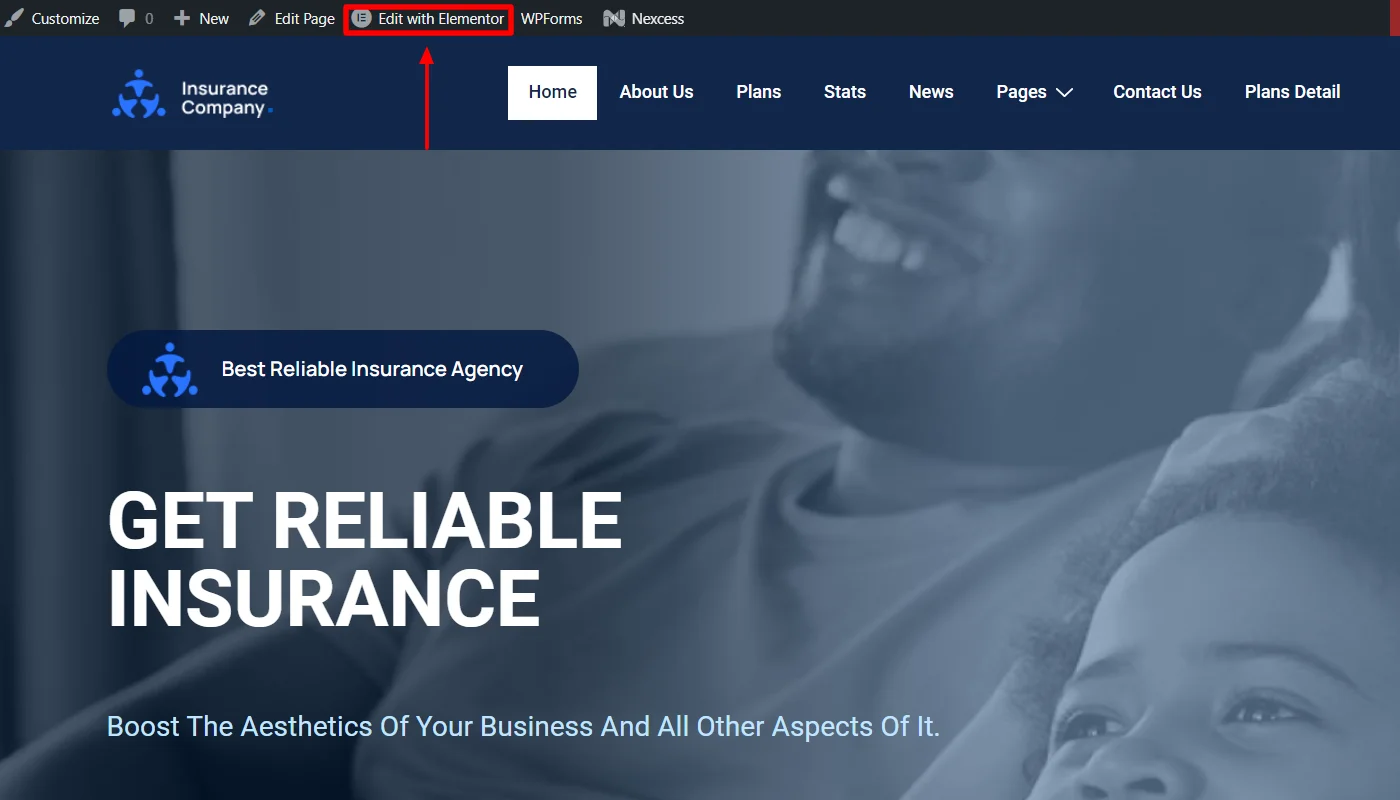
Once you activate the plugin, open the page where you want to add the testimonial slider. For tutorial purpose we’ll be using Insurance Company WordPress Website Template.
Step 2: Adding The Testimonial Widget
Click on Edit With Elementor on the page you want to edit.
Next, on the left sidebar, search for Testimonial Slider.

Drag and drop the RAE Testimonial Slider Widget in the section where you want to add it.

With this, you have successfully added the testimonial slider widget; now, let’s understand how to customize it.
Step 3: Customizing the Testimonial Widget
The testimonial slider widget allows you to customize various features:
Editing the Slides

The slides customization option shows the list of the total number of slides added in the slider.
You can drag and drop to change their position, duplicate a slide, or delete or add a slide. Upon clicking on a slide, it will open up.
You can select the background and content for the slide from here. Each slide has separate settings available.
Icon: Add an icon to the testimonial
Content: Enter the text you want to add for the testimonial.
Let’s look at some more cutomization options under the Slides category.

- Image: Upload or choose an image from the media library.
- Name: Enter the customer’s name.
- Title: Enter the customer’s title.
- Skin: Select a pre-designed skin from Default or Bubble.
- Layout: Choose from Image Inline, Image Stacked, Image Above, Image Left, Image Right.
- Alignment: Align the testimonial to the left, center or right.
- Slides Per View: Select the number of slides to show at one time, from 1 to 10.
- Slides To Scroll: Select how many slides to scroll per swipe, from 1 to 10.
- Width: Set the width of the widget.
Editing Additional Options
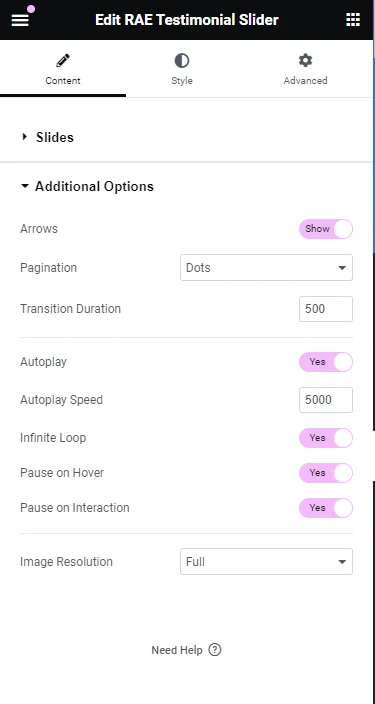
You can use these additional options to edit the testimonial widget further:
- Arrows: Show or hide the navigation arrows.
- Pagination: Select the carousel pagination style, either None, Dots, Fraction, or Progress.
- Transition Duration: Set the time between slide movements in milliseconds.
- Autoplay: Slide to YES to have the carousel slide automatically.
- Autoplay Speed: Set the speed at which the carousel will slide in milliseconds.
- Infinite Loop: Set to YES to have the carousel continue sliding, infinitely.
- Pause on Hover: Make the slide pause when the mouse hovers over it.
- Pause on Interaction: Set to YES to have the autoplay pause when the carousel is hovered over with a mouse or clicked.
- Image Size: Set the size of the image from thumbnail to full, or enter a custom size.
Step 4: Styling the Testimonial Slider Widget
The testimonial slider widget also allows you to style the widget according to your convenience to match your brand’s style. It allows you to style the following:
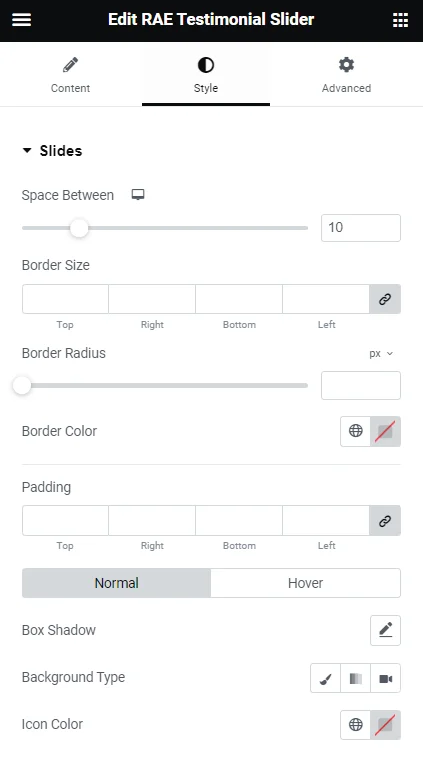
Slides
This lets you set the style of the slides with the following options:
- Space Between: Control the space between the slides.
- Background Color: Choose the background color of the slides.
- Border Size: Set the thickness of the border around each slide.
- Border Radius: Set the border-radius to control corner roundness.
- Border Color: Choose a color for the border.
- Padding: Set the padding within the border of each slide.

Content
- Gap: Control the space between the image and the testimonial text.
- Text Color: Choose the color of the testimonial text.
- Typography: Change the typography options for the testimonial text.
- Name:
- Text Color: Choose the color of the name.
- Typography: Change the typography options for the name.
- Title
- Text Color: Choose the color of the title.
- Typography: Change the typography options for the title.
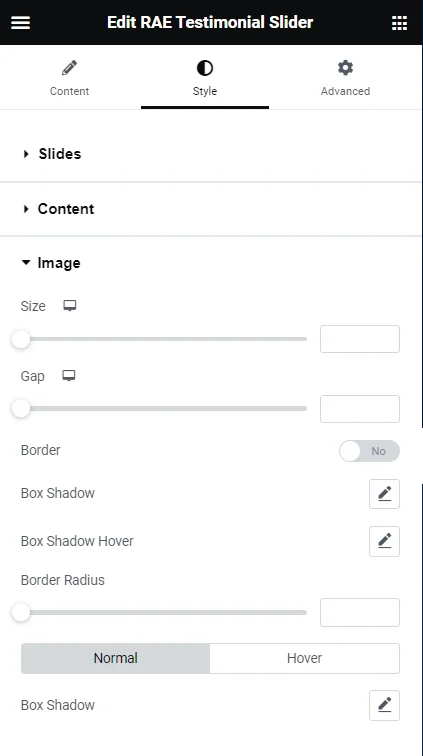
Image
- Size: Adjust the size of the image.
- Gap: If Image Inline is selected, the gap controls the space between the image and the name and title.
- Border: Slide to yes to place a border around the image.
- Border Color: If Border is set to yes, choose the color of the border.
- .Border Width: If Border is set to yes, set the thickness of the border around the image.
- Border Radius: Set the border-radius to control corner roundness. This option is available even if Border is set to no.
Navigation
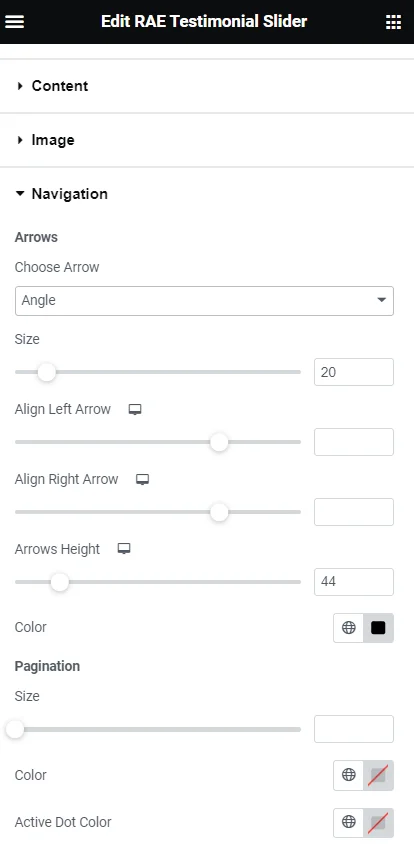
- Arrows
- Choose Arrow: Select the type of arrow from the dropdown
- Size: Adjust the size of the navigation arrows
- Align Left Arrow: Set the left arrow’s horizontal position
- Align Right Arrow: Set the right arrow’s horizontal position
- Arrows Height: Set the arrows’ height
- Color: Choose the color of the navigation arrows
- Pagination
- Size: Adjust the size of the pagination
- Color: Choose the color of the pagination
- Bubble (Only available if using Bubble skin)
- Background Color: Choose the color of the bubble’s background
- Padding: Set the padding within the bubble
- Border Radius: Set the border-radius to control corner roundness. This option is available even if Border is set to NO.
- Border: Slide to YES to place a border around the bubble
- Border Color: If Border is set to YES, choose the color of the border
- Border Width: If Border is set to YES, set the thickness of the border around the bubble
This is how you can add, configure, and style the Elementor testimonial slider widget.
FAQ
There are various ways to add a testimonial slider in WordPress. You can use the paid Elementor to add it or download a third-party plugin, such as Responsive Addons for Elementor that provides advanced elementor addons for free.
Yes, you can add a testimonial slider widget in WordPress for free using the Responsive Addons for Elementor plugin. This free and powerful plugin enhances the functionality of the Elementor page builder.
You can download the Responsive Addons for Elementor plugin to add a testimonial slider for free. All you need to do is install and activate the plugin, drag and drop the widget and customize it as per your preference.
Conclusion
Overall, the Elementor testimonial slider widget offers a sophisticated and visually captivating way to share feedback, build trust, and drive conversions.
Following the recommendations and guide in the article, you will be easily able to add and design a testimonial slider for your website.
If you liked this article, you might also consider reading:
- How To Add Elementor Pricing Table in WordPress
- How To Create Flip Box Overlays And Hovers In WordPress
- How to Create a Countdown Timer For Your WordPress Website
Download the free Responsive Elementor Addons plugin now. Additionally for building a fast website, you can also check out the Responsive theme now!
.


