
Are you looking to enhance the navigation of your website? You must consider adding breadcrumbs to your website.
Breaking it down in simple words, breadcrumbs are a navigation element commonly used in websites and applications to help users understand their current location on the website.
It typically appears as a horizontal list of links showing the user’s current location, starting from the homepage or the top-level section.
One of the easiest ways to add breadcrumb navigation to your website is to add an Elementor breadcrumb widget.
This article will cover everything you need to know to add breadcrumbs navigation to your website.
So, let’s dive in further!
What Is An Elementor Breadcrumbs widget?
The Elementor Breadcrumbs Widget is a feature that allows you to add a navigation trail to your WordPress website.
It displays website visitors’ current page location within the site’s hierarchy, making it easier for users to navigate and understand its structure.
Why You Should Add Breadcrumbs to WordPress Website?
Adding breadcrumbs to a WordPress website can significantly improve the user experience and navigation. It represents the website’s structure, allowing users to understand where they are and how they got there quickly.
Additionally, it makes it easier for users to navigate to higher-level pages, reducing the chances of getting lost on the website.
Furthermore, breadcrumbs also have SEO benefits, as they help search engines better understand the website’s content structure.
Moreover, it also improves visibility in search engine results by providing accurate content location.
Things You’ll Need to Add Free Breadcrumbs in Elementor
Next, let’s understand what prerequisites are needed to add a free breadcrumb to the Elementor website.
The basic requirement to add this Elementor widget requires you to have the Elementor page builder widget.

Elementor is a powerful WordPress page builder that allows users to create custom, visually appealing pages without extensive coding knowledge. It provides a user-friendly drag-and-drop interface, a wide range of customizable elements, and the ability to build responsive designs.
The Elementor page builder also offers a huge library of widgets for your website, including a breadcrumb widget. However, you need a premium version to access it.
If you want to take the pro version of Elementor, an alternative method for adding the free breadcrumb widget is via coding or using a third-party Elementor Addons plugin.

Coding can be quite technical; hence, we recommend using an Elementor Add-on plugin like Responsive Addons for Elementor. It is a powerful WordPress plugin offered by Cyberchimps. It provides a library of 80+ free widgets that help you enhance the functionality and customization options within the page builder.
The plugin also offers 250+ WordPress website templates, which you can import with a single click.
You will also need an SEO plugin alongside Elementor and Responsive Addons for Elementor. Breadcrumbs are a crucial part of website SEO and are arranged according to your site’s hierarchy, letting it decide which pages are the most important.
An SEO plugin helps understand page hierarchy; we recommend using Yoast SEO to integrate the plugin seamlessly.

Let’s now dive deep into how you can add the free breadcrumbs widget to your website with this plugin.
How to Add Breadcrumbs To Your Elementor Site
To add the free Elementor Breadcrumbs widget to your WordPress website, follow these steps:
[Note: To use the Elementor breadcrumbs widget, a website template must be built with the Elementor page builder.]
Cyberchimps offers 150+ WordPress Website templates that you might consider using to build your website instantly.
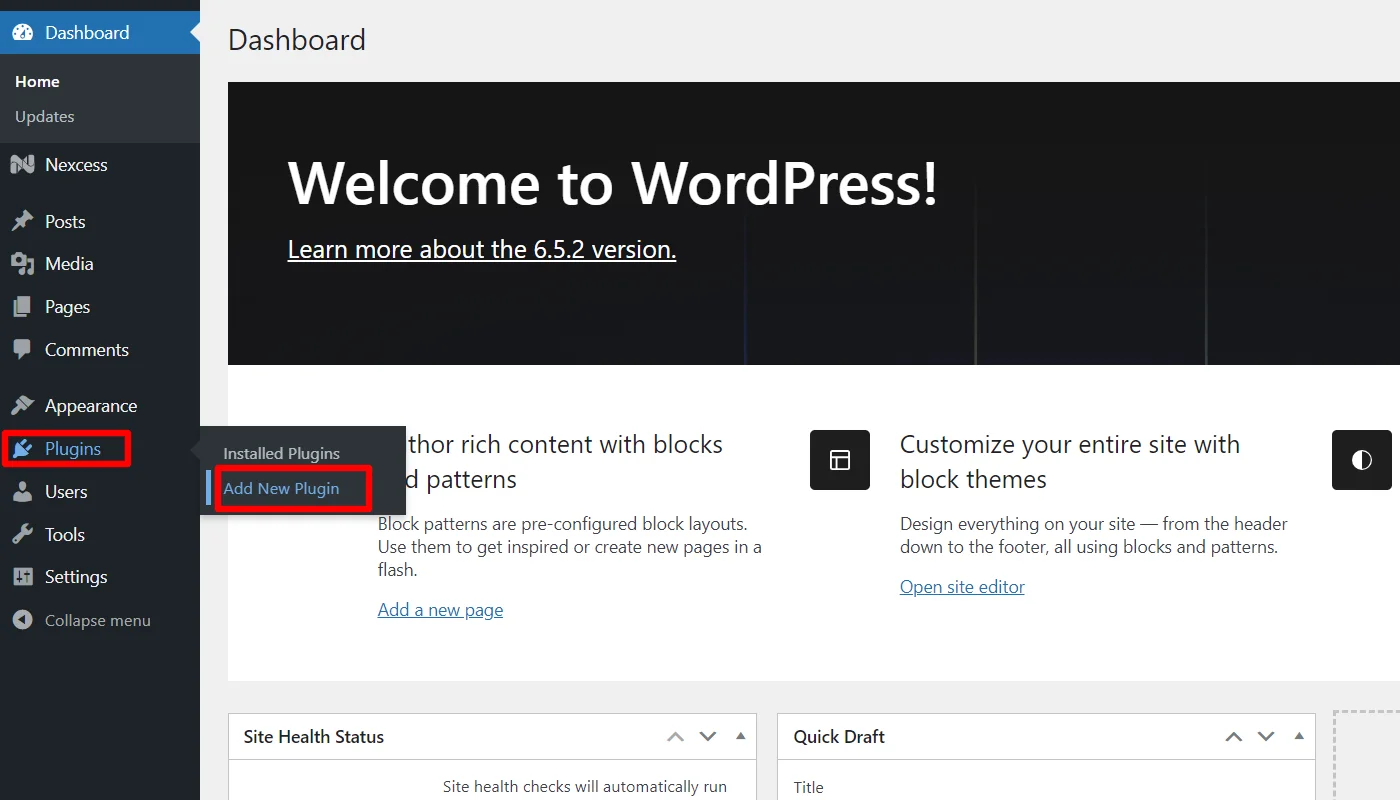
Step 1: Install and Activate Responsive Addons for Elementor
Navigate through your WordPress Admin dashboard and go to Plugins > Add New Plugin.
Go to the search bar above and search for responsive addons for elementor.
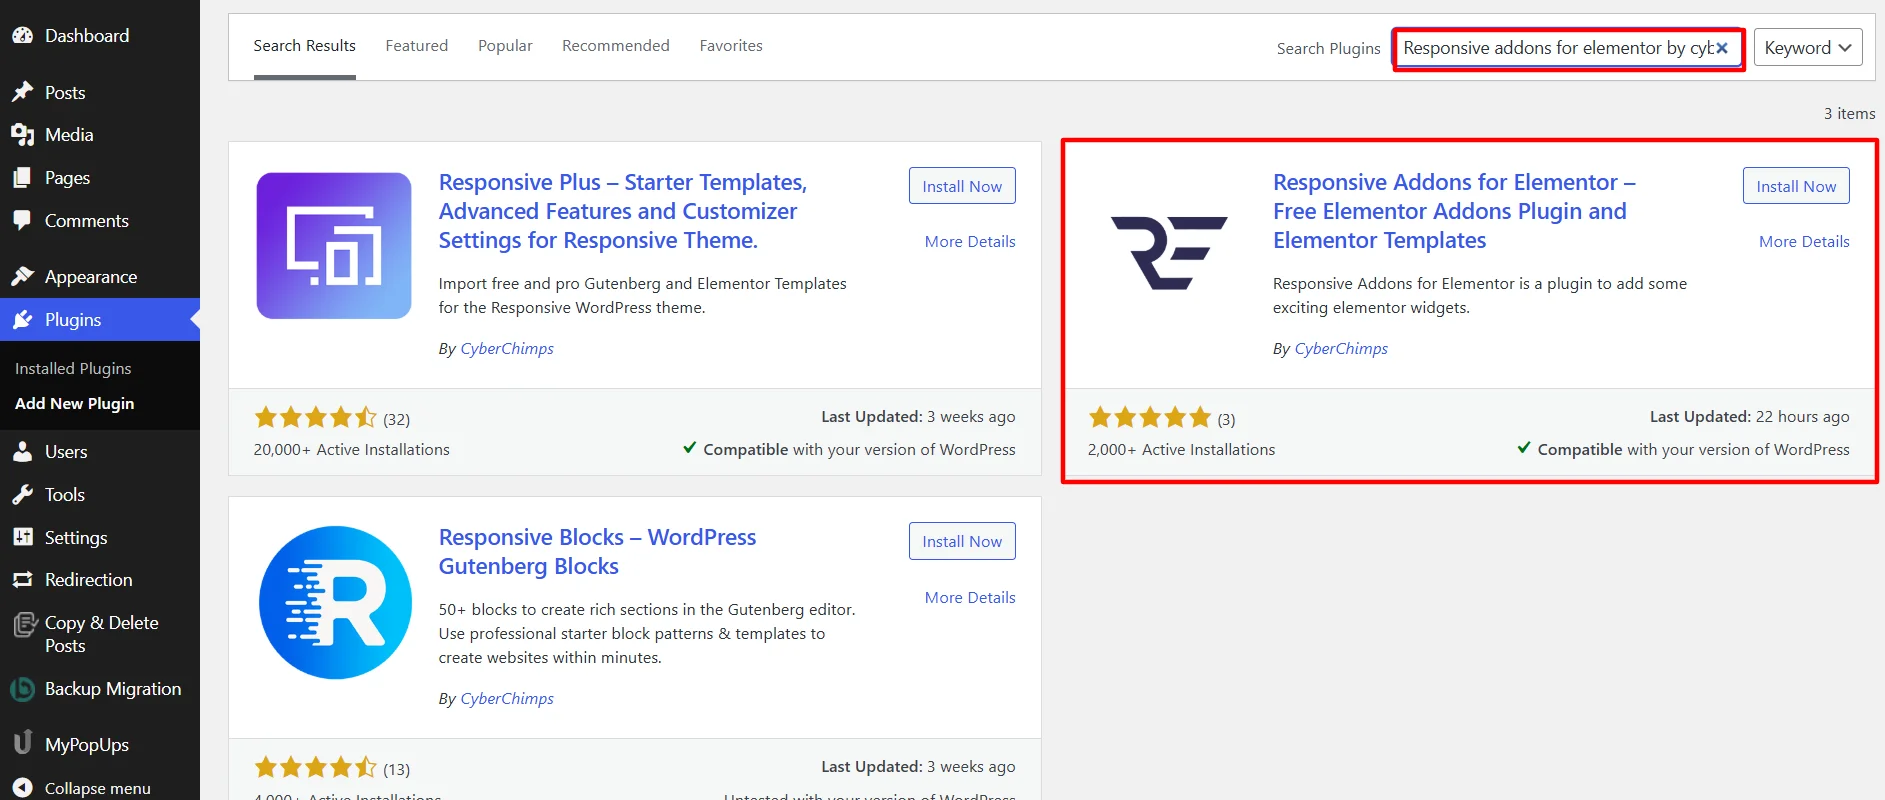
Next, click Install Now to download the Responsive Addons for Elementor plugin.
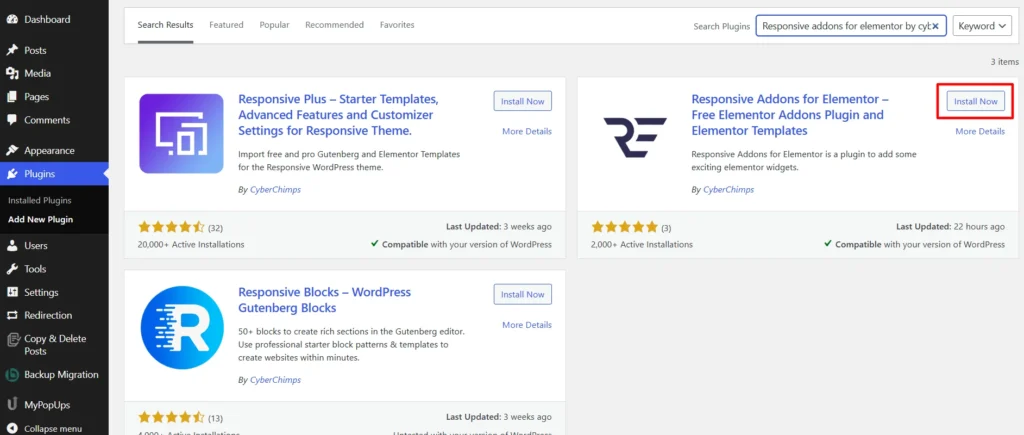
Click on the Activate button to activate the plugin.

Once you activate the plugin, open the page where you want to add the breadcrumbs widget. For this tutorial, we’ll use the Corporate Business WordPress Website Template.

Step 2: Adding The Breadcrumbs Widget
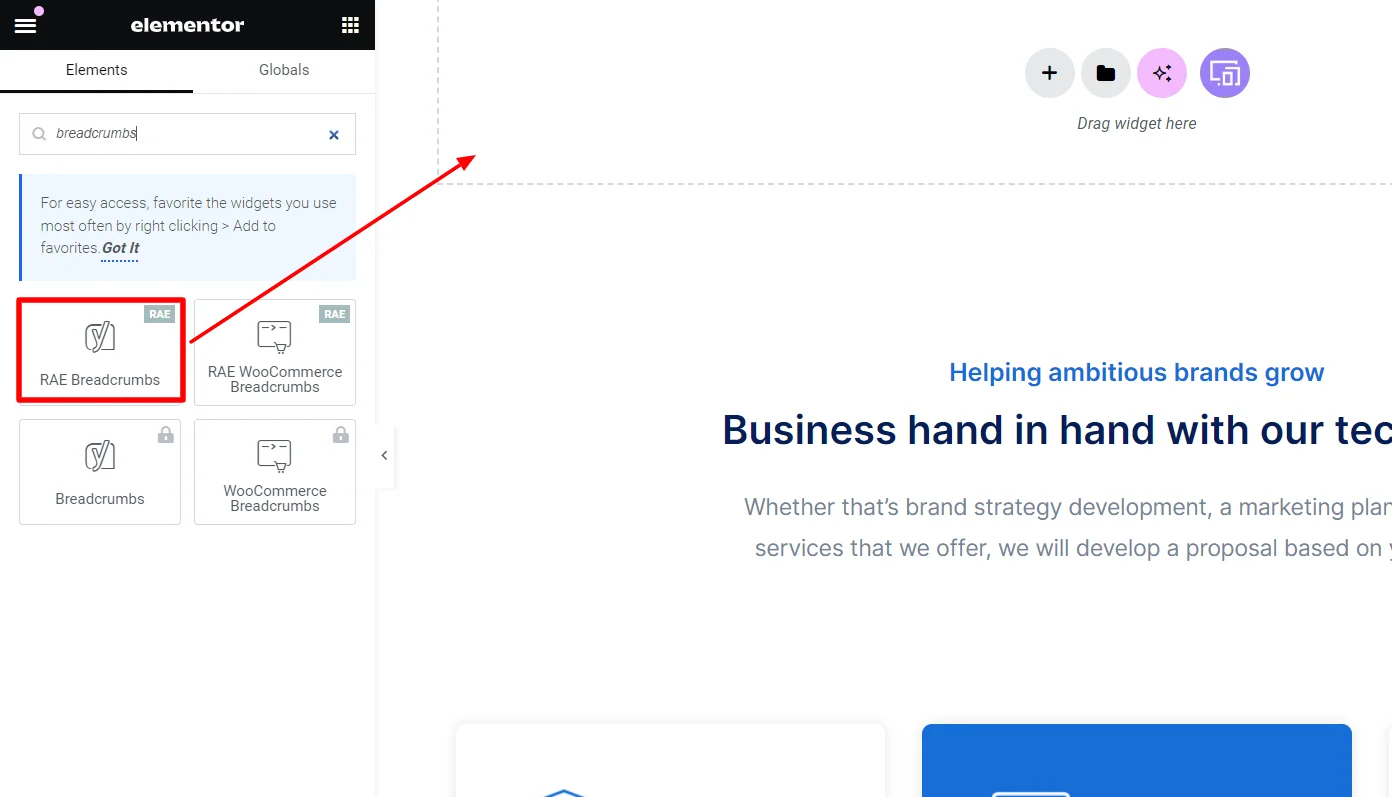
Click on Edit With Elementor on the page you want to edit.

Next, on the left sidebar, search for Breadcrumbs.

Drag and drop the RAE Breadcrumbs Widget in the section where you want to add it.
You have successfully added the timeline widget; now, let’s understand how to customize it.
Step 3: Customizing The Breadcrumbs Widget
The RAE breadcrumbs widget allows you to customize the following settings:
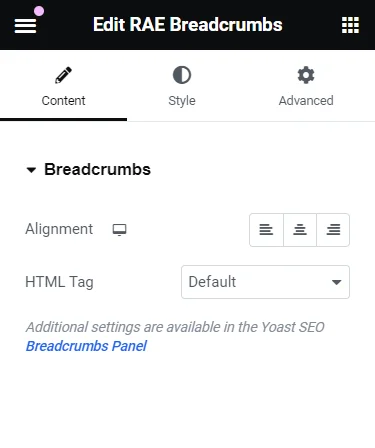
- Alignment: You can align the breadcrumbs left, center, or right within the container.
- HTML Tag: Choose from various tags to display your breadcrumbs within.
Step 4: Styling The Breadcrumbs Widget
The RAE breadcrumbs widget allows you to style the following settings:
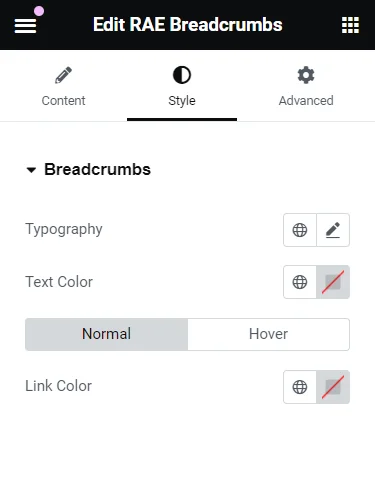
- Typography: This allows you to style the text of the widget
- Text Color: This allows you to style the color of the text in breadcrumbs widget
- Link Color: This allows you to style the color of links in the widget
How To Use the Elementor Breadcrumbs Widget?
Now that you know how to add the breadcrumbs widget and its settings, let’s understand how to use it.
For this tutorial, I will show how I used the above customization settings to build a functional site breadcrumb.
[We recommend you try adding the widget to pages other than the home page; this would give you a clear preview of its appearance. I will add it to the services page on my website.]
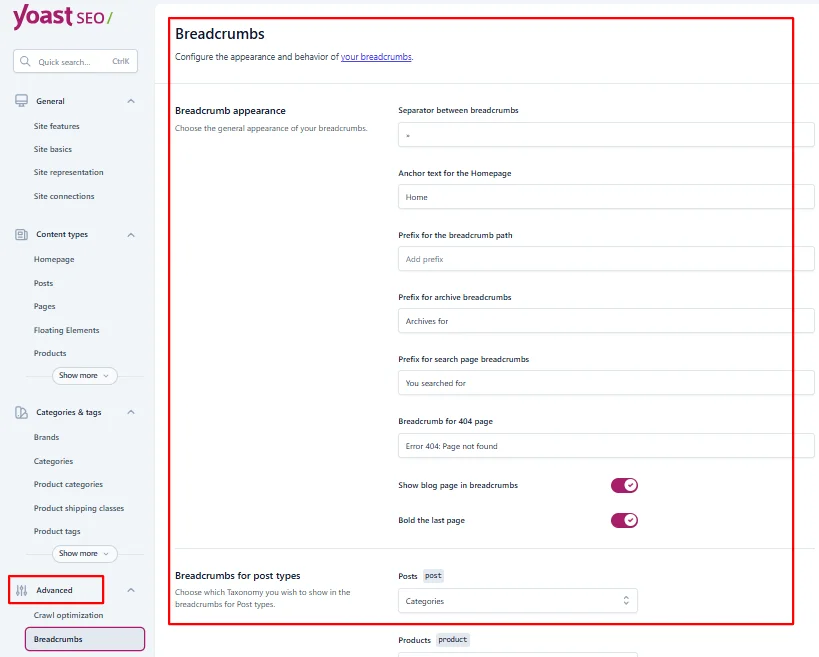
Before starting the website customizations, go to Yoast SEO > Settings.
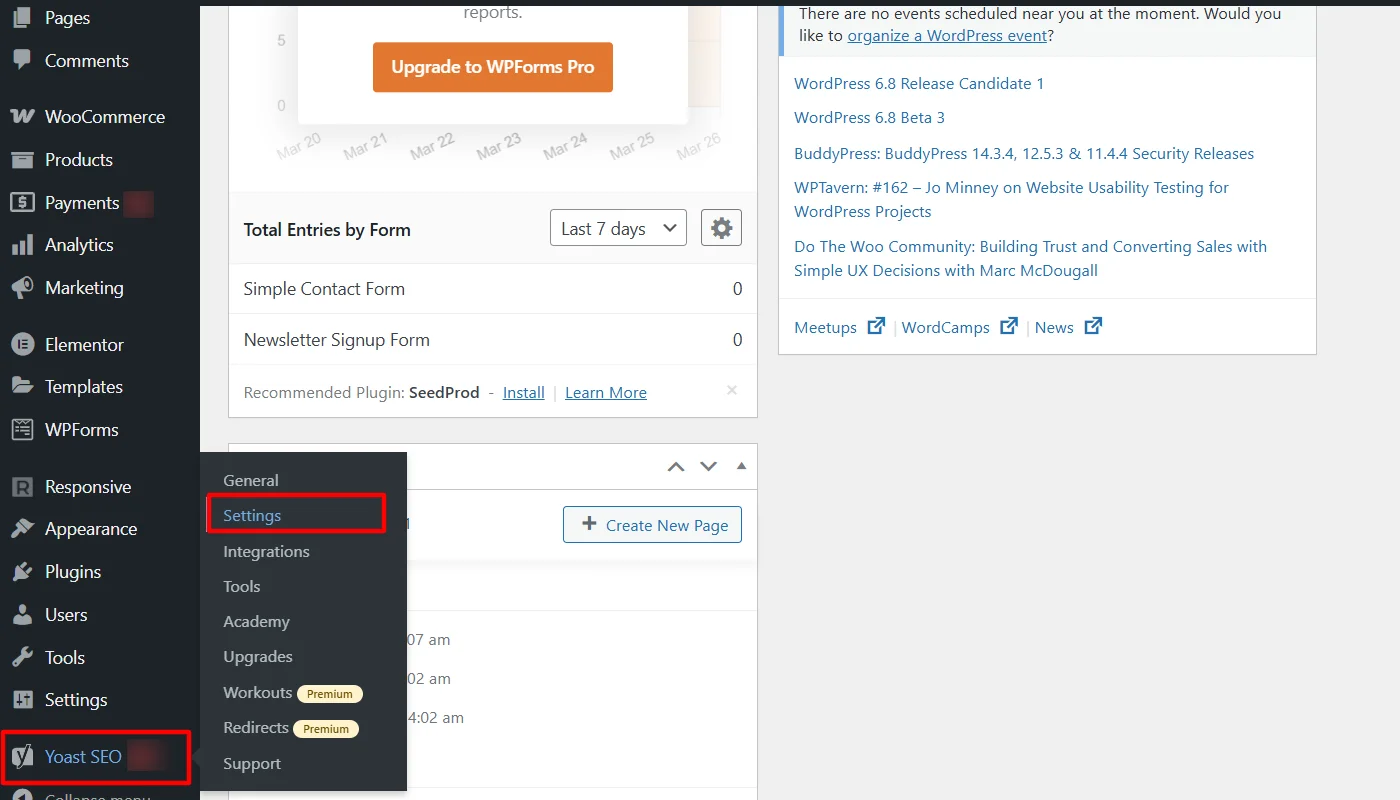
From the settings, locate Advanced > Breadcrumbs, make the necessary changes to customize your navigation appearance for post types, products, and taxonomies, and click Save Changes.
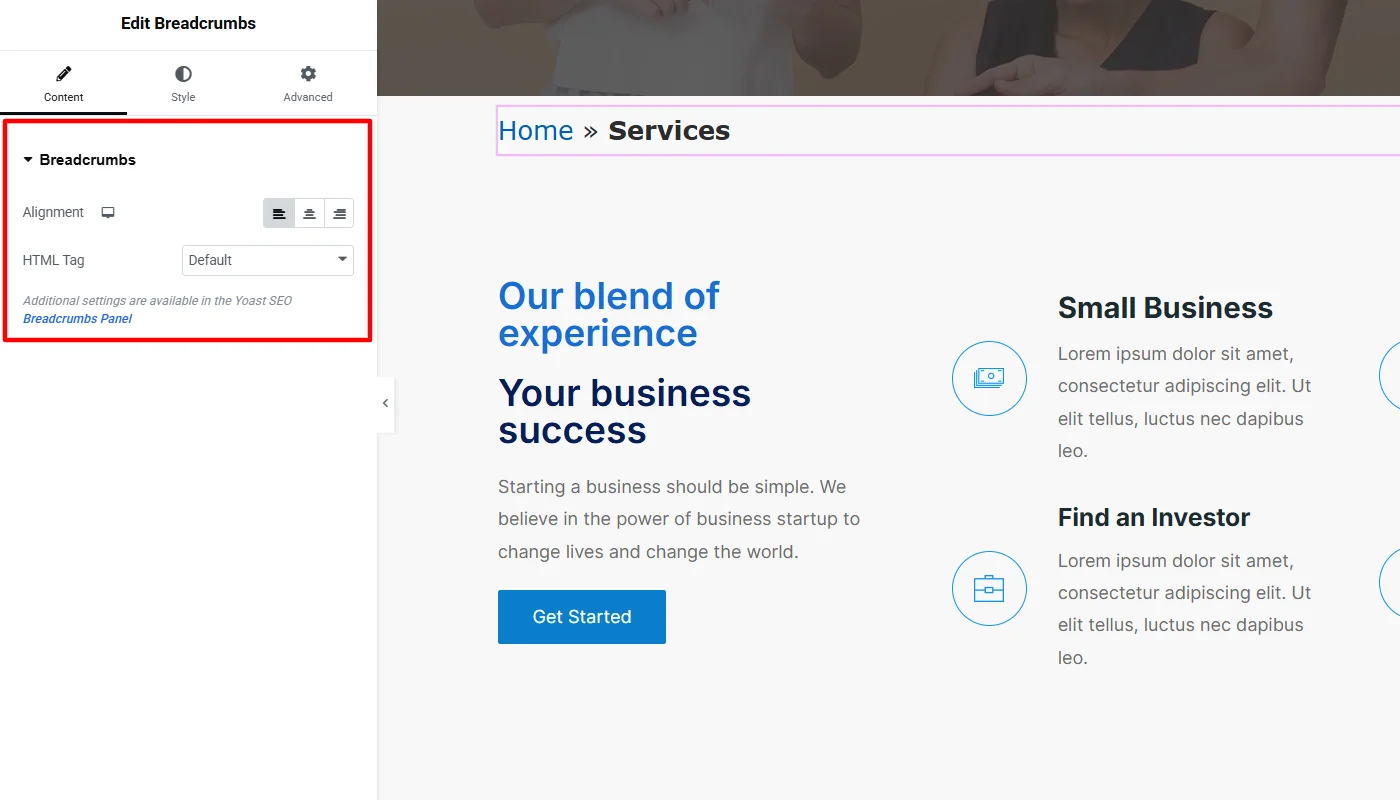
Customizing Breadcrumbs Widget Content
Now that we have the setup ready, I began customizing the breadcrumbs content. This is a simple widget with few content customization options, so I kept the settings at default.
I kept the widget’s alignment to the left and HTML tag as the default. You can change it at your convenience.
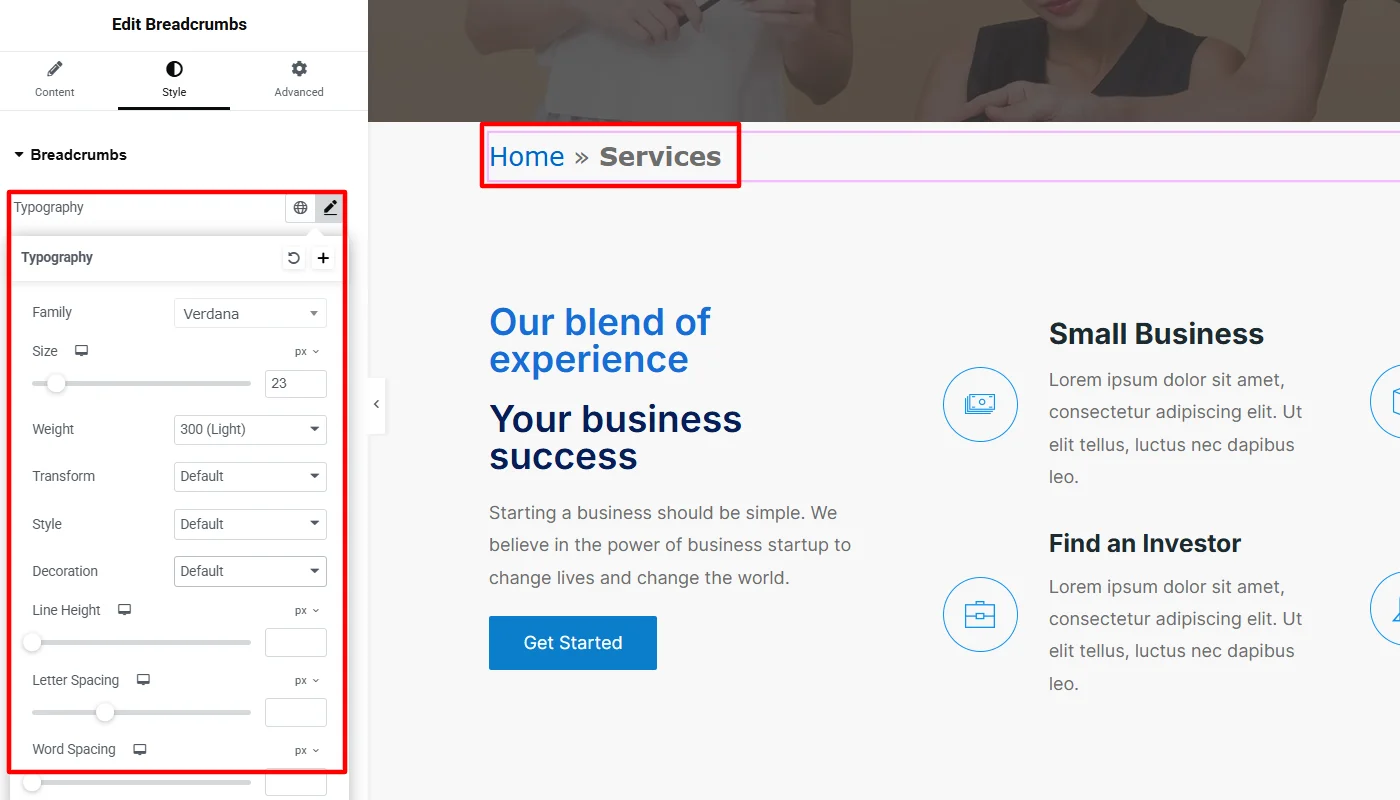
Styling Breadcrumbs Widget
Once the content customizations are done you can jump into styling the appearance of the site breadcrumbs.
For styling, I changed the typography, including the font family, size, and weight.
For the text color I kept it clear black and for the link I tried syncing the color with other elements of the site.
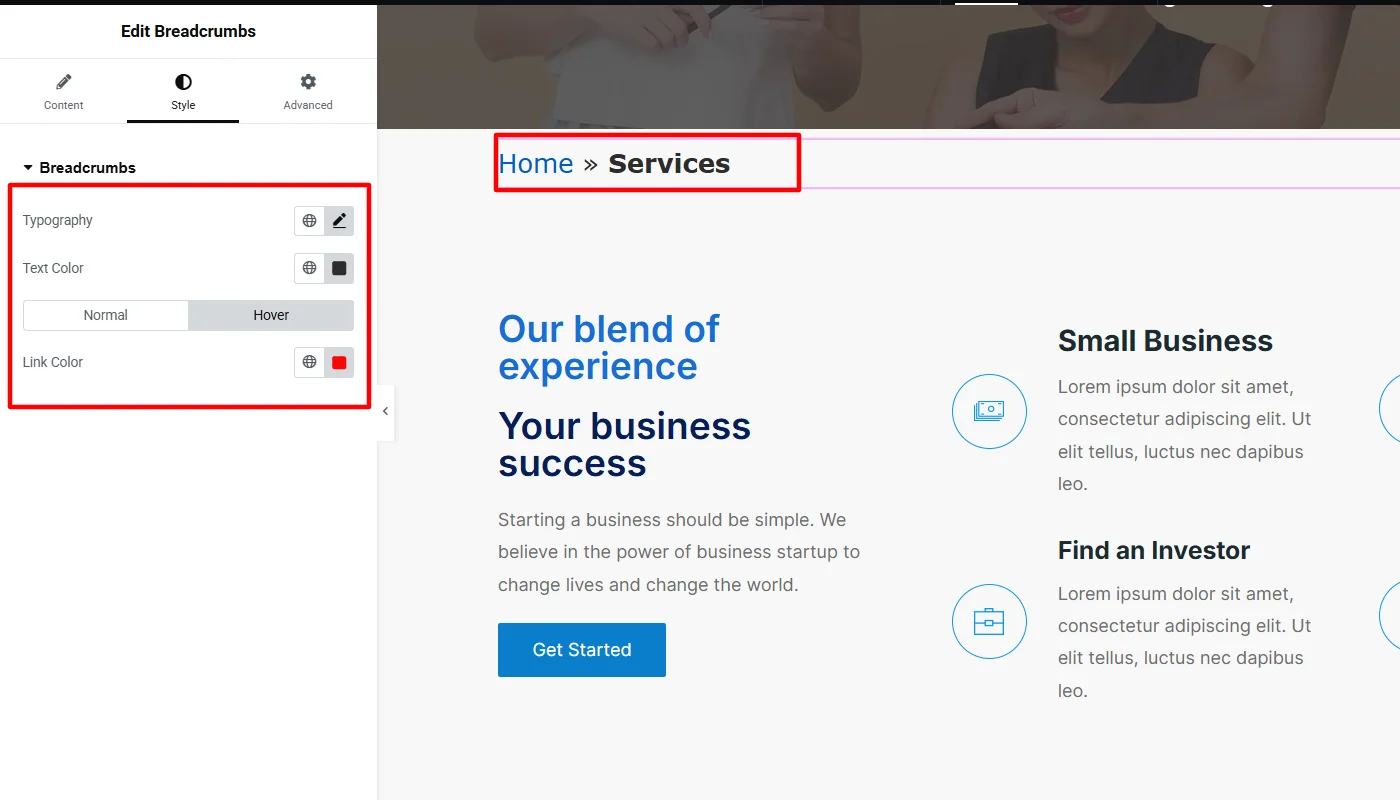
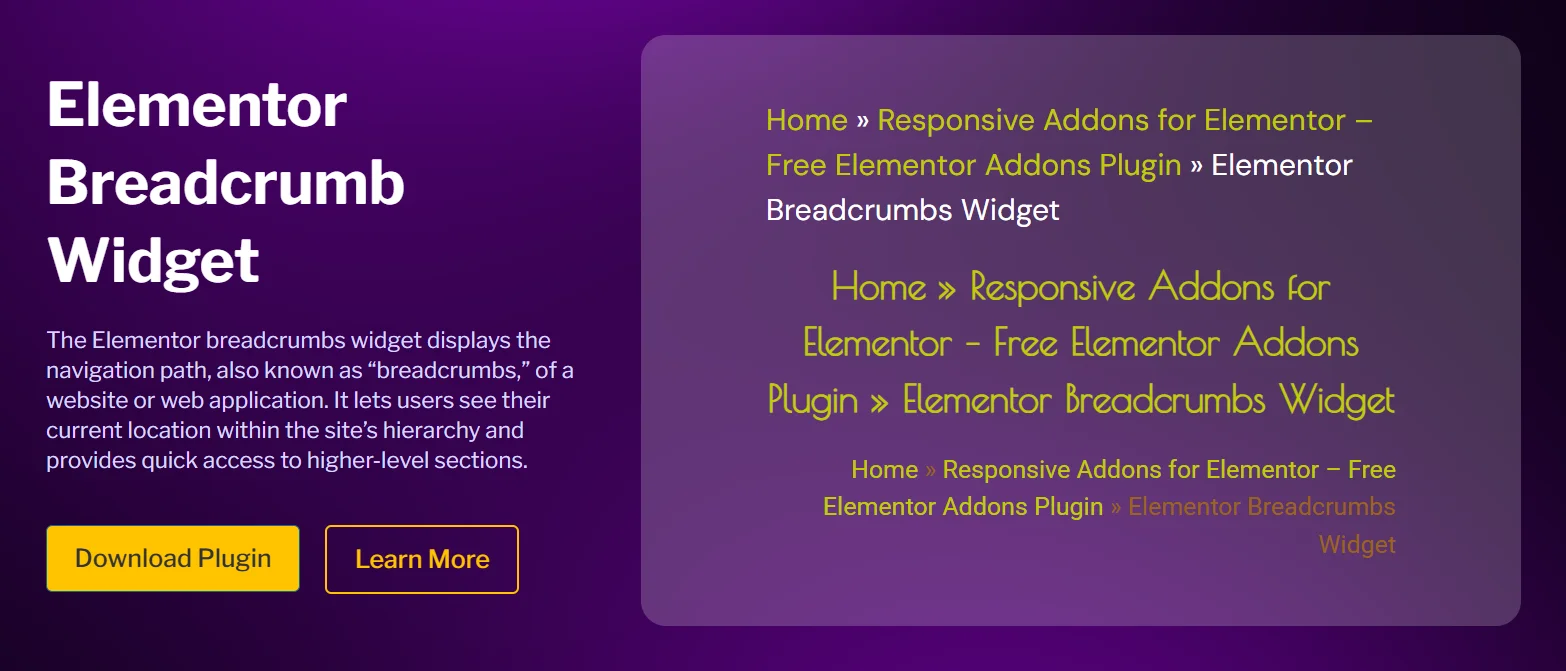
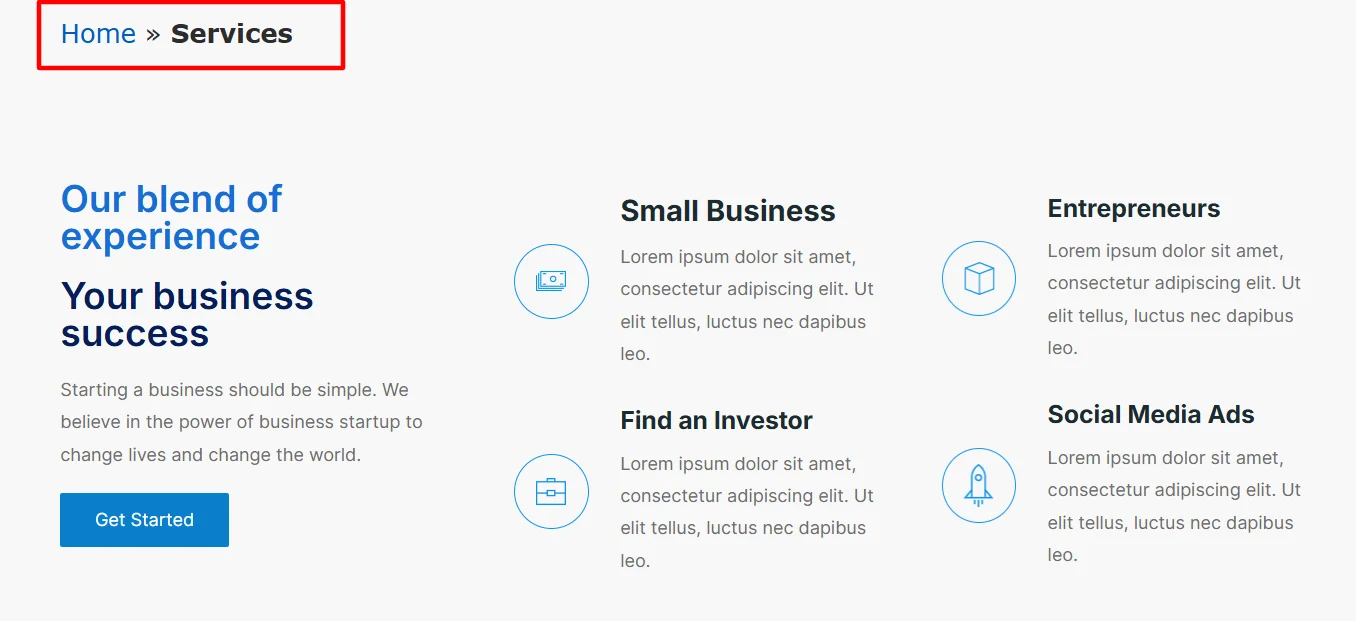
Final Appearance of Breadcrumbs Widget
After these adjustments and customizations, the final appearance of the breadcrumbs widget looked like this:
FAQ
To add breadcrumbs follow the following steps:
1. Install and Activate Responsive Addons for Elementor
2. Open the page where you want to add Breadcrumbs (Use an Elementor template)
3. Edit with Elementor
4. Search for the breadcrumbs widget
5. Drag and drop the widget
6. Customize the breadcrumbs widget
Breadcrumbs are a navigation element commonly used in websites and applications to help users understand their current location on the website.
Yes, you can add a breadcrumbs widget to your Elementor website for free using the Responsive Addons for Elementor plugin.
Conclusion
Breadcrumbs are an essential part of your website, which you must have. They not only guide your users but also improve your SEO and search engine visibility.
This article provides the essentials for adding the feature to your website. While there are various ways to add the widget, we recommend using the Responsive Addons for Elementor plugin, given its advanced custom features and intuitive interface.
If you liked this article, you can also consider reading:
- How To Add Product Rating To Elementor Website
- How to Add Divider to Your Elementor Website
- How To Add Search Bar To Elementor Website
Also, use the Responsive Theme for Cyberchimps to create a versatile website for any niche with ease.


