
Are you looking to add button to your Elementor Website?
Imagine a website where every action feels natural, where buttons entice you to explore, and where navigating the site is smooth and captivating. This is the kind of experience that every website owner aims to provide for their visitors.
As a website owner, you realize the significance of each click. Whether directing traffic to your latest blog post, showcasing a special offer, or simply guiding visitors to the next step, the tools you utilize can make a significant impact.
In this article, we’ll look at how we can add a button to your Elementor site.
What is a Button Widget?

A button widget is a powerful tool for creating interactive clickable buttons on your websites without any coding knowledge. Popular page builders like Elementor offer extensive customization, that allow you to take complete control of the WordPress platform.
Some of the customizations include changing the text, colors, size, and style to align with your website’s branding. It also lets you assign specific actions to the button, such as directing users to another webpage, initiating downloads, submitting forms, or triggering dynamic content like pop-ups.
Well-designed buttons can significantly enhance navigation and conversion rates, highlighting the importance of making it simple and clear for users to take the next step.
Why Add a Button to WordPress Website?
Adding a button widget to your website can enhance user experience and upgrade your site’s overall functionality. There are numerous and significant advantages to this action, including:
- Increasing Conversions: Strategically placing call-to-action (CTA) buttons can significantly elevate conversion rates by prompting users to perform specific actions, like signing up for access, making a purchase, or downloading a resource.
- Improving Engagement: Buttons are visually attractive and interactive, encouraging users to interact with your content. This can result in longer time spent on your site and a reduced bounce rate, as visitors are more likely to delve deeper.
- Responsive Design: Button widgets are created to be completely responsive, ensuring that they appear and function well on all devices, from desktops to smartphones. This guarantees a seamless experience for all users, regardless of how they access your site.
- Feedback Feature: Interactive buttons can provide visual feedback (such as color changes or animations) upon clicking, assuring users that their actions have been acknowledged.
- Analytics Monitoring: Buttons can be linked with analytics tools to monitor user interactions and gain valuable insights into user behavior and preferences.
Let’s look at what you’ll need to add a free button to your Elementor website.
Things You’ll Need For Adding Free Button in Elementor
Before adding a button to your WordPress site, it’s essential to have these two prerequisites in place:
1. Elementor Page Builder

Elementor, a widely utilized WordPress page builder, enables you to create impressive and highly customizable websites without coding.
You can effortlessly add and arrange text, images, and widgets with its intuitive drag-and-drop interface.
This plugin seamlessly integrates with various popular WordPress themes like Responsive theme, offering flexibility to beginners.
Elementor’s user-friendly interface allows for real-time page creation, providing a live preview of any modifications.
2. Responsive Addons for Elementor

Responsive Addons for Elementor is a versatile plugin designed to enhance the functionality of the Elementor page builder. This free WordPress plugin features over 80 Elementor widgets and over 250+ Elementor website templates.
Its primary focus is ensuring responsiveness, guaranteeing that all elements display optimally on mobile, tablet, and desktop views.
Additionally, it equips users with the necessary tools to enhance their web designs.
How to Add Button To Your Elementor Site?
[Note: To add a Button widget, your website must be built with the Elementor page builder].
Cyberchimps offers plenty of free Elementor templates you can use to build your website instantly. Once you’ve the template or page ready, you can easily add a button by following these instructions.
Step 1: Installing and Activating Responsive Addons for Elementor Plugin
From your WordPress dashboard, select Plugins > Add New Plugin.

Search for responsive addons for elementor in the search bar. Once the plugin appears, click on Install Now.
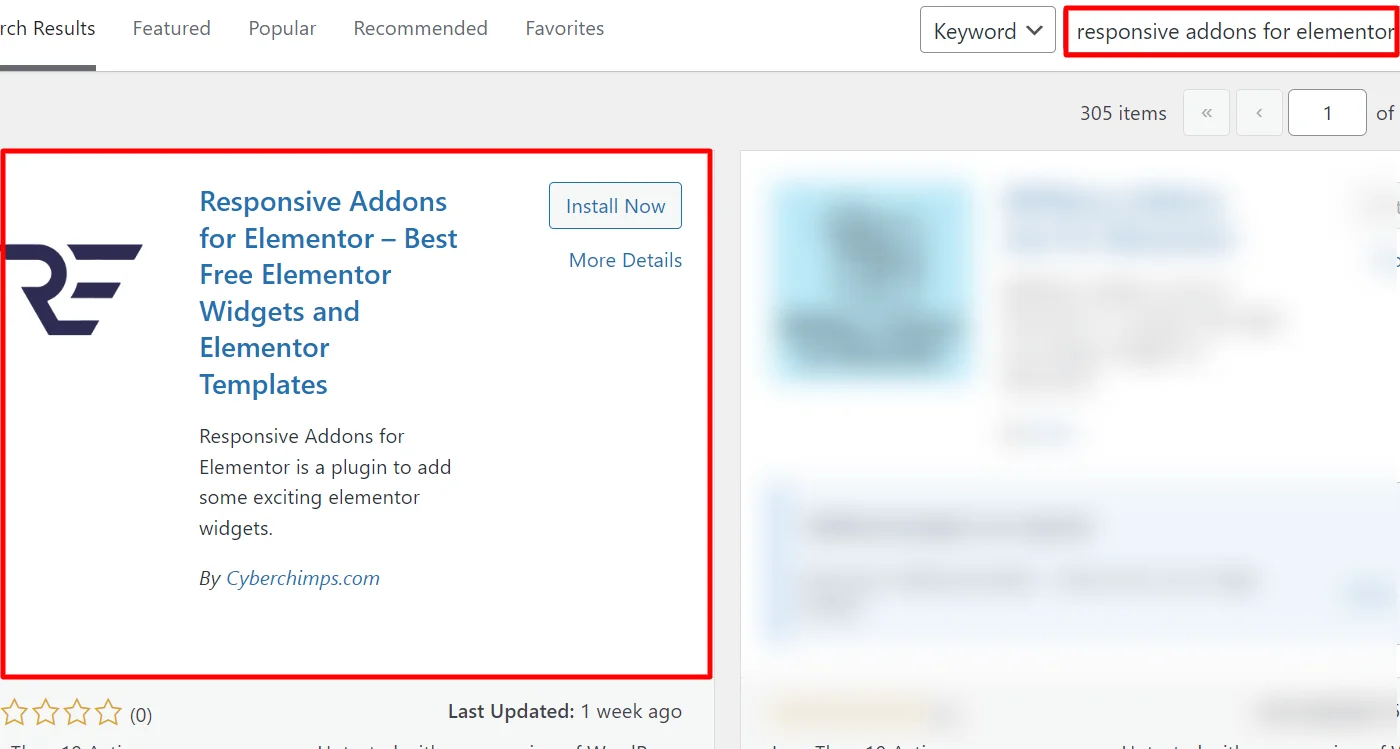
After the plugin is installed, click on the Activate button.

Step 2: Adding the Button Widget to the Page.
In this guide, we will be utilizing Nature WordPress Template.

If you need a suitable template for your website, you can freely browse through the Responsive Plus collection of free WordPress templates.
Once you land on the page, simply find and click on Edit with Elementor.

Next, head to the widget search bar and type RAE Button.

Then, drag and drop the widget onto the page to seamlessly integrate it into your design.

Step 3: Customizing the Responsive Addons for Elementor Button Widget
Ensure the widget matches the website theme to create an attractive visual appearance.
Now, let’s explore the Content section.

Button Settings
- Button Text: Enter the text you want to appear on the button.
- Button Link: Add the URL to which the button should link.
- Open Video in Lightbox: Check this box if you want the video to open in a lightbox.
We have completed the addition of the widget and have also successfully customized the RAE button widget.
Step 4: Styling the Responsive Addons for Elementor Button Widget
Let’s move towards styling our widget.

Wrapper Settings
- Button Size: Each button can be customized to various sizes, including Ex-large, Large, Medium, Small, and Tiny.
- Uppercase Label: This feature converts the button label to uppercase.
- Button Shape Style: Customize the button’s shape to Box, Round, or Curve.
- Button Style: Choose from three button styles: Normal, 3D, or Outline.
- Align: Horizontally align the button as per your preference.
- Padding: Add padding to the button to enhance its appearance and functionality.

Skin Settings
- Skin: Select the skin of your choice.
- Background Type: Select Background type e.g., Classic, Gradient.
- Box Shadow: Select the Box shadow.
Icon Settings
- Icon: Choose the icon to be displayed within the button.
- Icon Alignment: Specify whether the currency symbol or icon should be displayed to the left or right of the button text.
- Icon Size: Determine the size of the icon within the button.
- Icon Margin: Set the margin for the button’s icon to ensure proper spacing.
- Icon Color: Select the color for the icon using the button.
- Padding: Establish the spacing between the icon and the button’s content.

Text Settings
- Color: Select a color for the text.
- Text Shadow: Apply a box shadow effect to the button text.
- Typography: Adjust the text typography as needed.
How To Use the RAE Button Widget?
So basically, it appears to be very basic upon dropping the widget.

Further, to customize the button, I changed the default text to “Book Consultation.” In addition, I added a link to the button.

The button is a simple widget, so RAE offers basic content customizations and various styling options.
To begin with, I styled the wrapper by increasing the button size from the default medium to “large.” I also made some minor adjustments in button shape and style. You can also experiment with the button’s appearance using the given options.

Further, to style the button skin, I added a shadow effect color to the skin and changed the color of the button for both normal and hover to make it intuitive.
The widget also allows you to add an image as the button skin.

The RAE button widget also allows you to style the button by adding an icon. I added an icon to my button, changed its size per my needs, and did not make many other changes.
You can experiment to suit your requirements.
For the typography styling, I made minor changer in font, weight, and style and kept others mostly the same.

The final appearance of the button wIdget appeared like this.

FAQ
Install and Activate Responsive Addons for Elementor
Open the page where you want to add a Button(Use an Elementor web hosting)
Edit with Elementor
Search for the Button widget
Drag and drop the widget
Customize the Button widget
A button widget makes it simple to create clickable buttons, improve website navigation, engage users, and boost conversions.
Of course, it’s easy to integrate the button widget into your website for free using the Responsive Addons for Elementor plugin.
Conclusion
Incorporating a button widget into your Elementor website is more than just adding a design element; it’s about enhancing the overall user experience.
You make navigation intuitive and interactions meaningful by guiding visitors with clear, engaging buttons.
If you found this post useful, you might also be interested in:
- How to Add Table Of Contents To Your Elementor Website
- How to Add Divider to Your Elementor Website
- How To Add Search Bar To Elementor Website
If you are looking to add a button widget to your website, consider getting the Responsive Addons for Elementor now! Additionally, you grab the Responsive theme, a flexible WordPress theme that can simplify the process of creating your website.


