
Are you looking to add a feature list to your WordPress website?
You must have seen many websites with different styles of features. You might quickly notice the main features they highlight.
The feature list widget is the simplest yet effective way to highlight some qualities. This widget will help you to display the main features to your audience in the best possible way.
In this blog, we will walk through the steps for adding the Elementor feature list using the Responsive Addons for Elementor plugin.
What is Elementor Feature List Widget?

The Elementor feature list widget is a tool that you can use with Elementor website builder that allows you to display the features you want to highlight easily.
You can add icons, titles, and descriptions to this widget, which can be used to highlight products, services, or achievements. You can customize this widget according to your web design and make it more engaging.
If you have a WordPress website, this widget might be the best way to display the key features. Now, let’s see why you should add a feature list widget.
Why You Should Add Feature List to WordPress Website
As a feature list is the most effective way to highlight things, here are other benefits of adding this widget to your WordPress website.
- Easy to Understand: A feature list widget quickly helps your visitors understand the things you highlight or the key features of our business.
- Increased Conversions: Highlighting the top features can influence customers to take action, such as purchasing or signing up.
- Improves User Experience: Organizing your information is better so visitors can easily navigate to the vital information.
- Enhances Design: A well-designed feature list makes your website look professional and engaging. Play around with icons to enhance its look.
Things You’ll Need for Adding Free Feature List in Elementor
You will need two important plugins to add a free Elementor feature list widget to your WordPress website.
1. Elementor Website Builder Plugin
Elementor is a famous website builder that is similar to Gutenberg editor. It is used to design responsive wordpress websites.
It uses drag-and-drop features to simplify the process of building websites. This allows you to align the elements according to your design easily.
This makes Elementor a popular choice among beginners for building websites. You will have to install this plugin in WordPress.
2. Responsive Addons for Elementor
Responsive Addons for Elementor is an essential plugin that will help you add a feature list widget to your website. As Elementor has limited free widgets, this plugin will give you access to over 80 free widgets.
Responsive Addons for Elementor also offers over 150 templates. This plugin is built for Elementor to enhance the website’s functionality and appearance.
This plugin can make your website appear professional and boost engagement without coding. Responsive Addons for Elementor is the only plugin you’ll need for any widget.
How to Add Feature List To Your Elementor Website
(Note: To add a feature list widget, you must have your website built on Elementor builder)
Responsive Addons for Elementor offers numerous widgets; we will go through a step-by-step process for adding a feature list widget to your Elementor website.
Step 1: Installing Responsive Addons for Elementor Plugin
In your WordPress dashboard, go to Plugins > Add New Plugin.
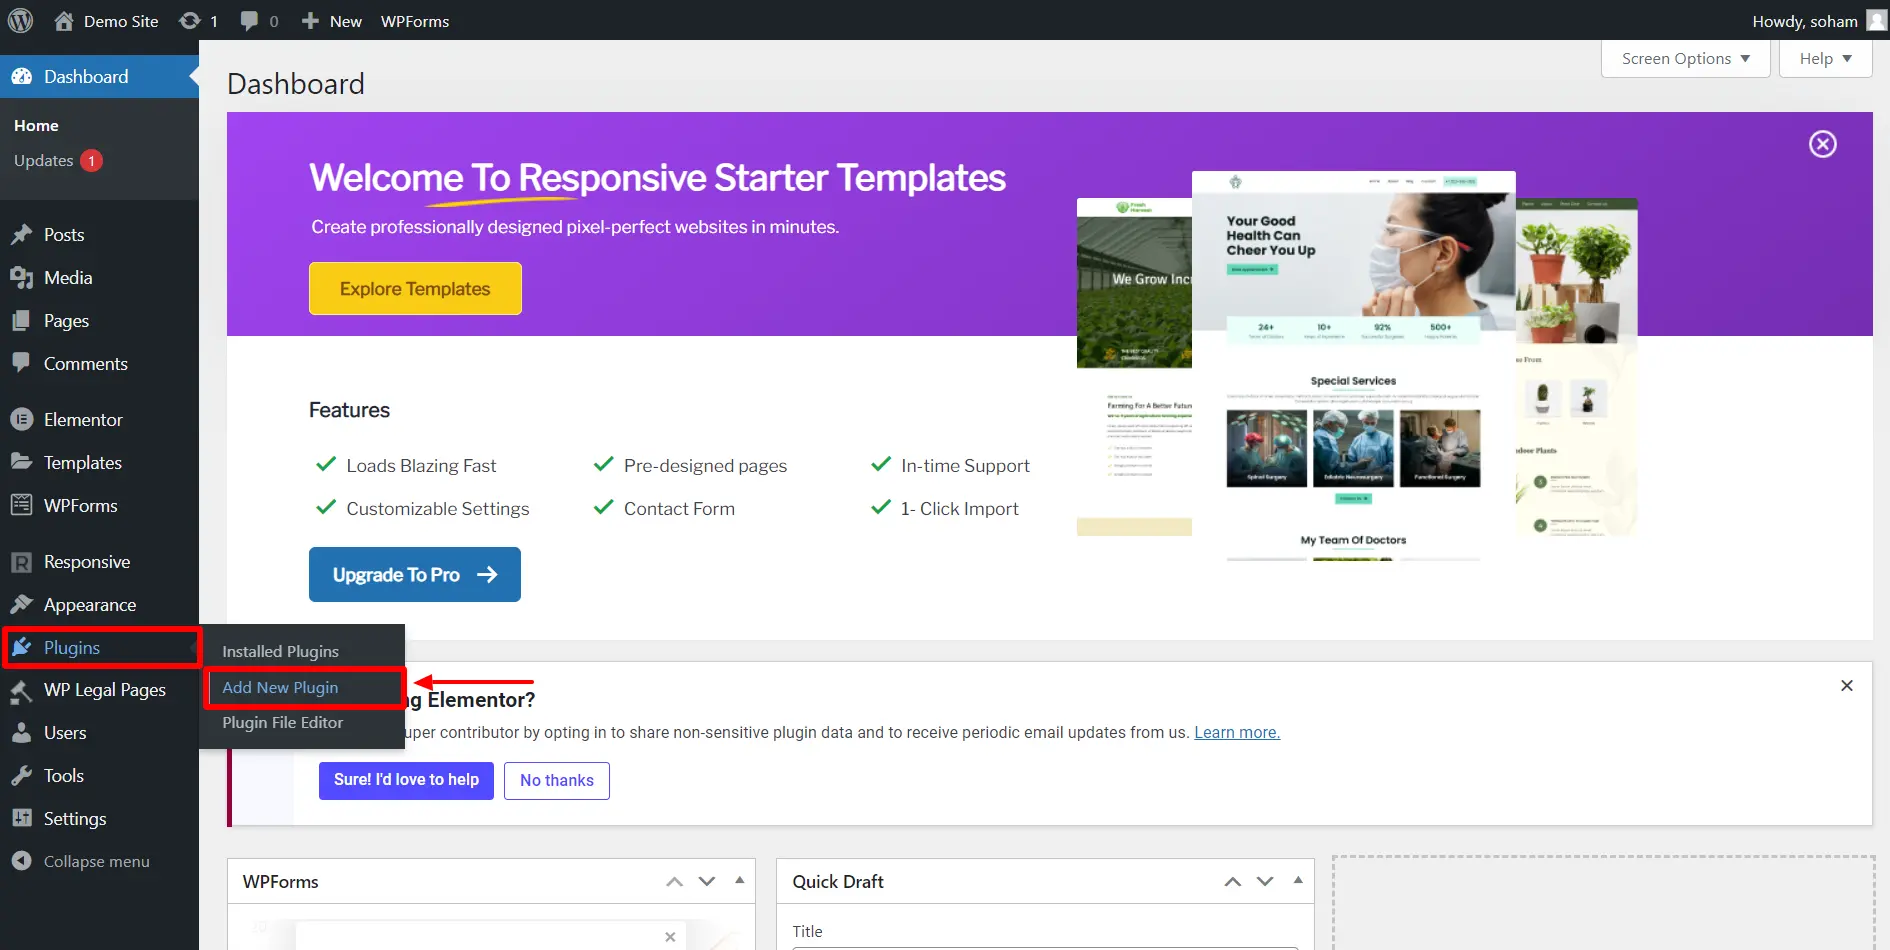
Search for Responsive Addons for Elementor by Cyberchimps.
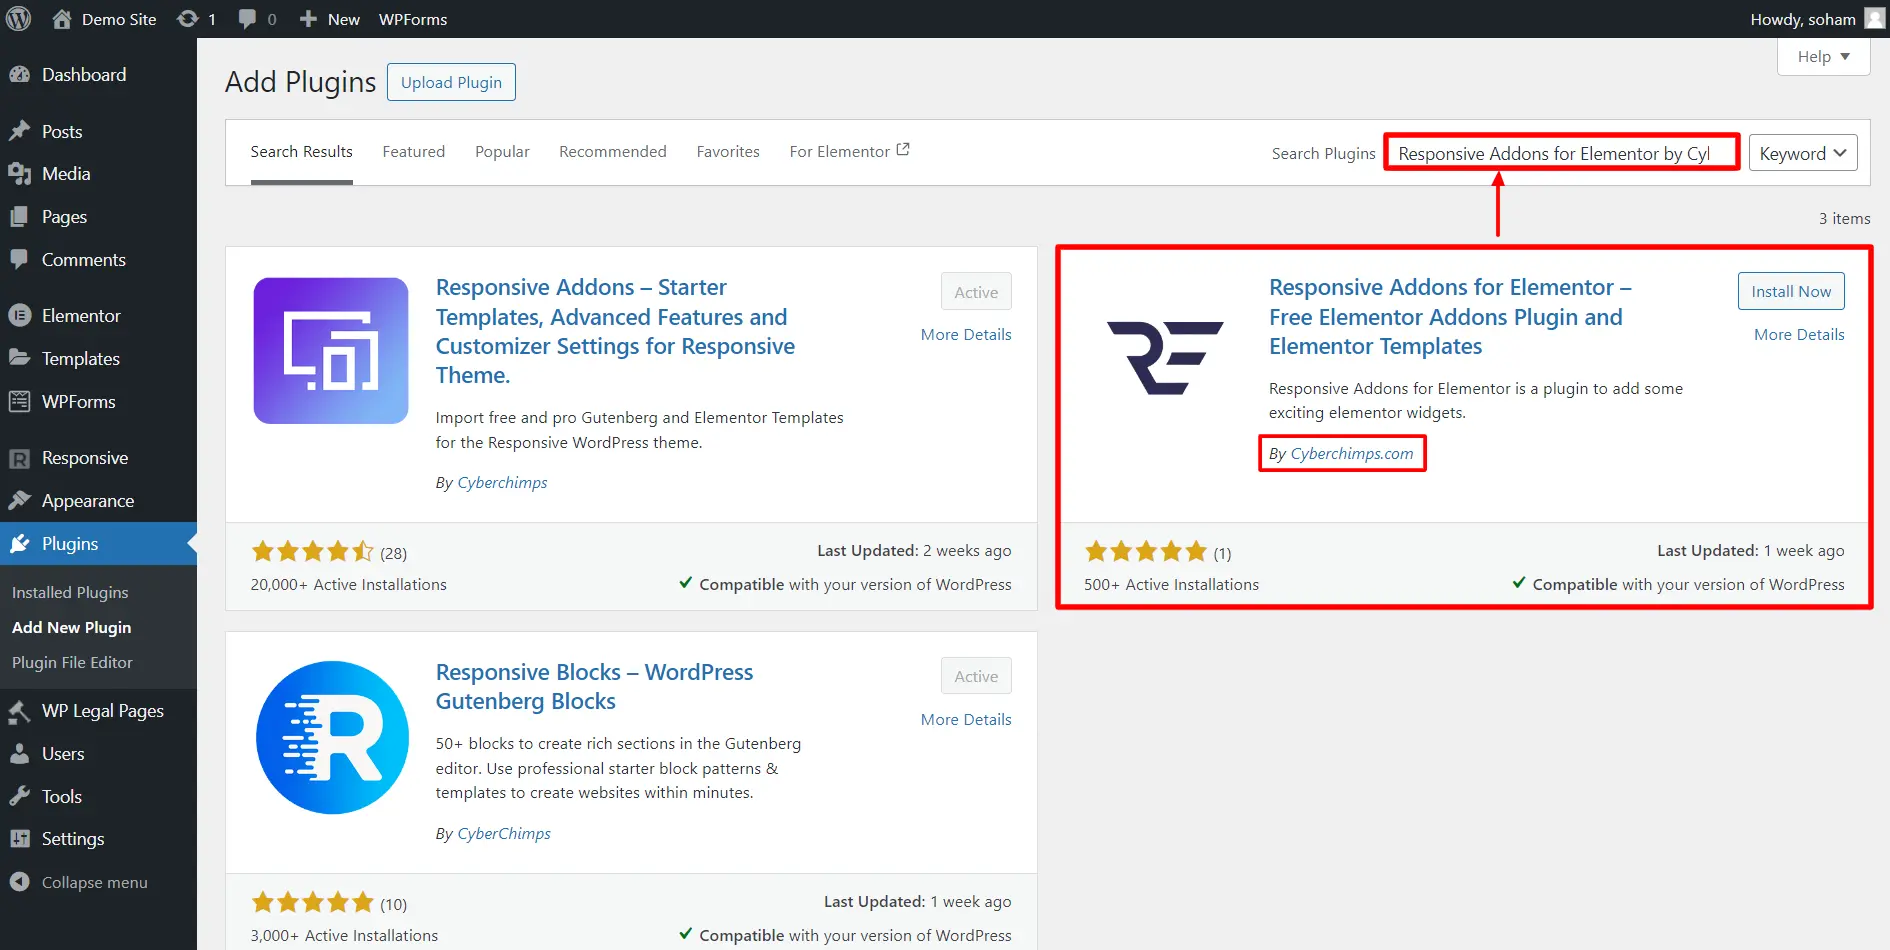
Click on Install Now button.

After installing the plugin, click on Activate.

You have now installed the plugin.
Step 2: Adding the RAE Feature List Widget to Elementor Page
Open the page where you want to add the feature list in Elementor editor. For tutorial purposes, we will use the Interior Design Template by Cyberchimps.
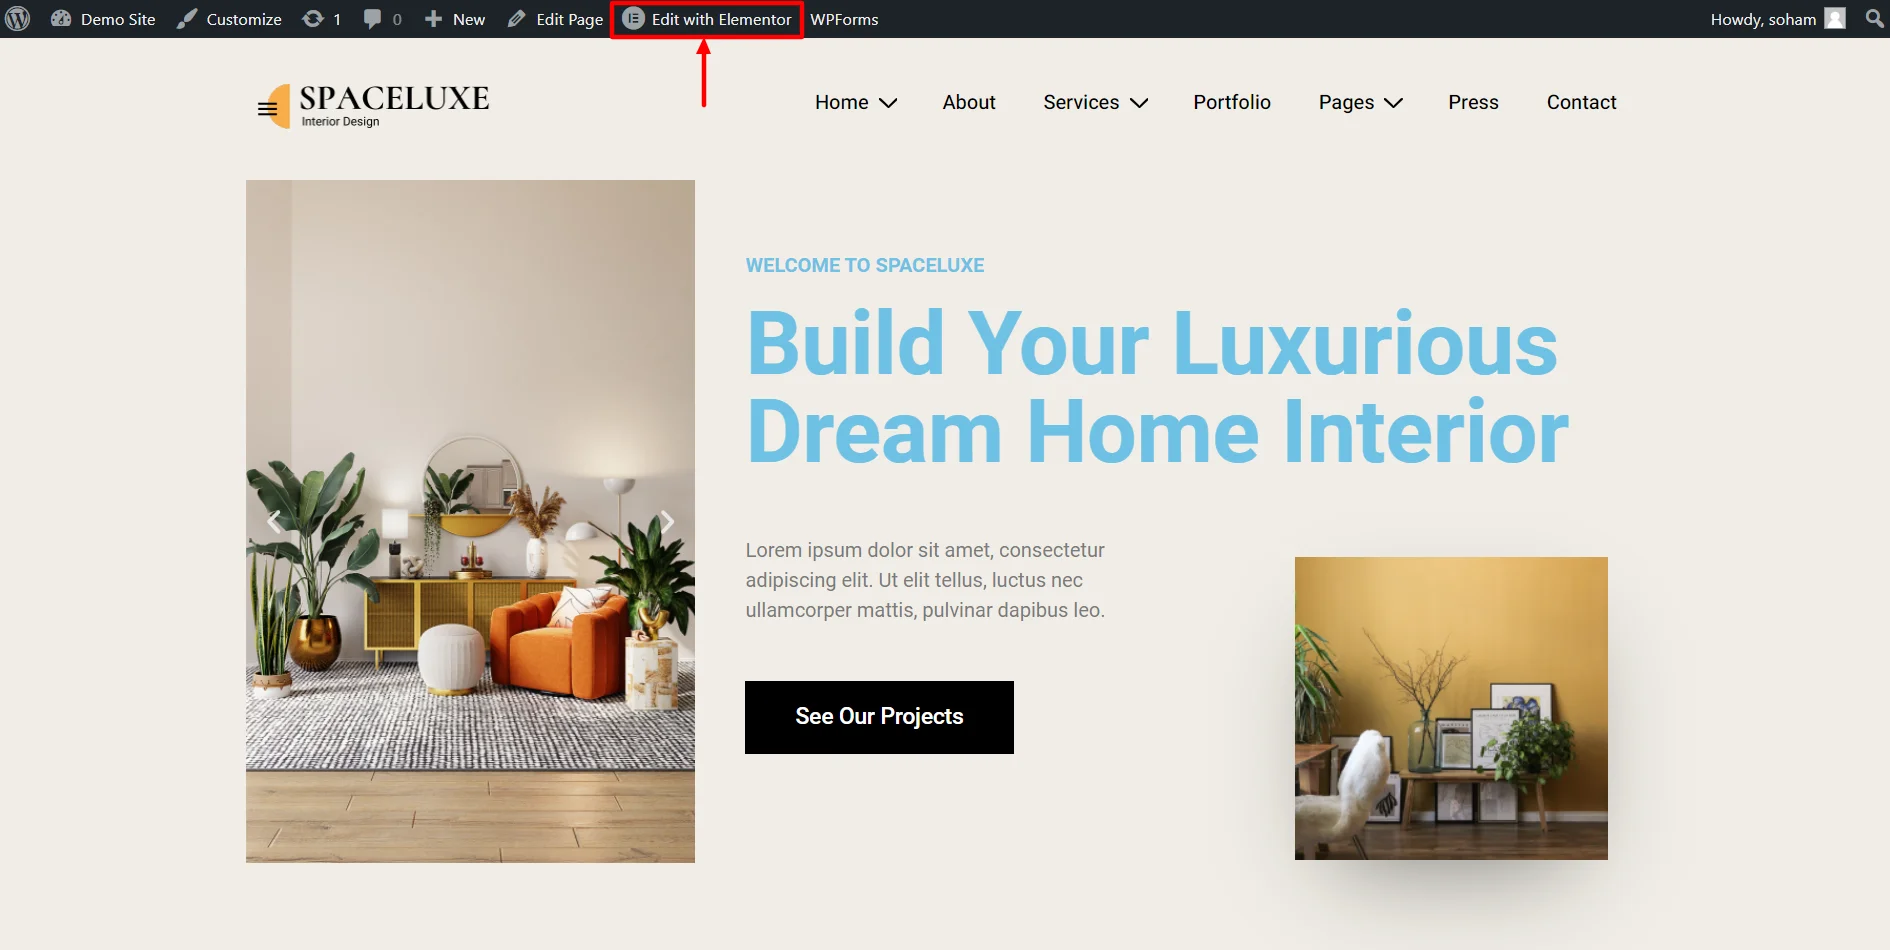
On the page where you want to add the widget, click Edit with Elementor.
In the Widgets tab, search for RAE Feature List.
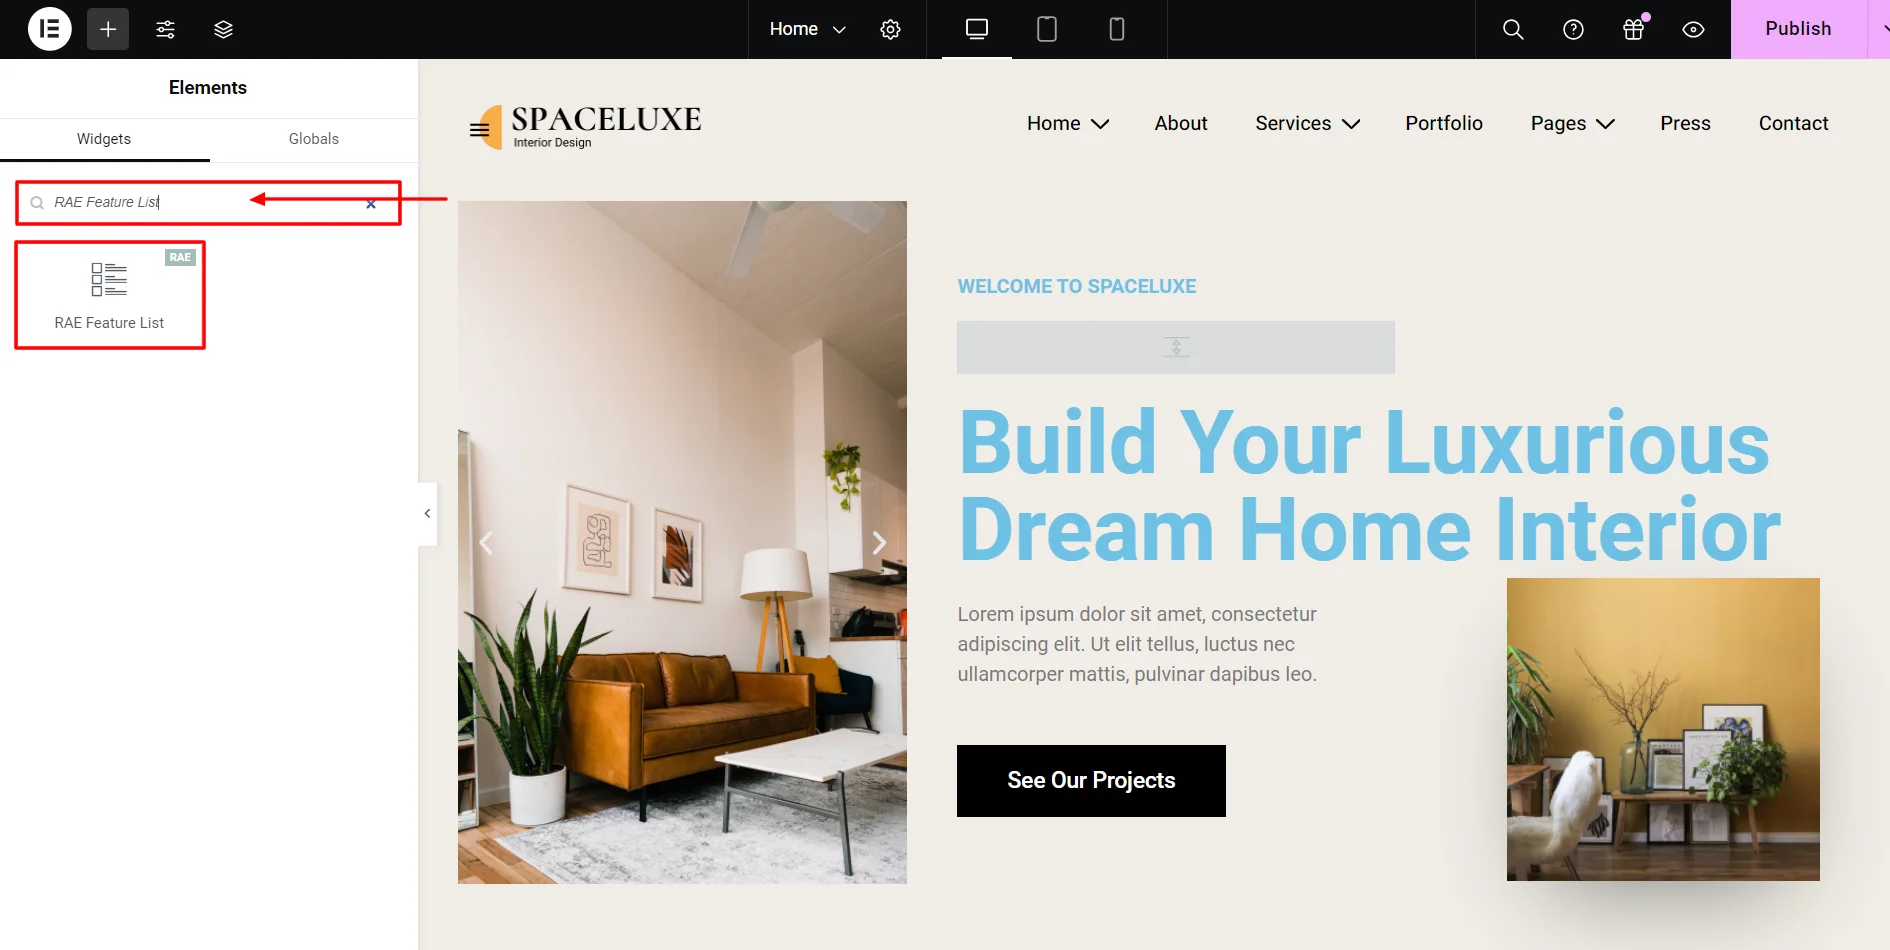
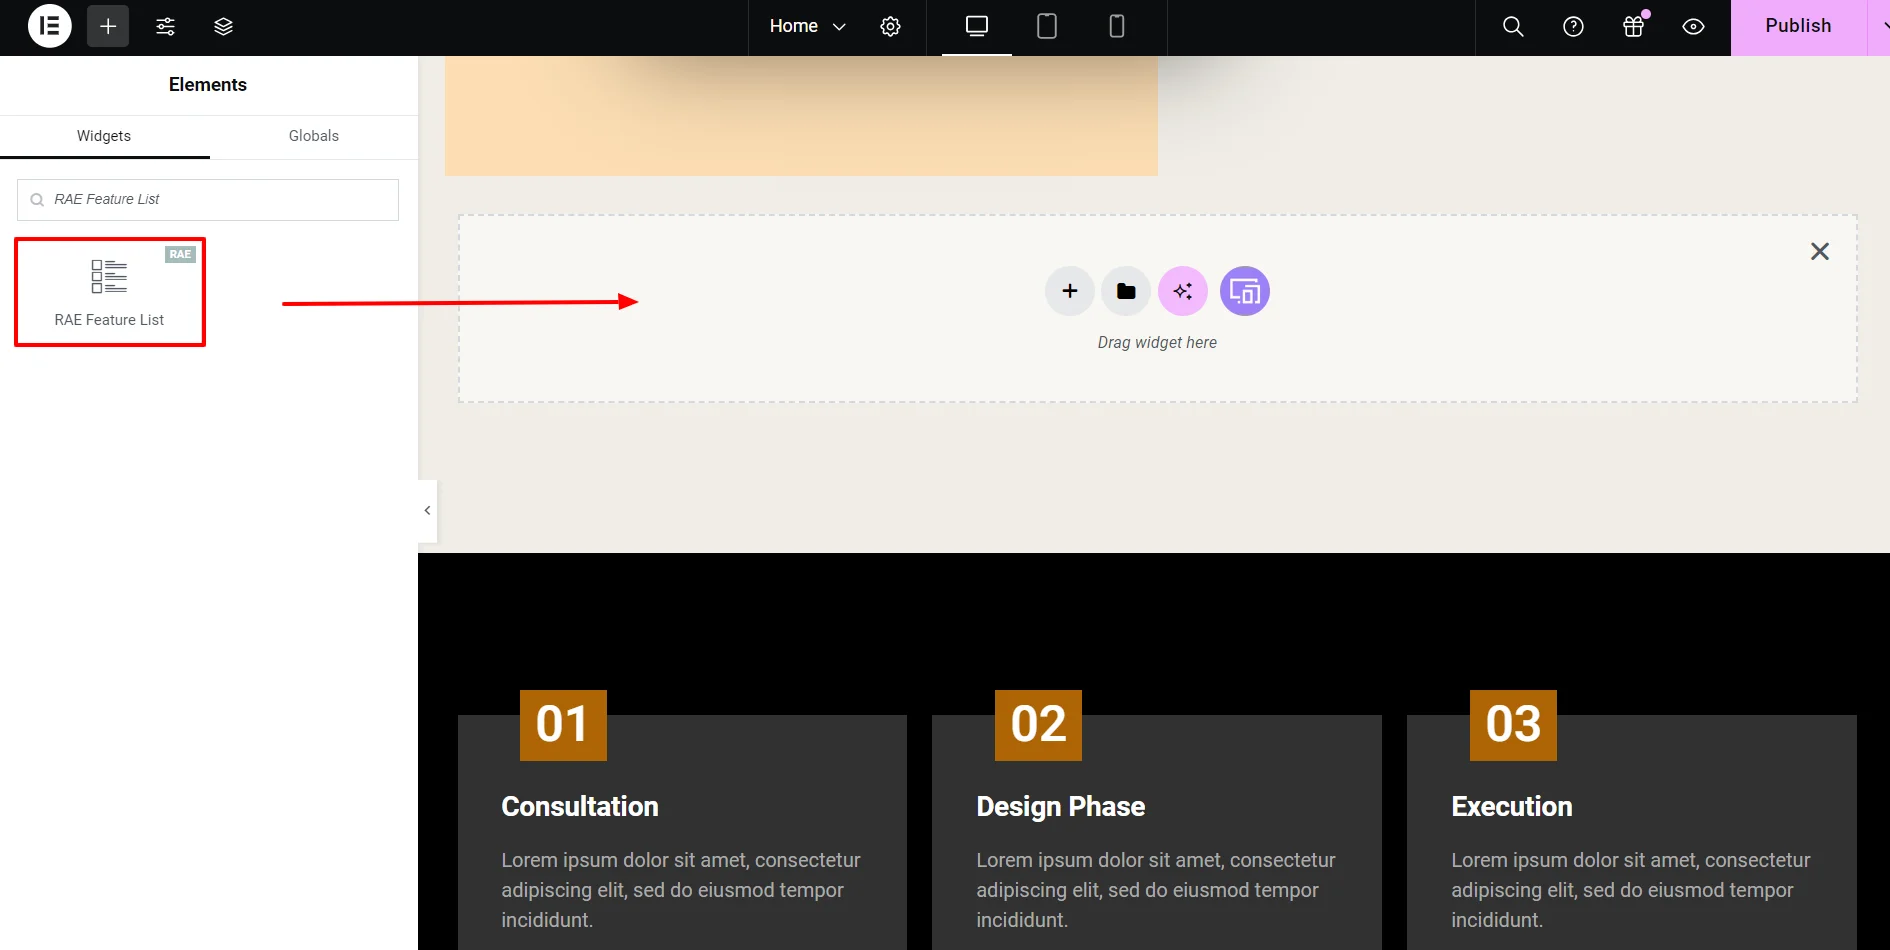
Insert the RAE feature list widget wherever you want in the page.
Step 3: Customising the Widget
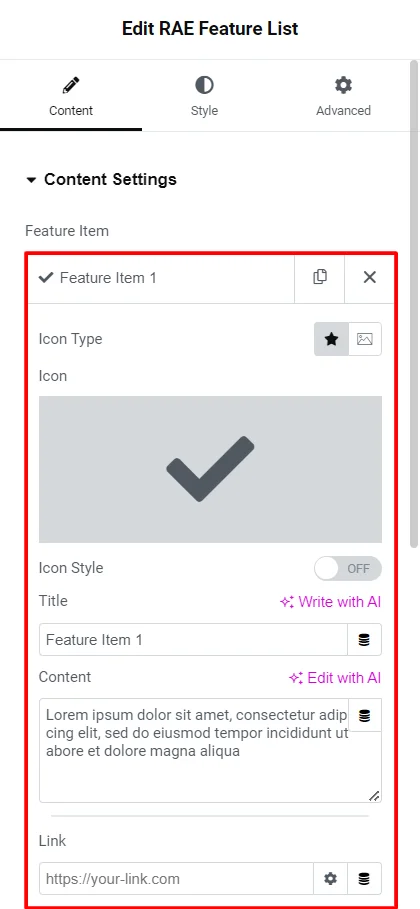
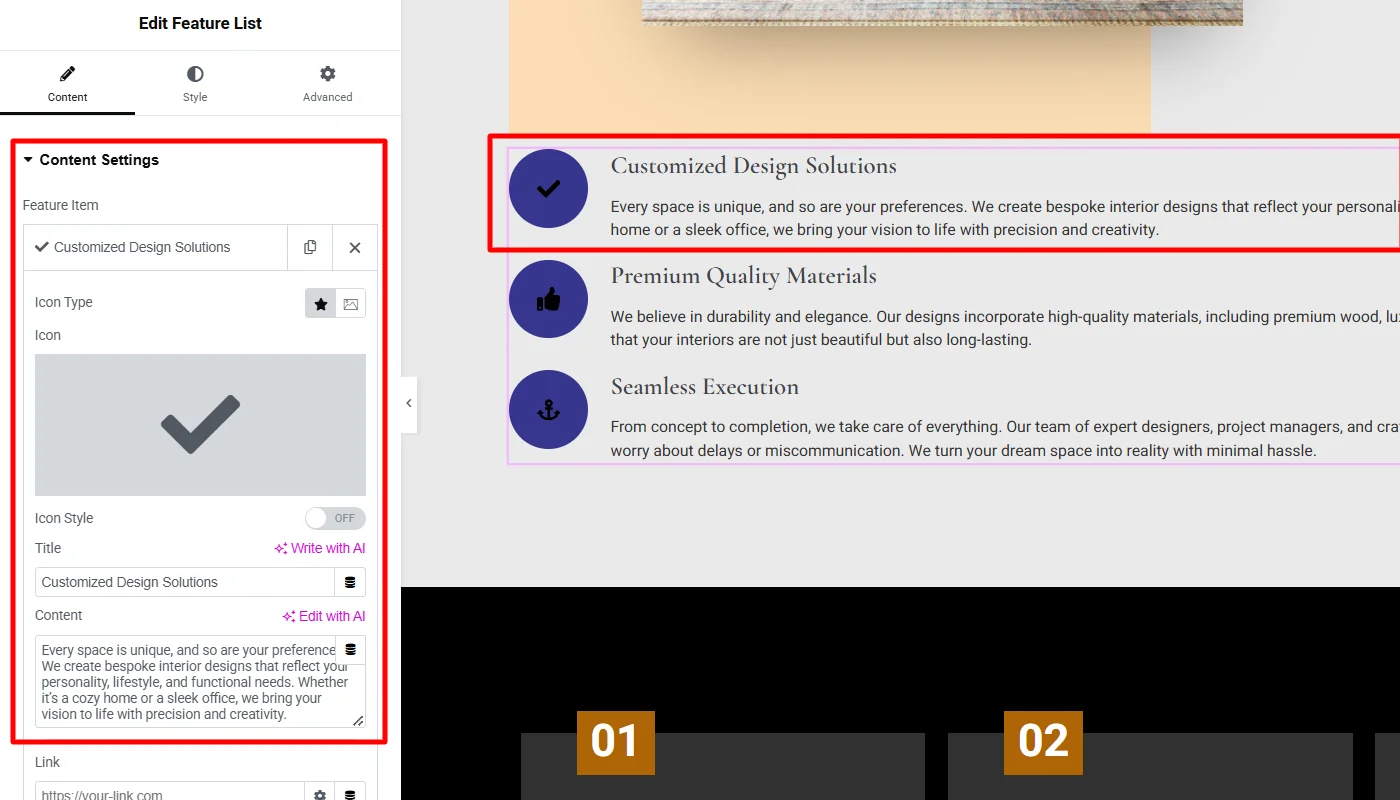
Content Settings
- Feature Item
- Icon Type: Choose between icons and images as your symbol for the feature by the toggle switch.
- Icon Style: You can also change the icon color and background color.
- Title: Add the title you want to your feature item.
- Content: Here, you can add a description to the feature, which will explain it to your audience.
- Link: If you want to link the feature to something, insert the link in the given section.
- Add item: Add more features to the widget by clicking the Add Item button.

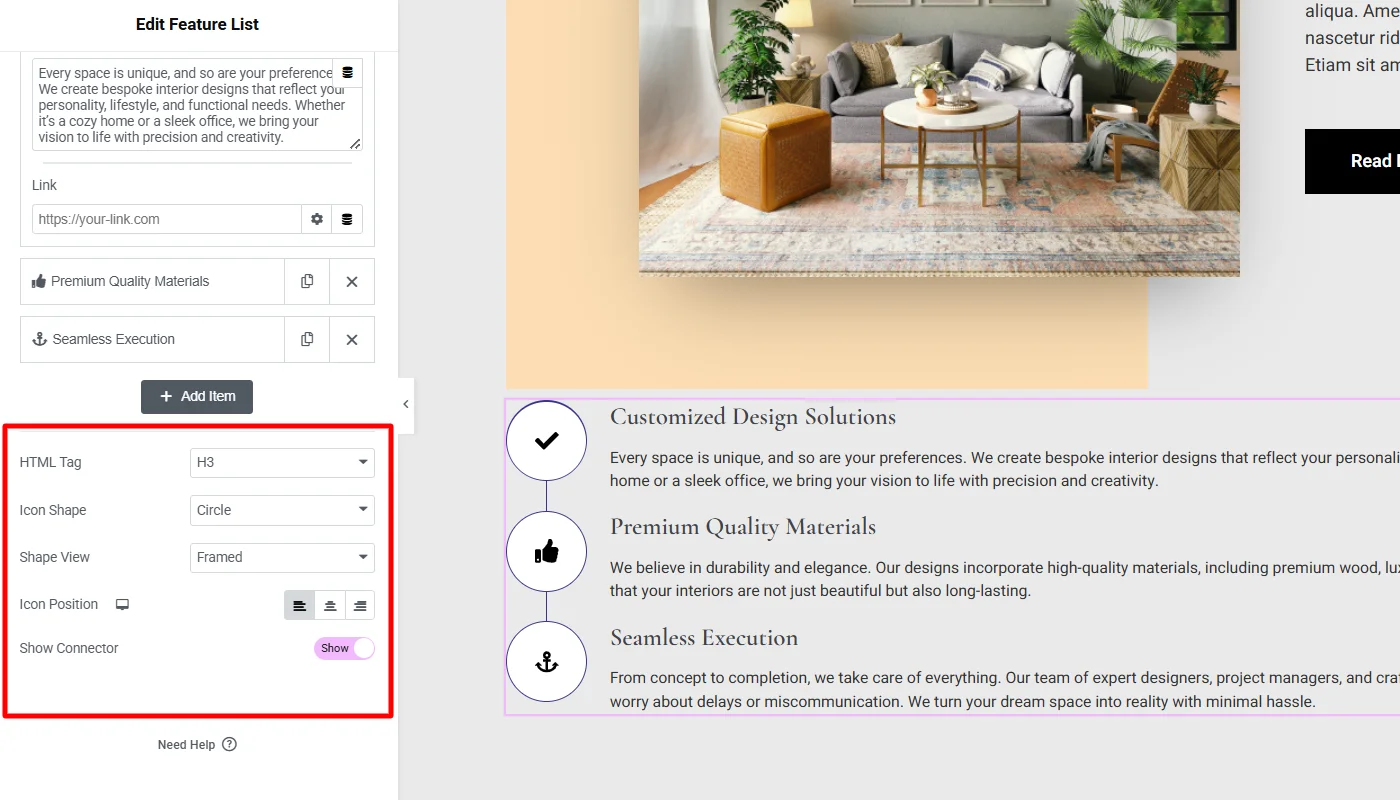
- HTML tag: Decide which heading tag you want to give these features.
- Icon Shape: Choose between circle, square, and rhombus shape for your icons.
- Shape view: If you keep this option stacked, the icons will be solid color; otherwise, they will become transparent.
- Icon Position: Select where you want icons left, right, or on top of content.
- Show Connector: Toggle the switch on if you want to connect your icons with a line.
Style Settings
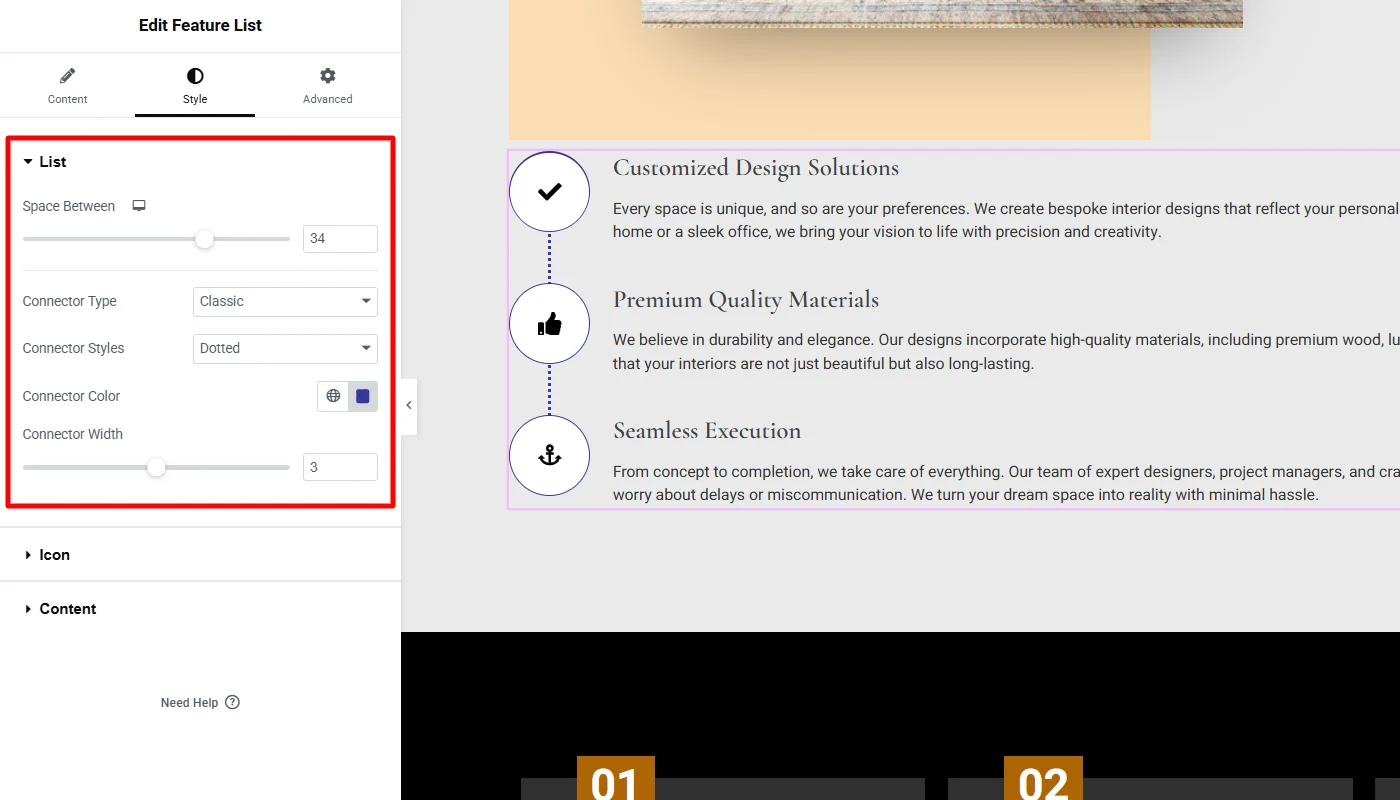
- List: Here, you can adjust the space between the features.
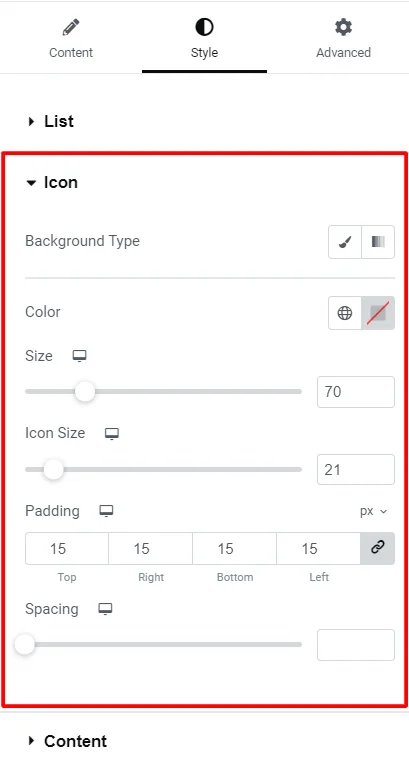
- Icon
- Background Type: If you want a gradient background to your icon, change it here.
- Color: Set the icon color using this section.
- Size: Set the size of the shape according to your preference.
- Icon size: Set the icon size of your feature.
- Spacing: Moving the slider, adjust the space between your icon and the content.
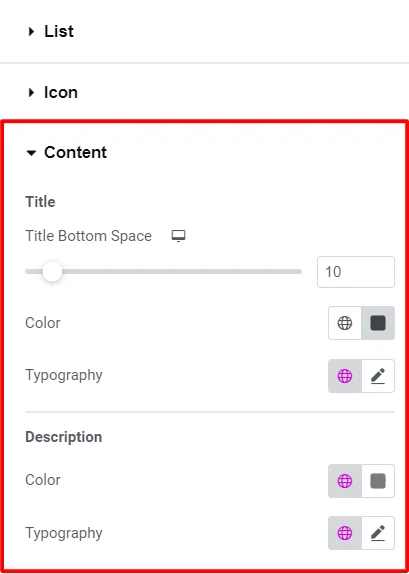
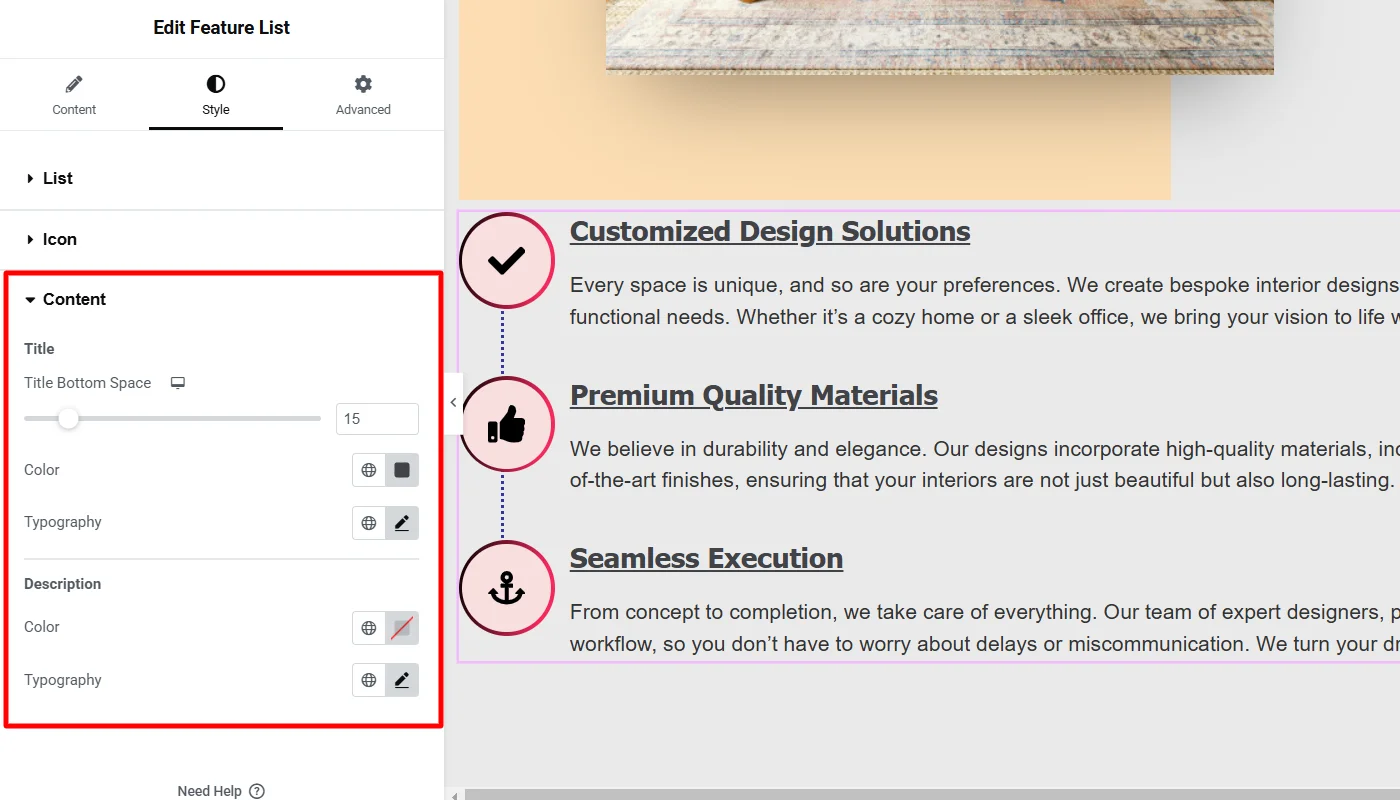
- Content
- Title Bottom Space: Use this slider to adjust the space between the title and the description.
- Color: Set the title and the description color of your feature.
- Typography: customize the font, style, spacing, and weight of the typography.
How To Use Feature List Widget
Now that we have explored the widget’s customization and styling settings let’s explore how we used them to create an intuitive section for our website.
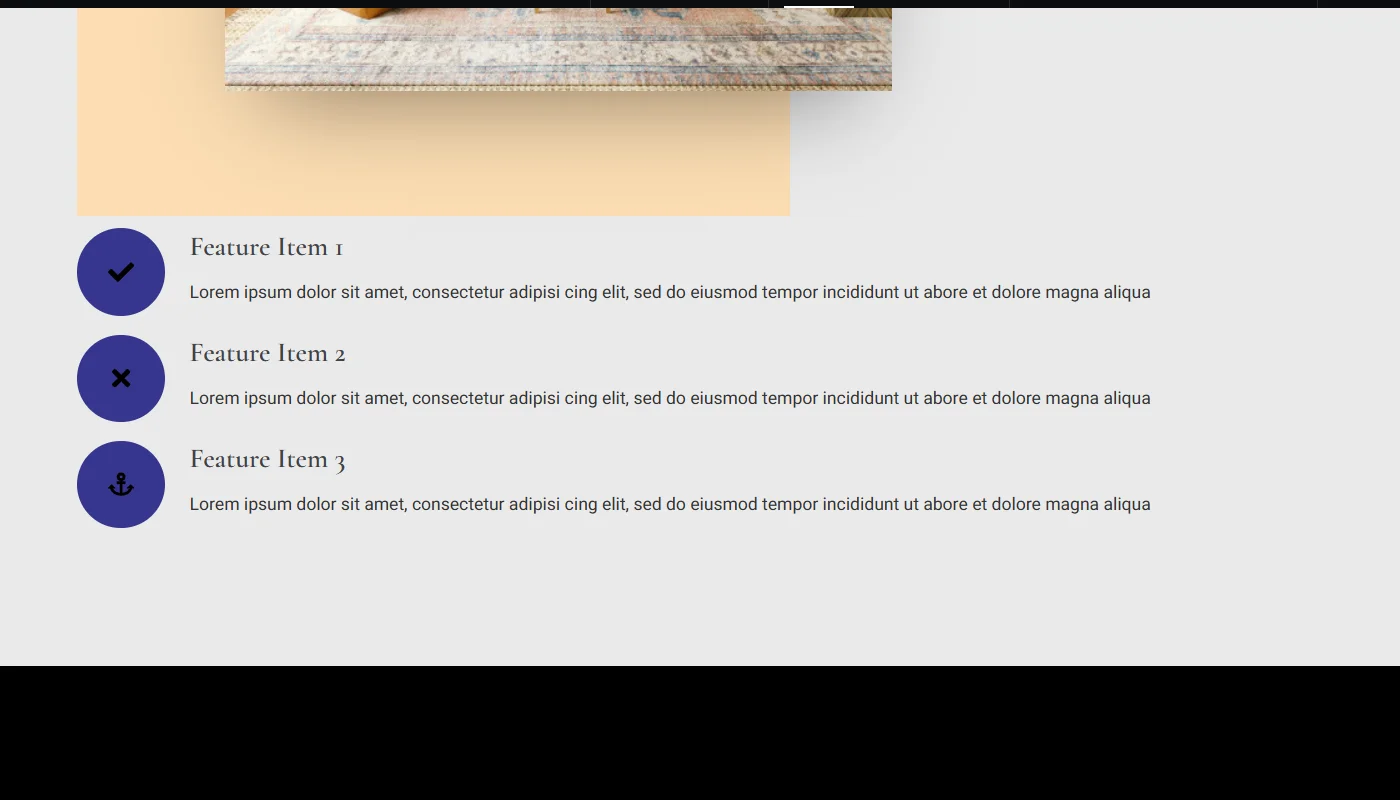
Upon dropping the widget, it looked something like this.
I began by adding the heading and content for the feature list.
Once the content was added, I customized the general content settings. I kept the Heading HTML tag the same, but the icon looked quite unappealing, so I changed the icon shape to “circle” and the shape view to “stacked.” Also, I toggle on the connector to make it look more intuitive.
The widget is simple, giving me a basic setting to add content to the feature list and style it. After we finished the content, I styled its appearance.
I began by styling the list. First, I slightly increased the space between the items in the list, changed the connector style to dotted, and increased the connector width to make it more visible.
Next, I styled the icon, giving it a gradient background with appealing colors and changing the interior color from white to light red. I also adjusted the overall and icon sizes to align with the website’s aesthetics.
Lastly, to style the content of the feature list, I kept it minimalist by making a few changes to the font and typography and adding a bit of styling to it.
How To Use Feature List Widget
Now that we have explored the widget’s customization and styling settings let’s explore how we used them to create an intuitive section for our website.
Upon dropping the widget, it looked something like this.
I began by adding the heading and content for the feature list.
Once the content was added, I customized the general content settings. I kept the Heading HTML tag the same, but the icon looked quite unappealing, so I changed the icon shape to “circle” and the shape view to “stacked.” Also, I toggle on the connector to make it look more intuitive.
The widget is simple, giving me a basic setting to add content to the feature list and style it. After we finished the content, I styled its appearance.
I began by styling the list. First, I slightly increased the space between the items in the list, changed the connector style to dotted, and increased the connector width to make it more visible.
Next, I styled the icon, giving it a gradient background with appealing colors and changing the interior color from white to light red. I also adjusted the overall and icon sizes to align with the website’s aesthetics.
Lastly, to style the content of the feature list, I kept it minimalist by making a few changes to the font and typography and adding a bit of styling.
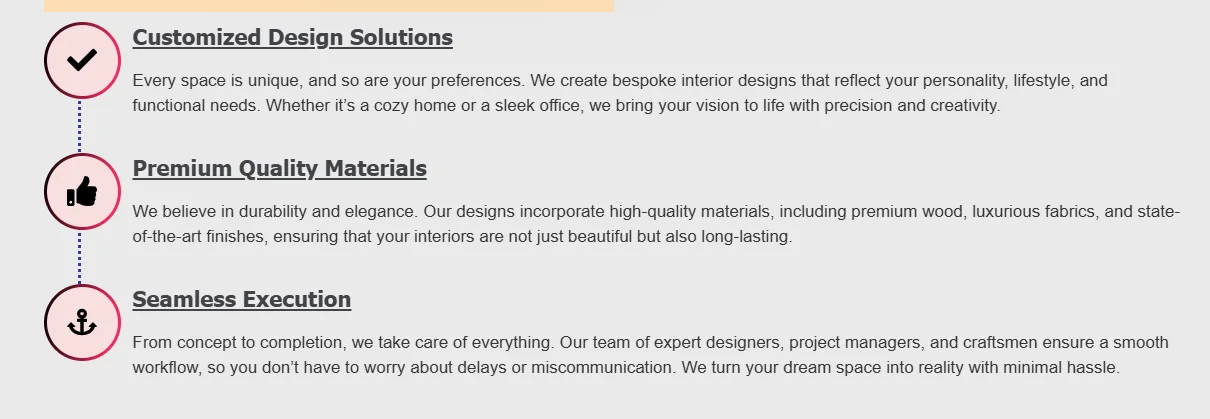
Final Appearance
You have successfully inserted the RAE feature list widget on your live WordPress website.
FAQ
To add a feature list to your Elementor website, you must install Responsive Addons for Elementor. While editing your page in Elementor, search and add the RAE feature list widget.
The feature list widget is an Elementor tool that highlights things for your visitors on your website. It may contain products, services, features, or achievements on your website.
Yes, you can add a feature list for free in Elementor using the Responsive Addons for Elementor plugin. This plugin is free to use and doesn’t charge for plugins.
Conclusion
Adding a feature list to your website can highlight things and increase user engagement.
Following these simple steps, you can include a feature list on your webpage. Installing Responsive Addons for Elementor plugin allows you to do all this for free.
If you find this blog informative, please check out our other articles.
- How to Add Button to Your Elementor Website
- How to Add Testimonial Slider To Your Elementor Website
- How To Add FAQ To Your Elementor Website
Want to customize your Elementor website? Grab the Responsive Addons for the Elementor plugin now!


