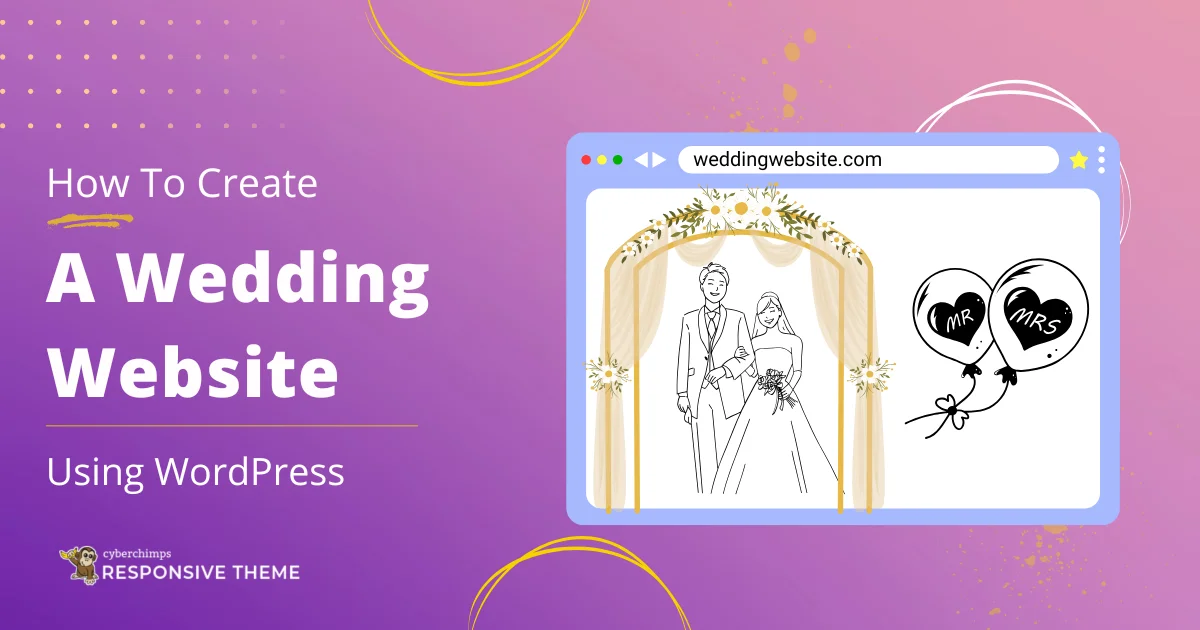
Are you wondering how to create a wedding website with WordPress?
Well, it is pretty simple. After the introduction of WordPress, there has been a seamless change in the website-building process. Unlike traditional methods, you can now create any website without coding.
Wedding businesses are a popular niche that has recently gained significant popularity over the internet.
If you want to create a wedding website, this article will help you explore everything you need to know and provide a step-by-step framework.
So, let’s get started without further ado!
Types of Wedding Websites You Can Make with WordPress
If you are new to creating your online website, you might not know but every broad website category can be further broken into small niches. You should create a small niche website with your specific business at the beginning.
While you might confused about what specific niches fall under the category of wedding websites, well then, the possibilities are endless!
WordPress offers incredible flexibility, allowing you to create various types of wedding websites tailored to different needs. Here are some popular options to consider:
- Wedding Planning Business Websites: If you’re in the wedding planning industry, a professional website can showcase your services, share client testimonials, and highlight your portfolio of successful events. It’s also a great way to attract new clients through SEO and online marketing.
- Photography or Videography Portfolios: A wedding website is essential for photographers and videographers to display their best work. If you are in the profession, you can create stunning galleries or videos to showcase your style and help potential clients envision their special day captured through your lens.
- Wedding Venue Websites: If you own or manage a wedding venue, a website can help you highlight the unique features of your space. Your venue website can Include details like pricing, availability, and virtual tours to attract couples looking for a venue.
- Wedding Vendor Marketplaces are Trendy these days. People often look for a one-stop shop for all wedding services. These websites help multiple small vendors to connect with couples. You can create a marketplace where photographers, florists, caterers, and other wedding professionals can showcase their services.
- Wedding Blogs: If you love sharing tips, trends, and inspiration related to weddings, consider making a blog dedicated to wedding ideas, DIY projects, and expert advice that can attract a loyal audience and generate income through ads or affiliate marketing.
Benefits of Making a Wedding Website
While you might have considered making what type of wedding website you want to create, you might wonder what the benefits are.
It’s no secret that the global penetration of the internet has significantly transformed all business activities. Your website acts as your online address, allowing anyone to contact you worldwide.
Moreover, it also offers various other benefits, let’s study them each one by one:
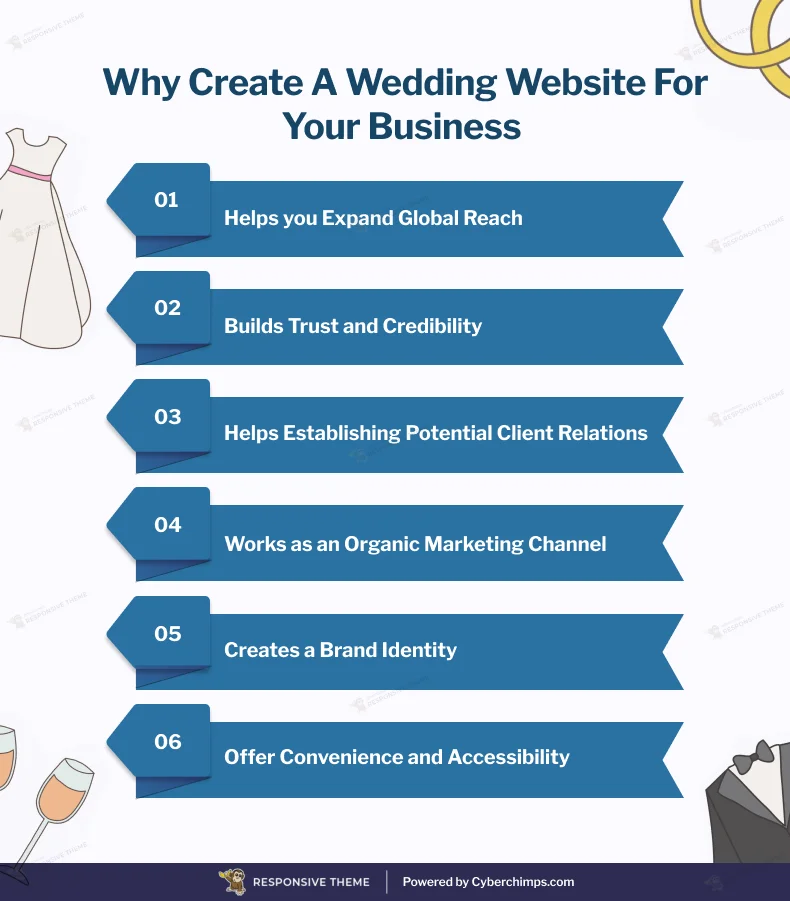
1. Online Reach
Your online wedding business website helps you create potential connections and get clients worldwide. Since internet users are actively searching for wedding services, your website acts as a virtual storefront, enabling you to tap into a larger audience and grow your business.
2. Builds Credibility
A professionally designed wedding website can help you highlight and showcase your work through portfolios, testimonials, and case studies. Sharing customer success stories and displaying your expertise builds trust, positioning your business as a reliable choice for clients.
3. Client Engagement
Features like contact forms, live chat, and FAQs streamline communication with potential clients. A user-friendly website ensures faster responses, allowing you to address inquiries and book appointments effortlessly.
4. Acts as a Marketing Channel
Your website is the central hub for marketing strategies, including SEO, social media campaigns, and email marketing. Optimizing your website content with relevant keywords, can attract clients searching for wedding-related services and stand out from competitors.
5. Showcase Brand Identity
Your website reflects your brand’s personality and values, from the design and layout to the tone of your content. A cohesive and visually appealing design ensures that your business makes a lasting impression on visitors.
6. Convenience and Accessibility
A wedding website is accessible 24/7, providing potential clients with detailed information about your services, portfolio, and contact details at their convenience. Additionally, integrating tools like booking systems or payment gateways enhances user experience and streamlines operations.
Prerequisites Required to Create Your Wedding WordPress Website
Now, considering that you know what type of wedding website you want to create and what benefits it will offer your business. Let’s jump right into how to create your wedding WordPress website.
Well, before we start learning how to create, there are some prerequisites you need to have in place to build an advanced and fully functional wedding website; these include:
- Domain Name
- A Web Hosting Plan
- WordPress Platform
- A Dedicated Theme and Template
These prerequisites might sound daunting to you and appear to be creating a website complex. However, let me tell you, it is nothing as such.
The process is straightforward, and it will be easier with the article’s guidance. All you need to do is follow the steps, and that’s it. Just put all these things in place as per instructions and your wedding website will be ready soon.
Let’s jump into the steps.
How to Make a Wedding Website With WordPress
To create your wedding website, follow the following steps:
Step 1: Get Domain Name and Hosting Service
Domain name and web hosting are major requirements to have in place before you start creating your website.
A domain name is your website’s address. A simple domain name development technique is using your business name and the extension .com.
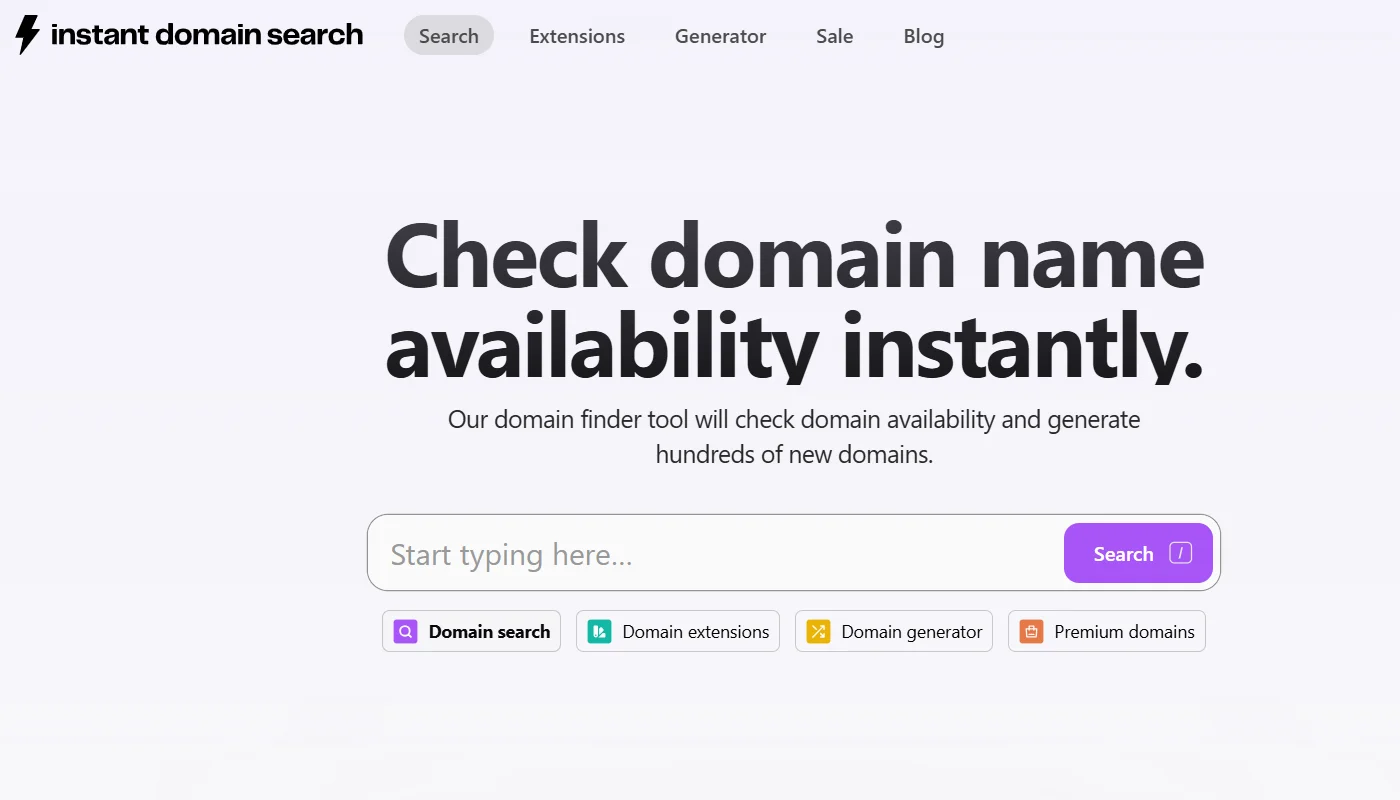
You can check whether the domain name is available using a service such as Namecheap. If the website is available, proceed; otherwise, you can change the name or use a country-specific extension, such as .net.
Also, the domain name you want may be previously taken by others due to which it might be unavailable. You can check whether the domain name is available using a website like Instant Domain Search.
Once your domain name is ready, you will need a web hosting service.
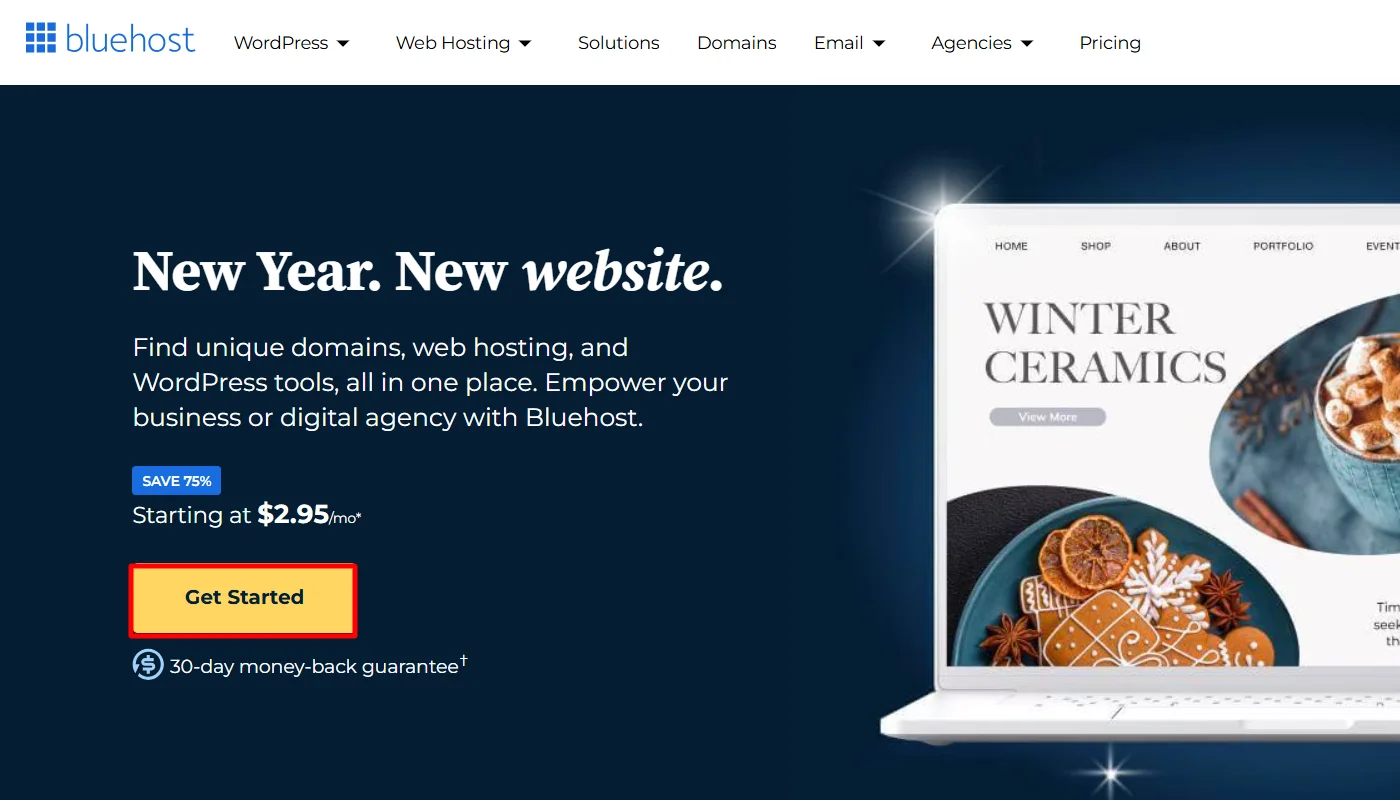
Web hosting is where your website’s data is stored. You can choose from various web hosting service providers, but for this article, we are using the example of Bluehost’s hosting service you might consider choosing other web hosting providers as well.
When you arrive at the Bluehost webpage, start by clicking the Get Started Now button.
Click on the Get Started button.
Upon clicking, you will be taken to their signup page, where you will be asked to choose a pricing plan.
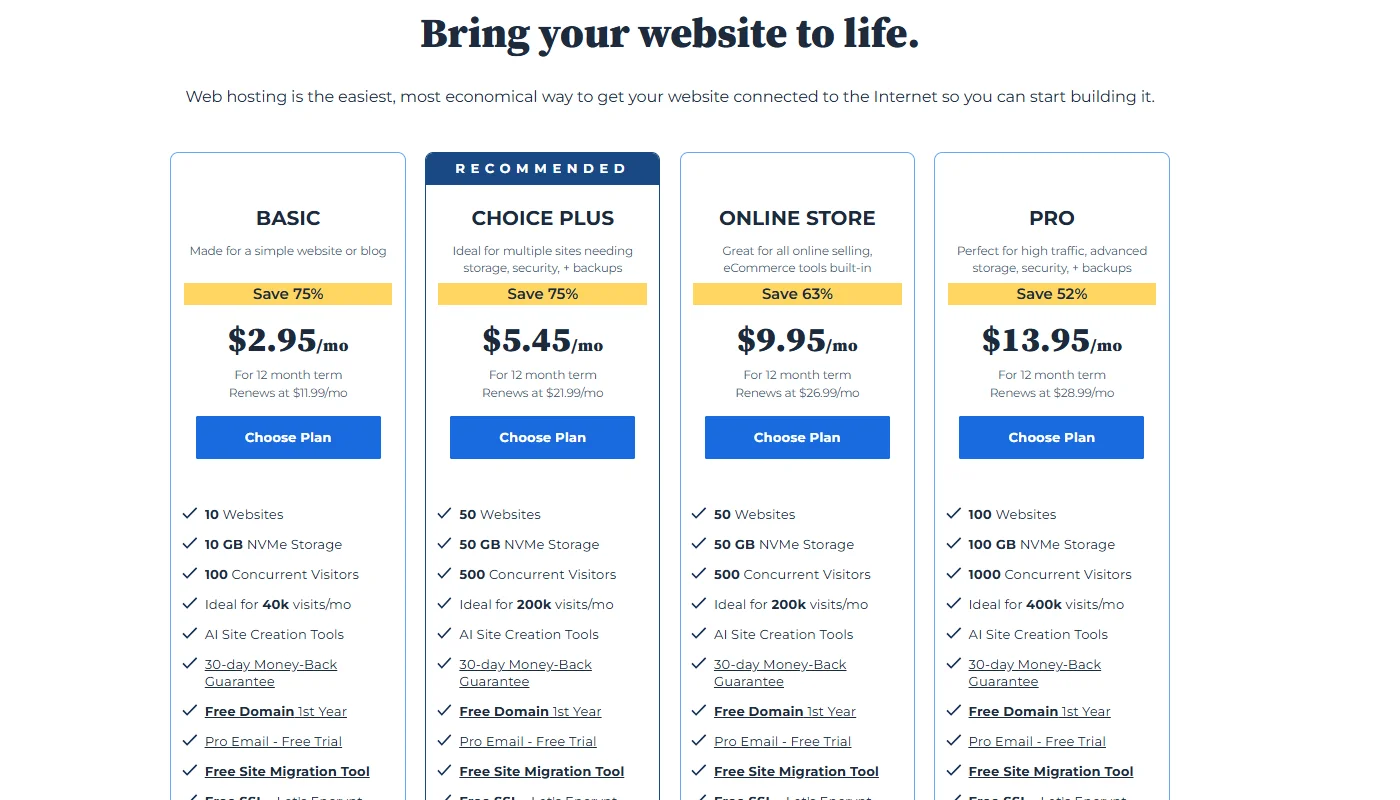
Choosing the plus plan is wise for running a small-scale or mid-scale business. After selecting the plan, enter your website’s domain name.
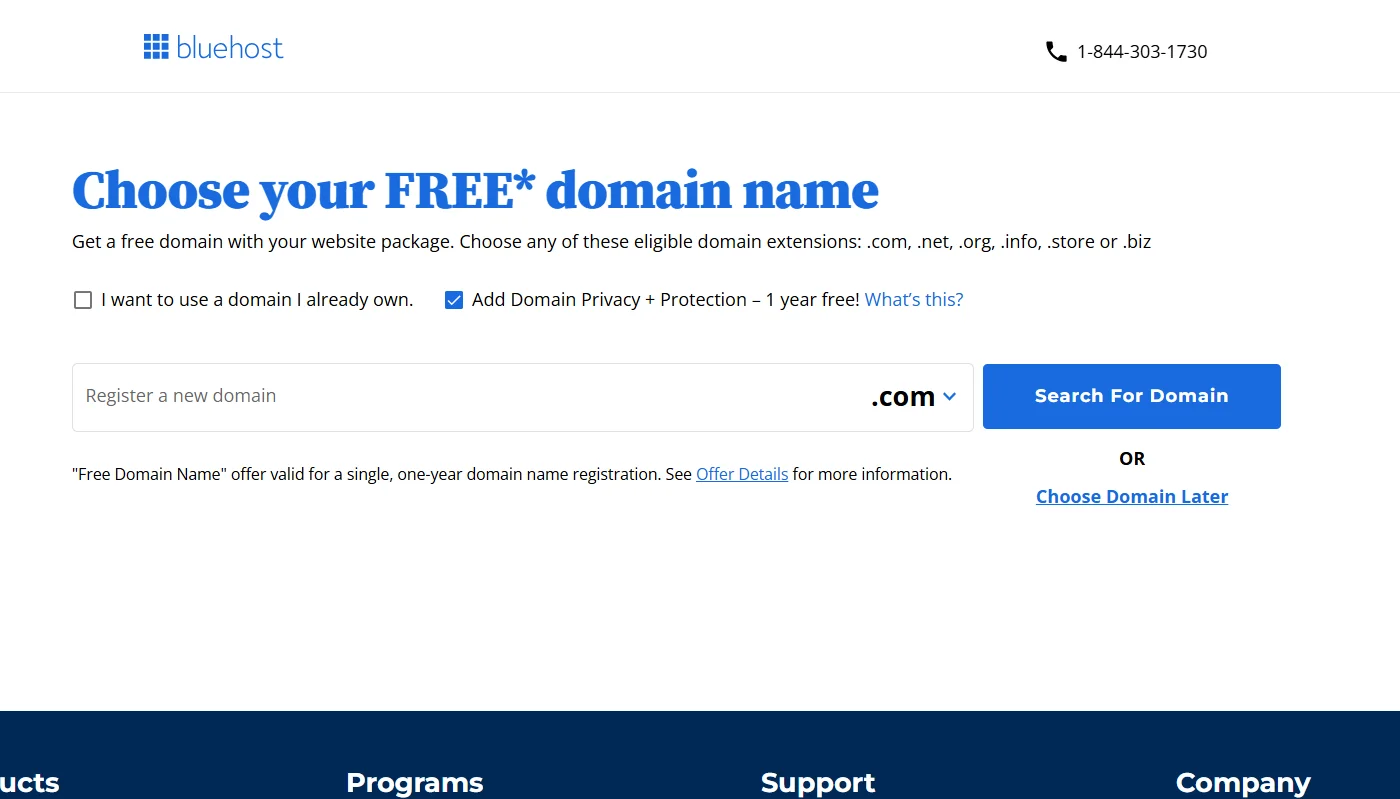
However, Bluehost also offers a free domain name, so if you haven’t already, you can get one from Bluehost.
Once registered with hosting, you’re ready to take further steps.
Step 2: Install WordPress
After registration with the hosting provider, you must install the WordPress platform.
All hosting providers majorly offer one-click Installation for WordPress through their login dashboard.
Below are the steps to install WordPress using the 1-Click Installation feature:
- Log into Web hosting.
- Go to the control panel.
- Click on the WordPress icon (Install WordPress), which you can find under the website section.
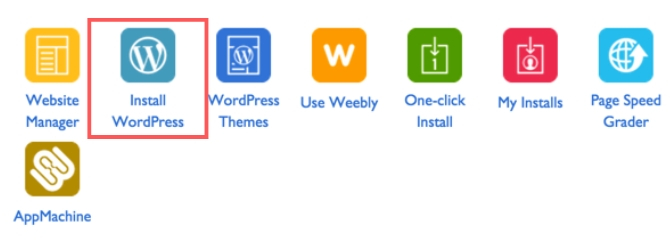
- Choose the domain where you’d like to install WordPress.
- Enter the site name, admin username, and admin password of your choice, then click on “Install Now.”
Congratulations! You’ve successfully installed WordPress and are now ready to build your wedding website.
Step 3: Install A Theme
Once you have installed WordPress, you will need a user-friendly theme with an intuitive interface and layout for your wedding site.
If you are confused about what it is and consider it the same as a template, let me tell you both are different.
A WordPress theme is a collection of files that determines a WordPress website’s visual appearance and layout. It controls the site’s appearance and functions, allowing you to customize the design without altering the core WordPress software.
While various wedding themes are available on the WordPress repository, not all might suit your needs, so find one that can help you best. Cyberchimps Responsive theme is one such recommended theme that suits all the purposes of creating a versatile wedding site.
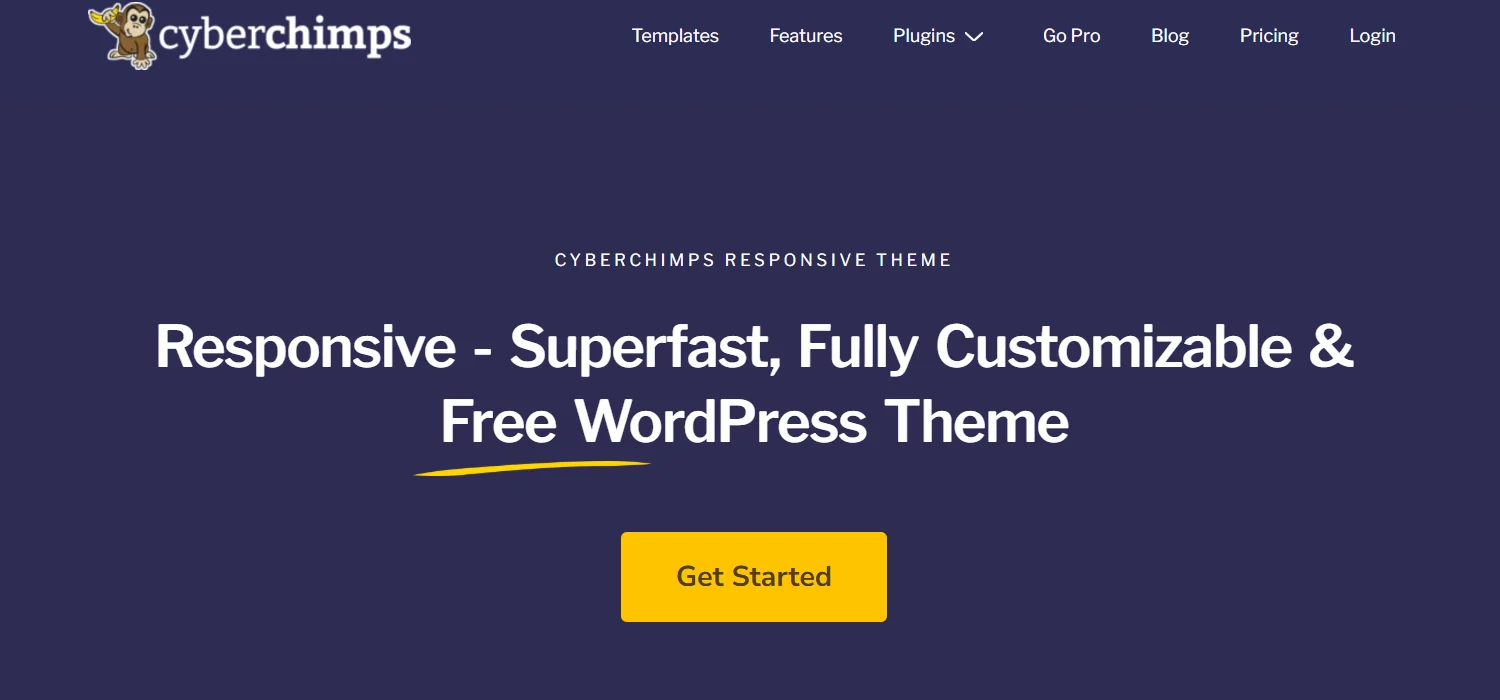
Over 20,000 users actively install and use the Cyberchimps Responsive theme, rated 4.7/5. This versatile, multipurpose theme offers a user-friendly interface for creating any website.
In addition, the theme seamlessly integrates with its sister plugin, Responsive Starter Templates, allowing you to create any website with just one click of import. Let’s understand how to install the theme.
Log in to your WordPress admin dashboard.
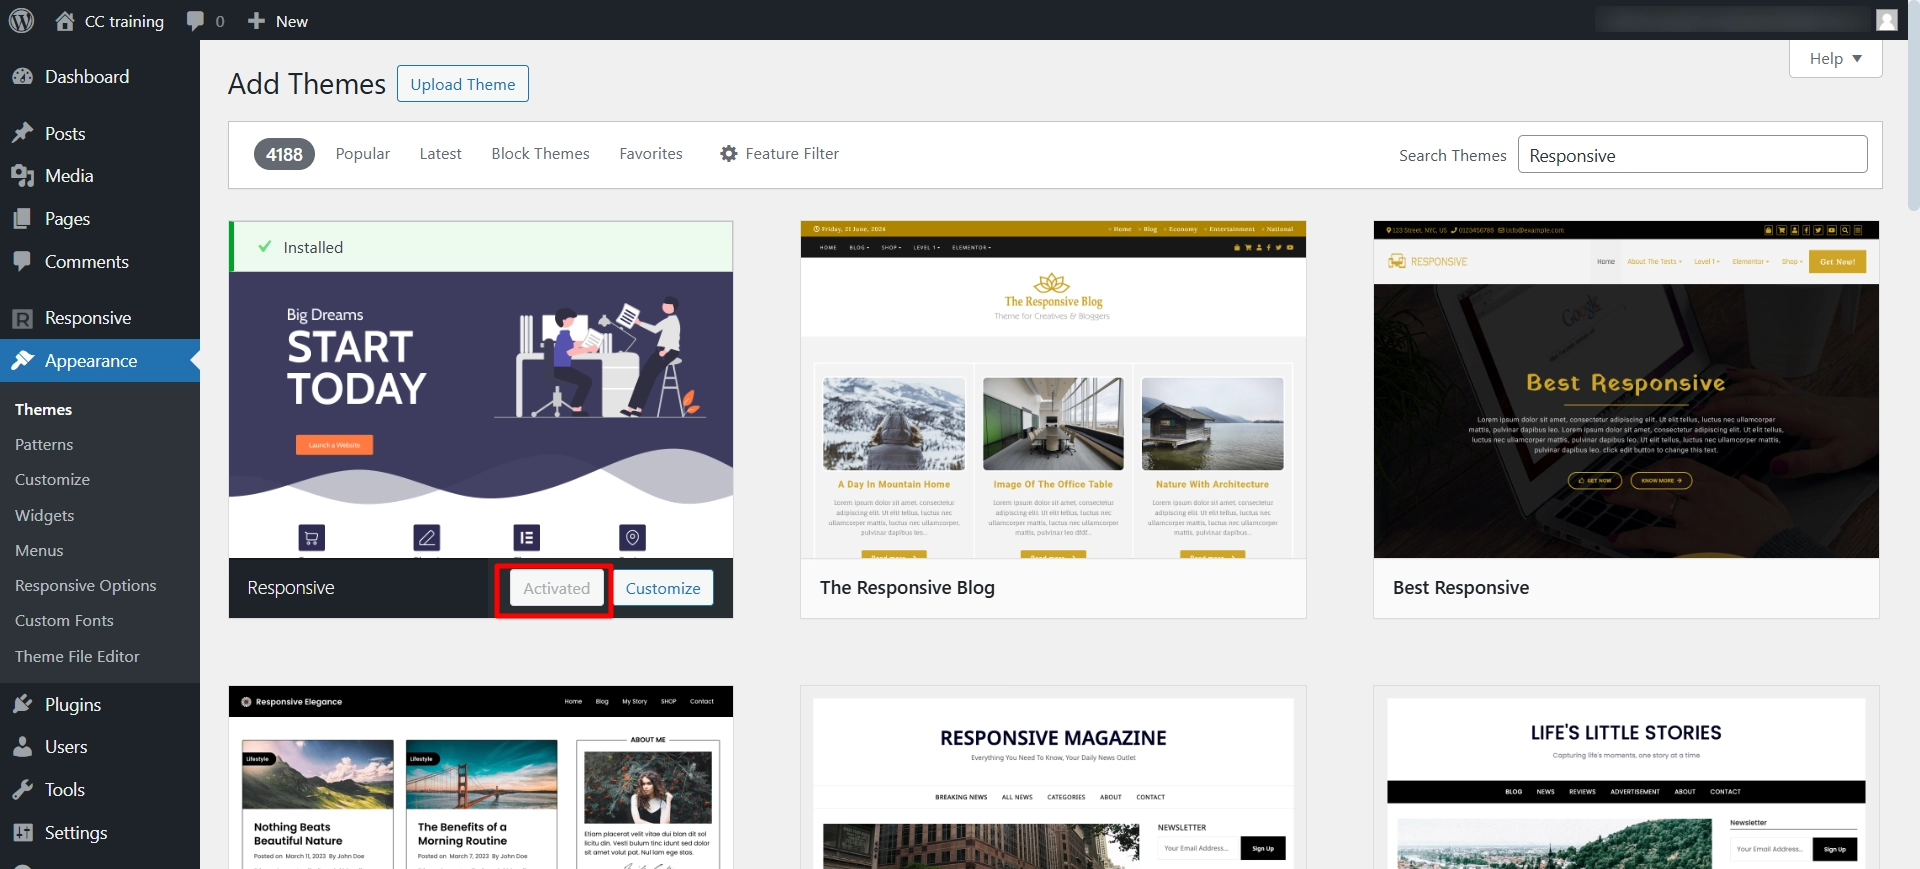
Go to Appearance > Themes > Add New
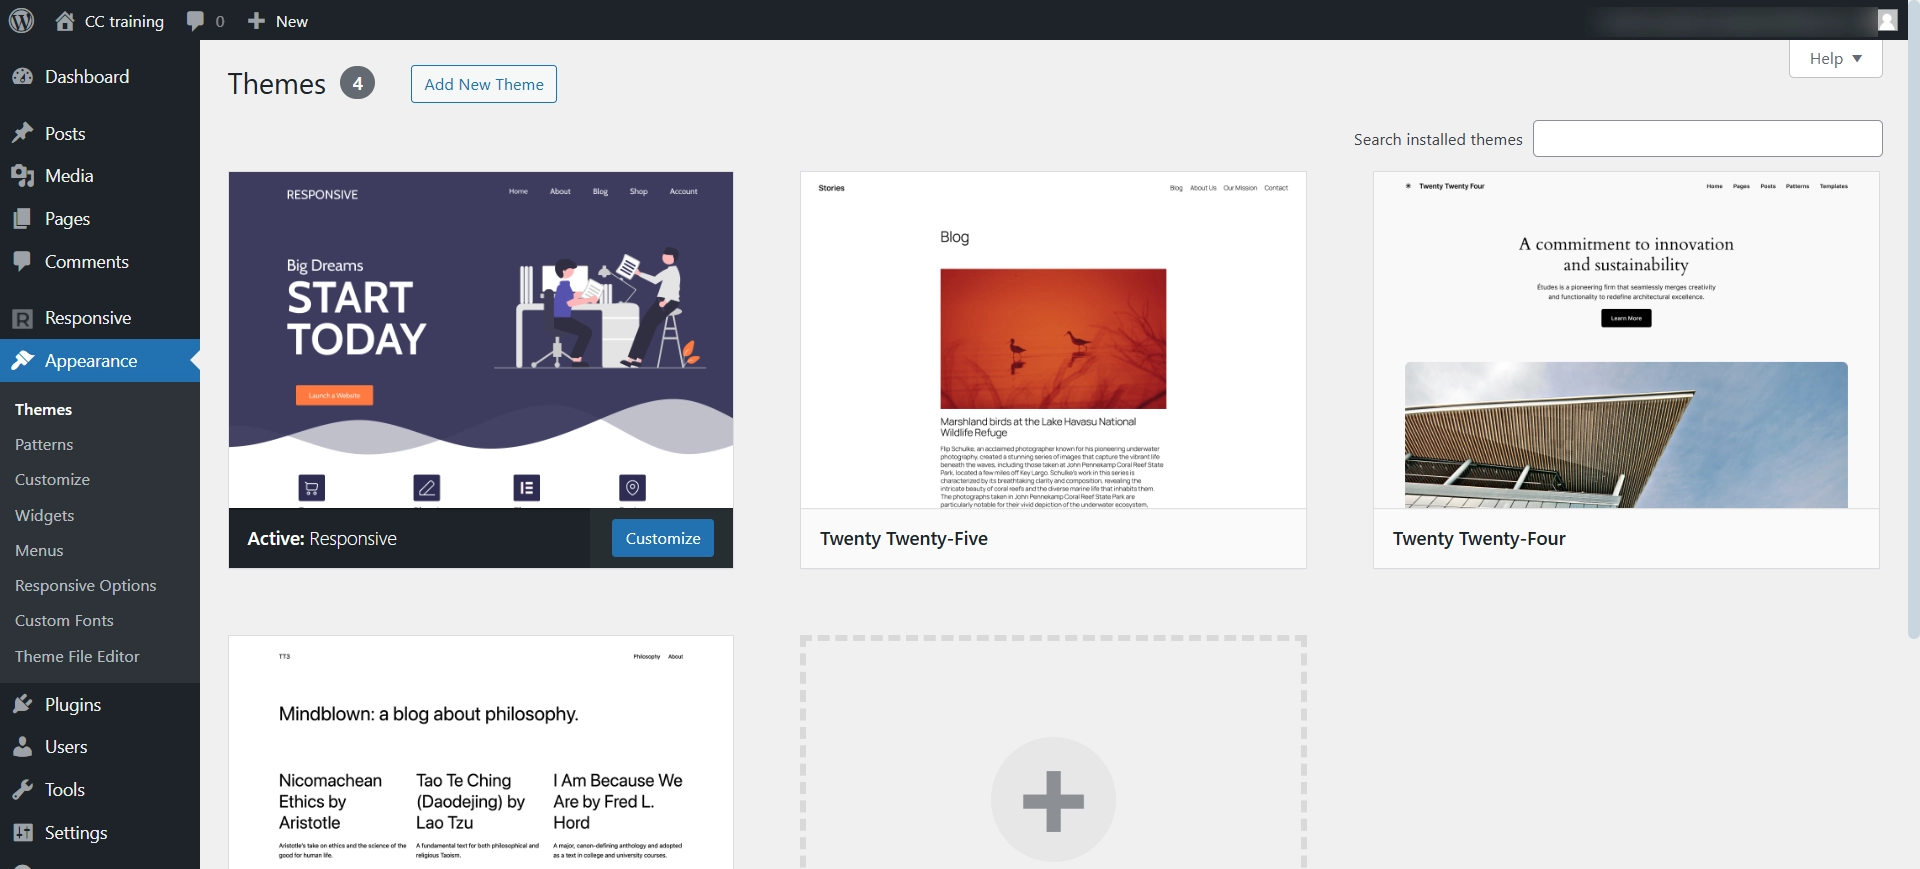
Search for Responsive on the search bar
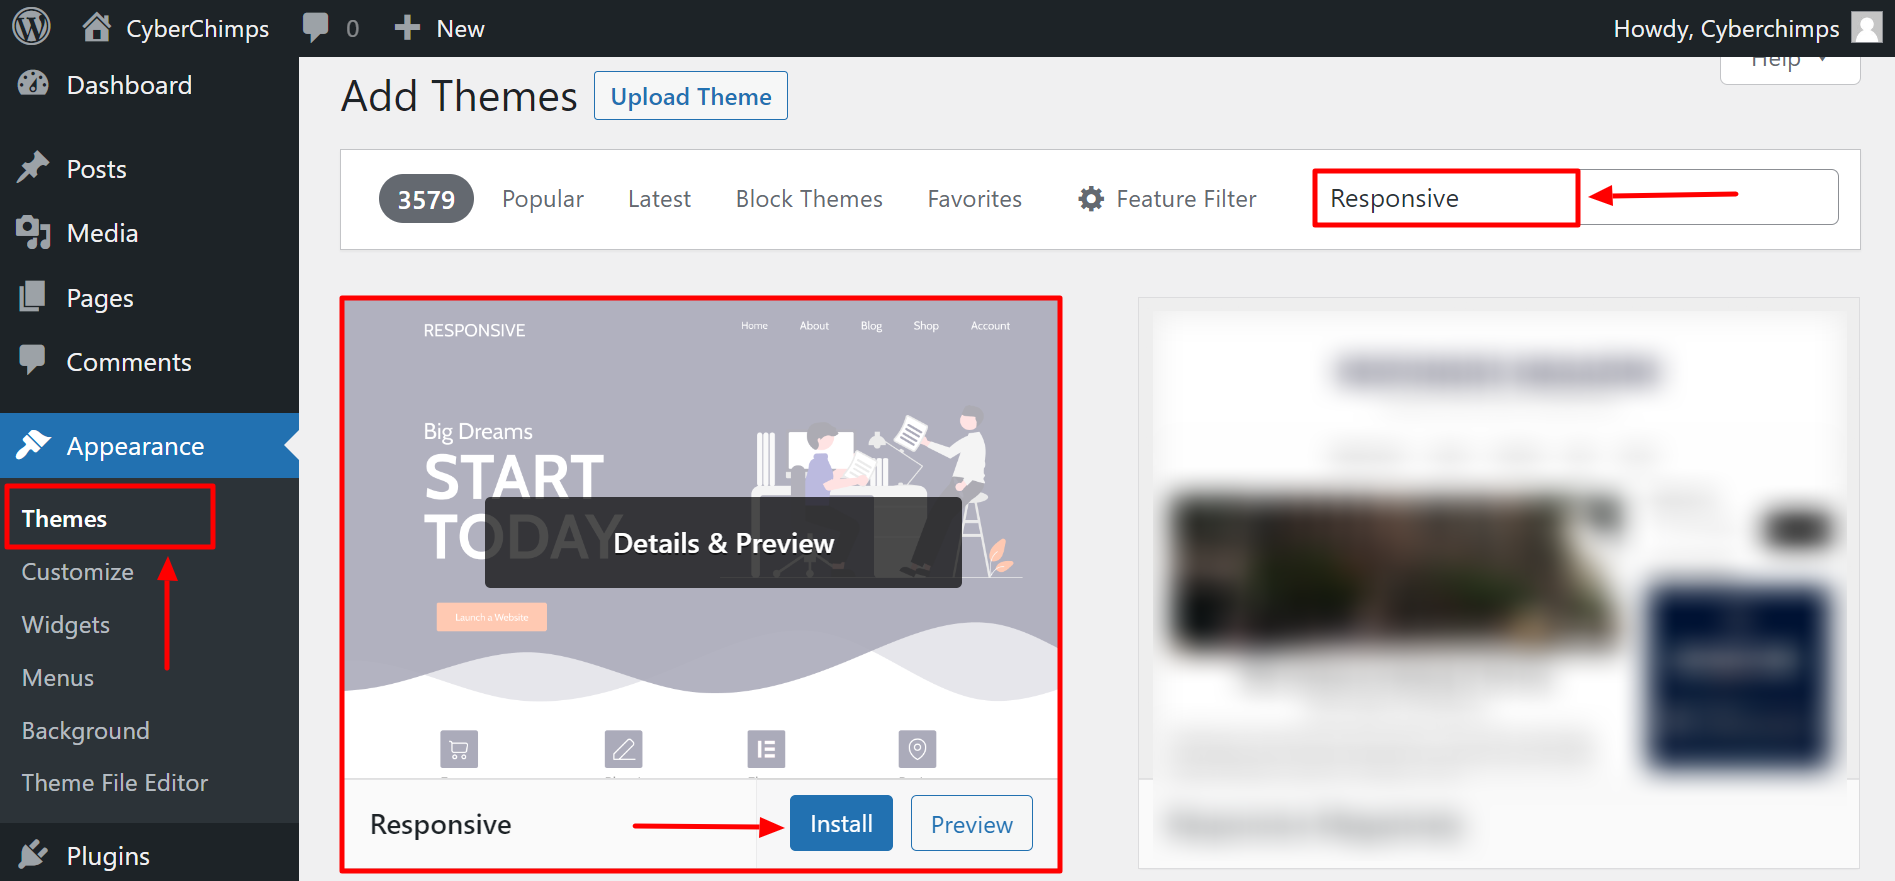
Click on Install Now to start installing the Responsive theme
Activate Responsive theme
Step 4: Install And Activate Responsive Starter Templates plugin
We only need the Responsive Plus – Starter Templates plugin to import a wedding website.
Follow these steps to install the Responsive Plus plugin.
From your WordPress dashboard, navigate to Plugins > Add New Plugin
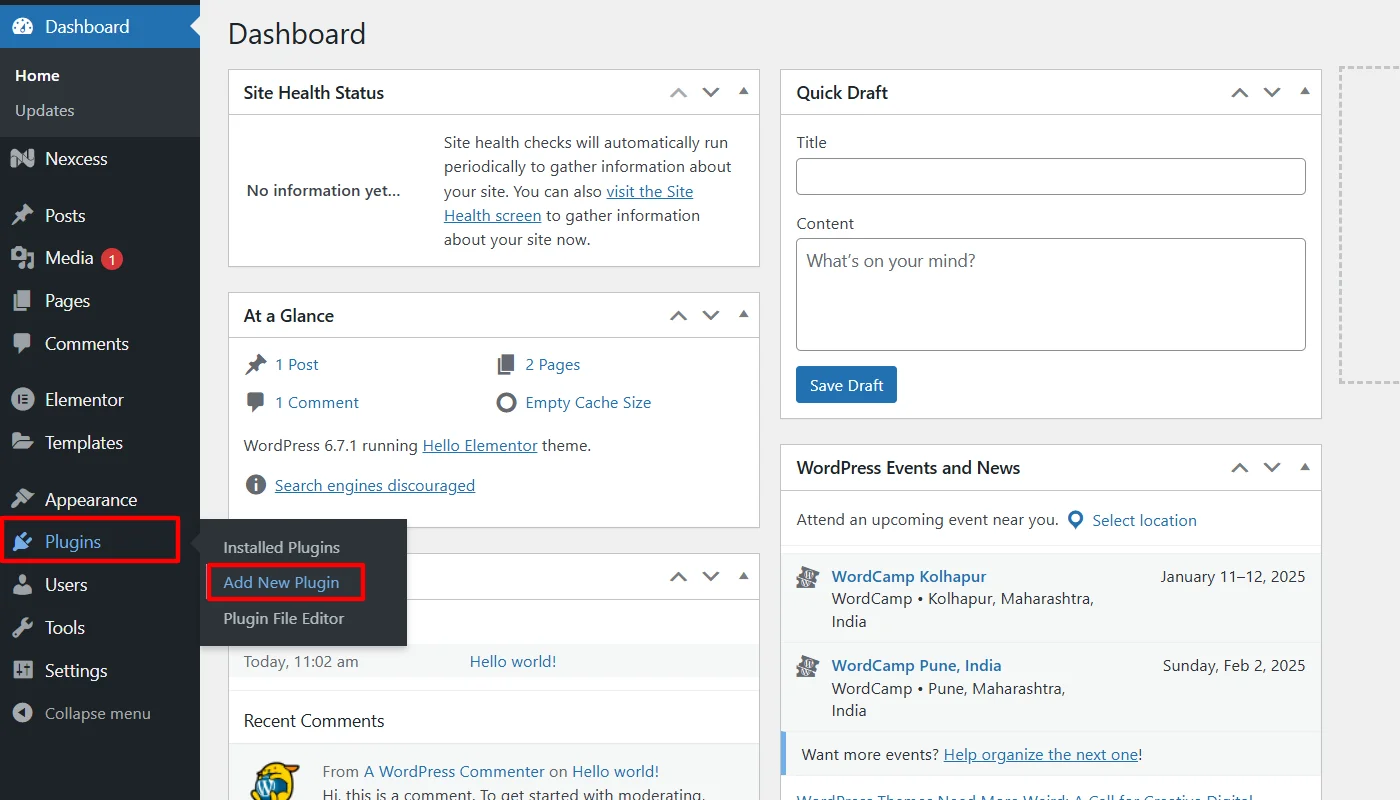
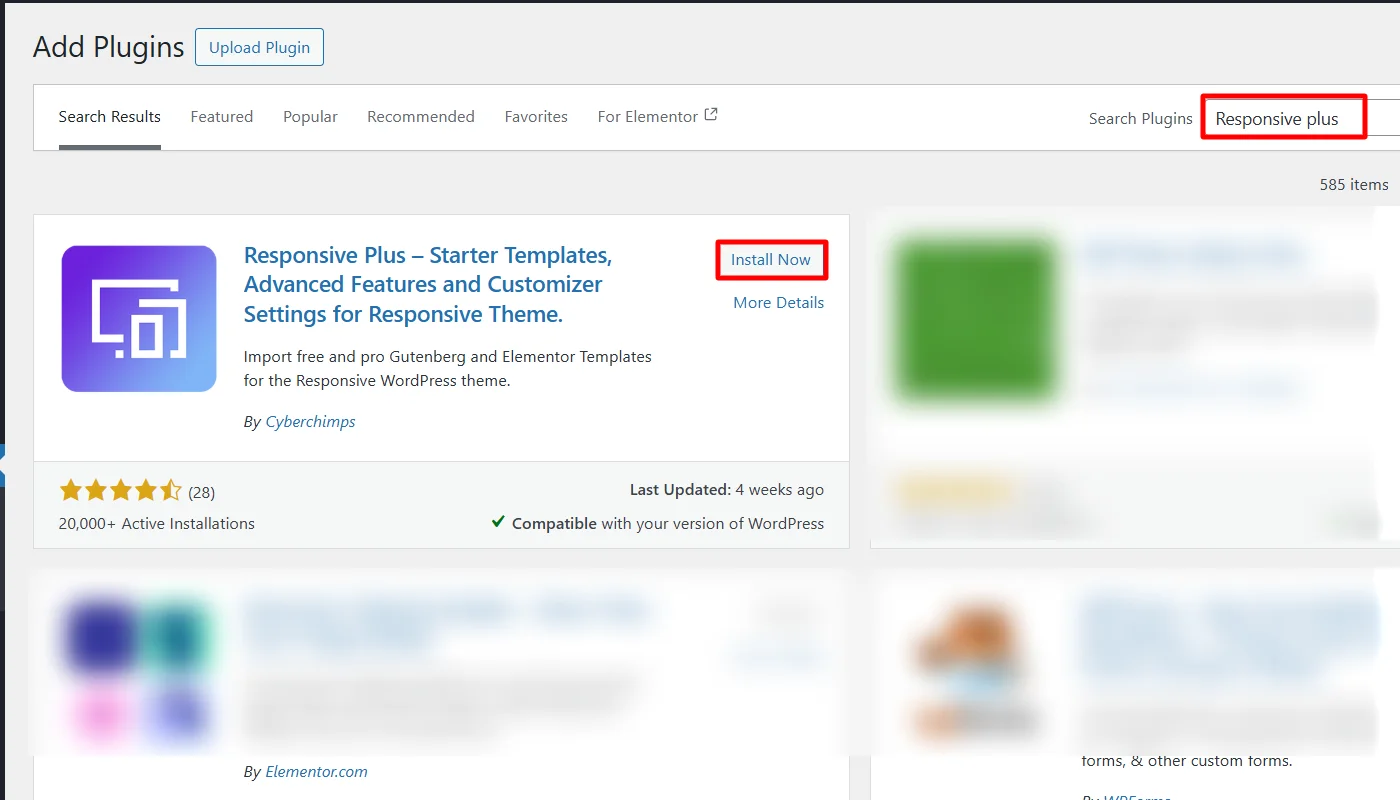
Search the Responsive Plus plugin in the search bar and click Install Now.
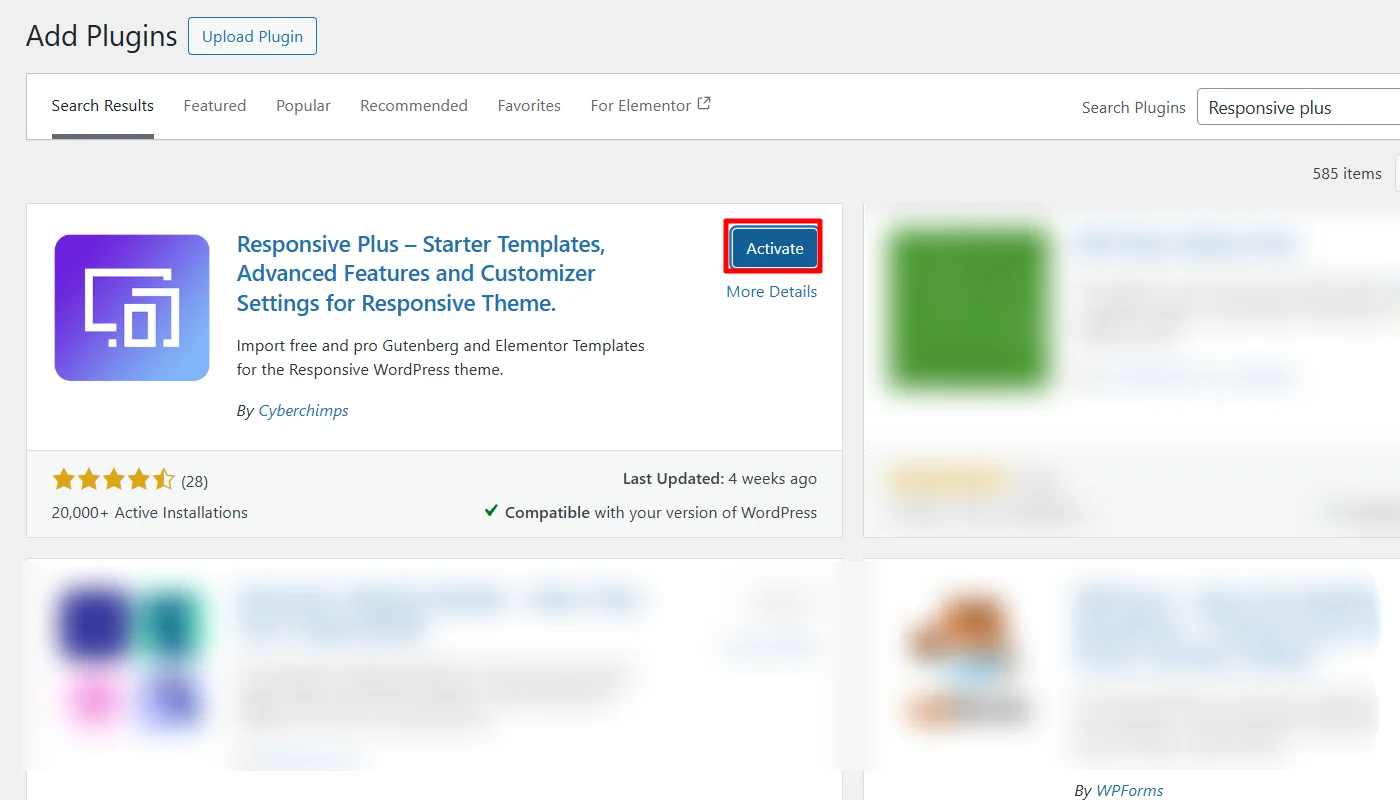
To activate the plugin, click on Activate after installation.
Step 5: Install Wedding Template
Once The plugin is installed and active, let’s understand how you import a template.
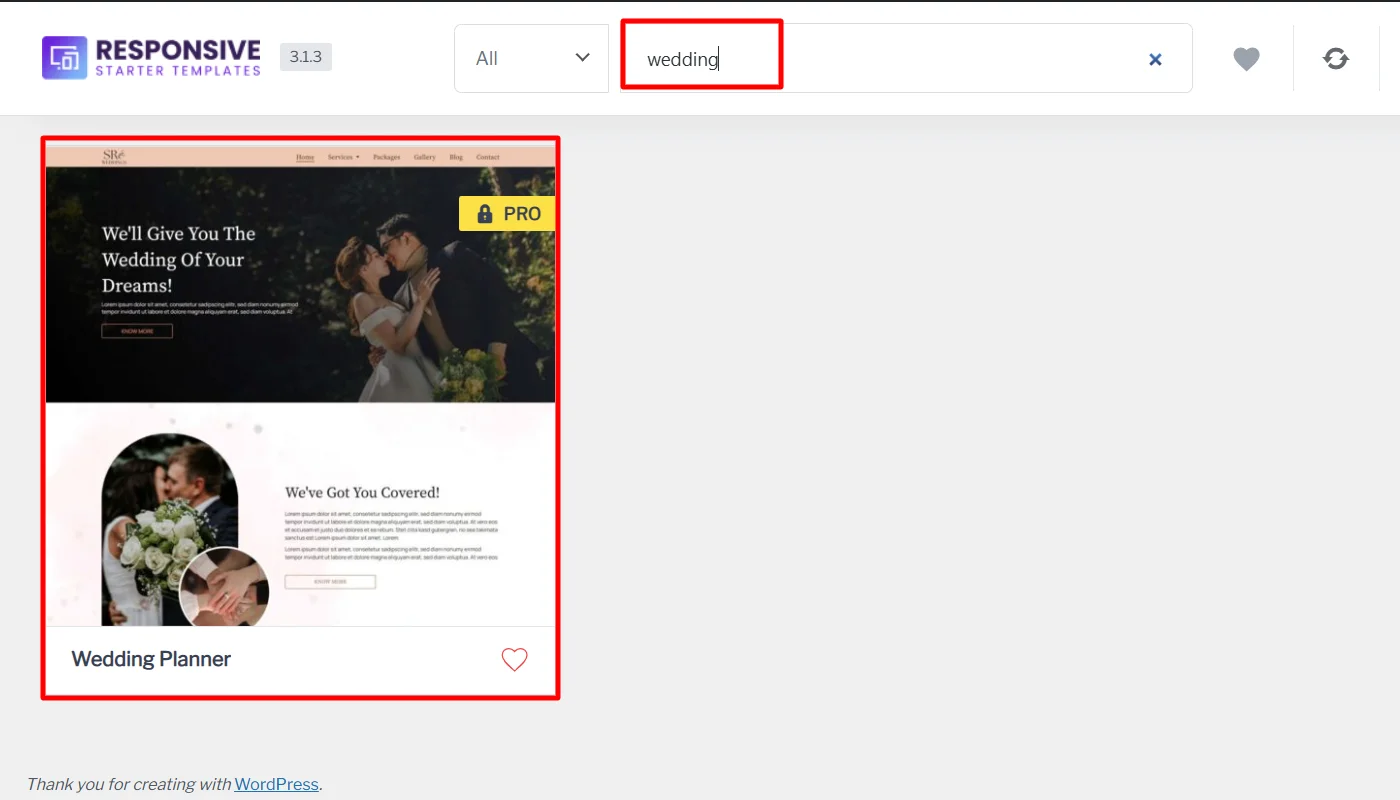
(Note: The plugin offers 250+ responsive website templates for this article, so we will import the wedding planner template. You may also choose another niche-specific template, such as photography, florist, eCommerce, etc.)
Steps to follow to import the business template:
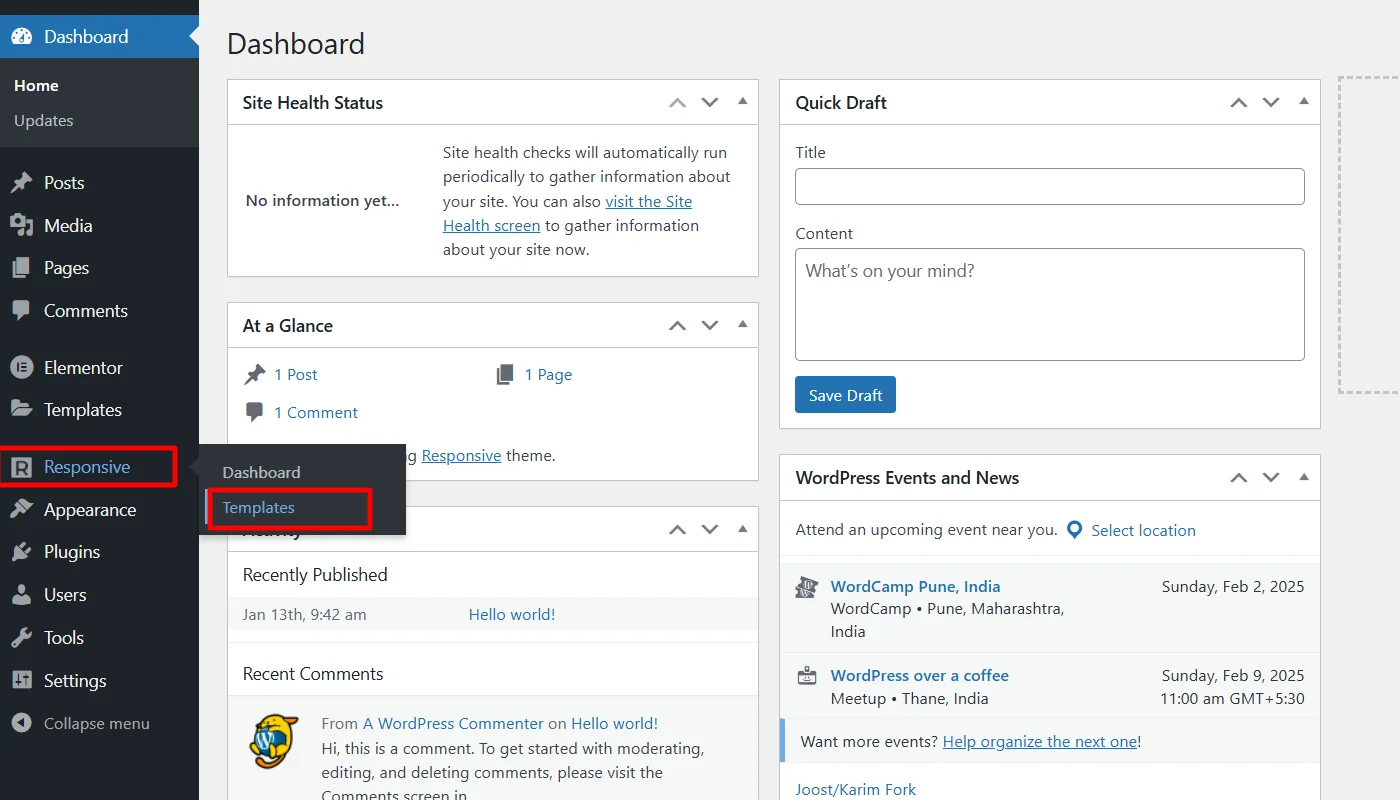
Hover on Responsive and click on the Templates button.
Search for Wedding in the search bar option and click on the Wedding Planner template.
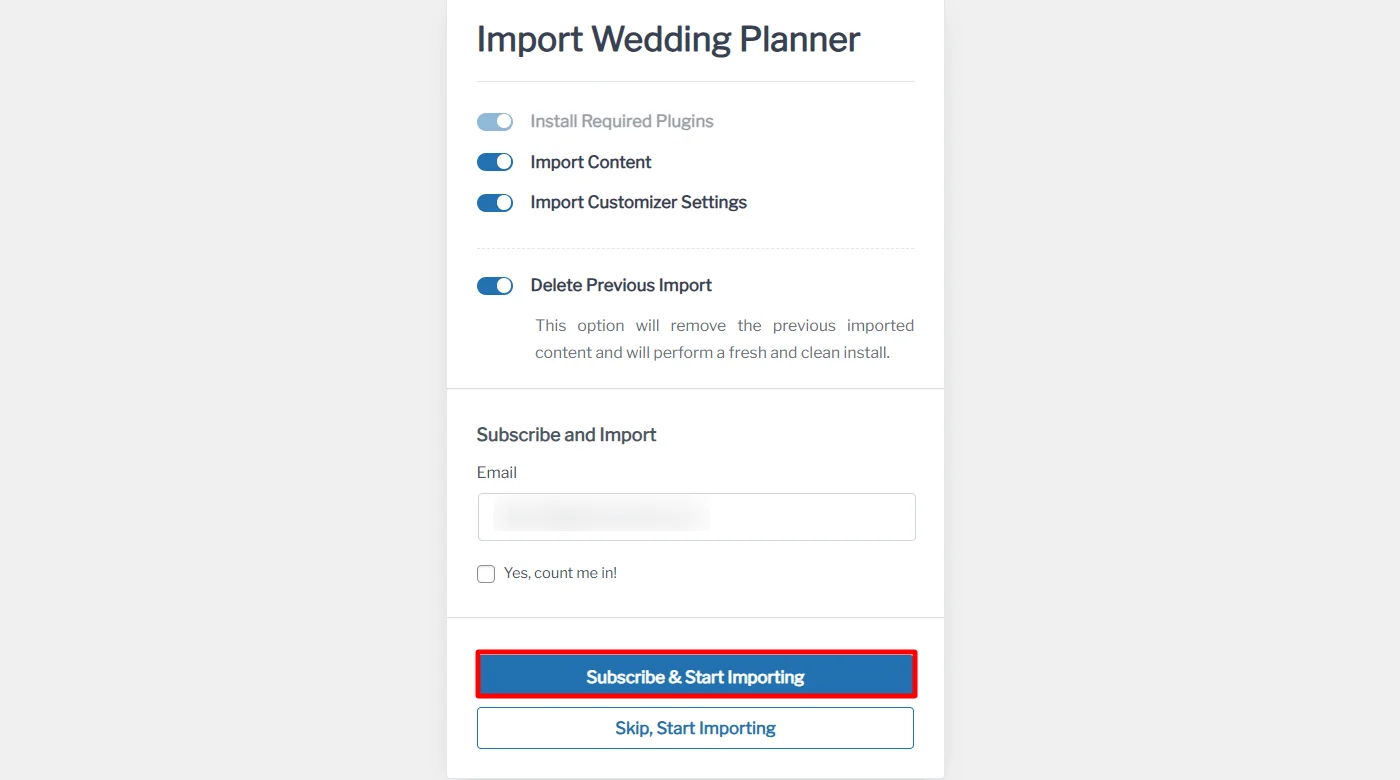
Click on the Import Site button.

Next, click on the Subscribe and start importing button.
Once imported, click on Visit Website.
Once you have launched, your Wedding website will look like this.
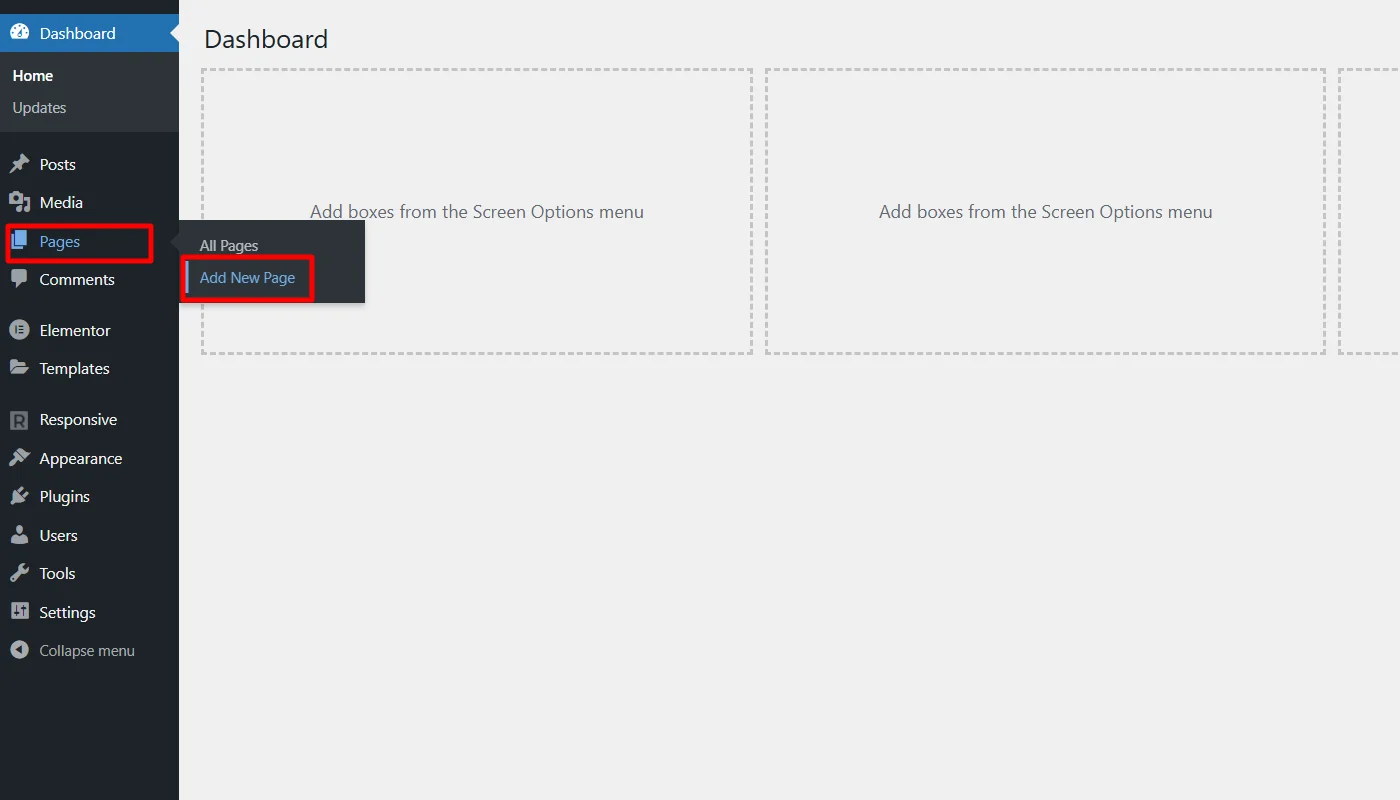
Step 6: Adding New Pages to Your Website
Now that you have installed a template representing your business, you can add new content to your website.
This section will look at how to add new pages and posts to your website.
Adding new pages to your WordPress site is a cakewalk. Click on Pages > Add New on the left pane of your dashboard, and you’ll see a screen like this:
(Note: Don’t worry if your CMS’s text editor looks slightly different. It will have the same functionalities as the one shown above.)
You can add content in the text editor, and your page will be live when you click the Publish button at the top right corner.
Now, let’s look at the four must-have pages on your website:
Homepage
The homepage is the first page users will see on your website. So, make sure your homepage makes a strong first impression!
Your homepage should give a sneak peek of your business. Briefly describe what you do, your USP (Unique Selling Proposition), contact details, and your offerings.
Products/Services Page(s)
This page is your sales pitch. Discuss your products or services extensively. If you sell multiple products or offer different services, create multiple pages for each, depending on the requirement.
Remember to add a call to action button at the end of each page to purchase the product or to contact you for more details about the offerings.
About Us Page
Buyers are curious to know more about the brand they’re doing business with. Use this opportunity to tell the world about what your business stands for.
Talk about your vision, mission, values, and dedication to serving your clients.
Contact Us Page
Visitors need to know how to get in touch with you. The Contact Us page serves this purpose.
Mention your business hours, physical address, phone number, email address, and other applicable contact details.
Depending on your requirements, you can add additional pages. Also, if you are keen on starting a blog to talk about your products business or looking to help your customers solve their problems, you can add Posts similar to Pages.
Step 7: Setting Up a Navigation Menu
Once you have added a few pages to your website, making them easily discoverable for your website visitors is necessary.
Setting up a navigation menu at the top of the page helps us do that.
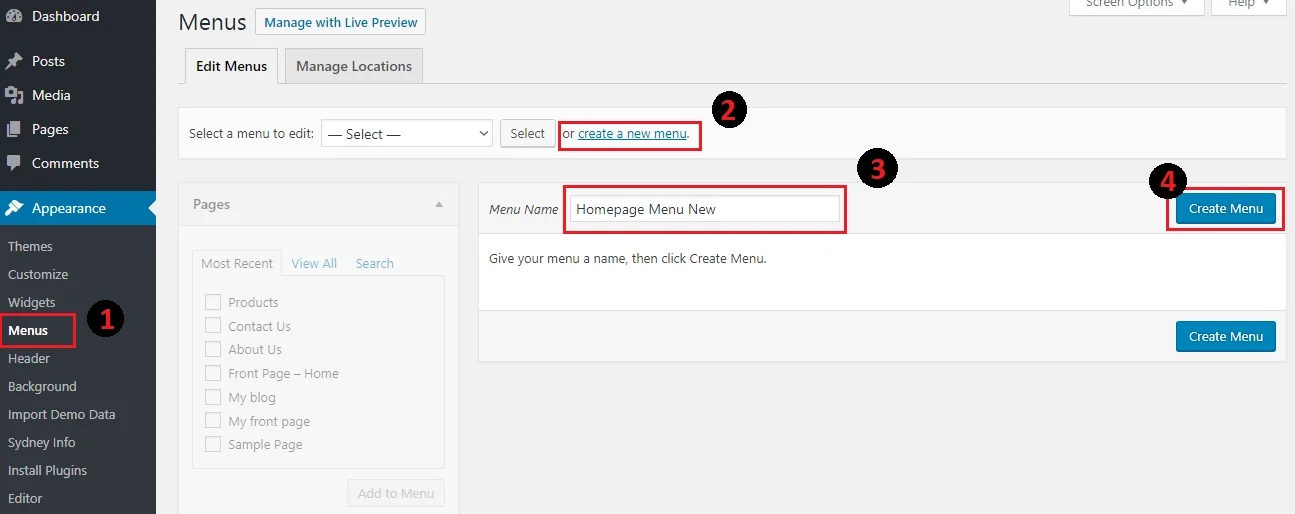
To set up a navigation menu, follow the below steps:
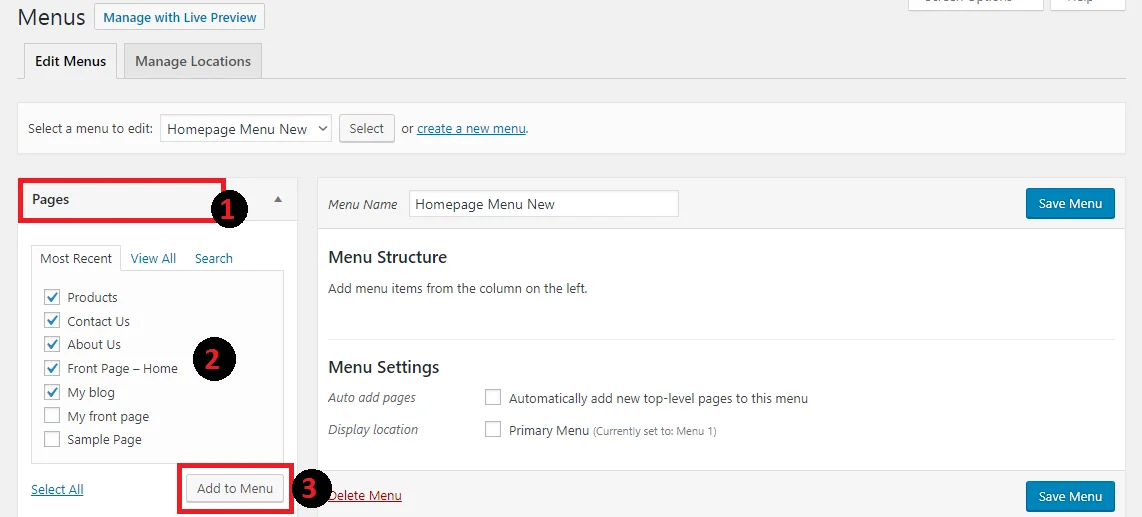
- Go to Appearances > Menu
- 2. Click on Add New Menu
- Type in the name of your menu in the Menu Name text box
- Click on the Create Menu button
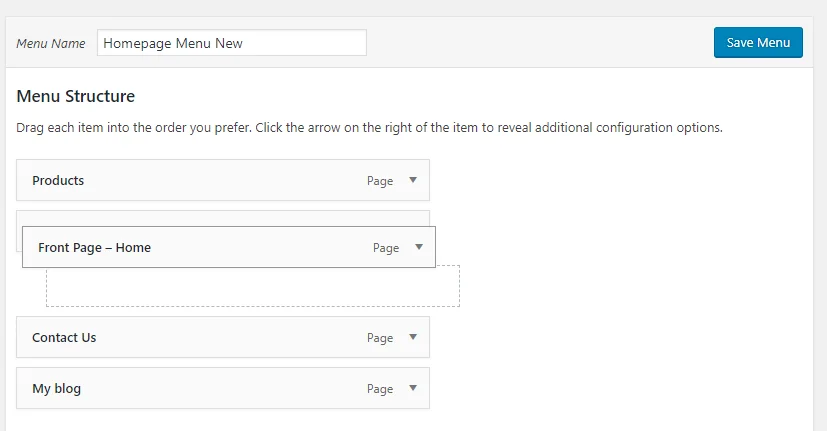
Once you create your menu, you can add pages, pages, categories or external links to it as below:
Once you add menu elements, you can drag and drop to rearrange their order. And once you’re done, hit Save Menu:
After saving the menu, perform the following steps to set it as your primary menu:
- Click on the Manage Locations tab
- From the Primary Menu drop-down, choose the menu of your choice
- Click on Save Changes
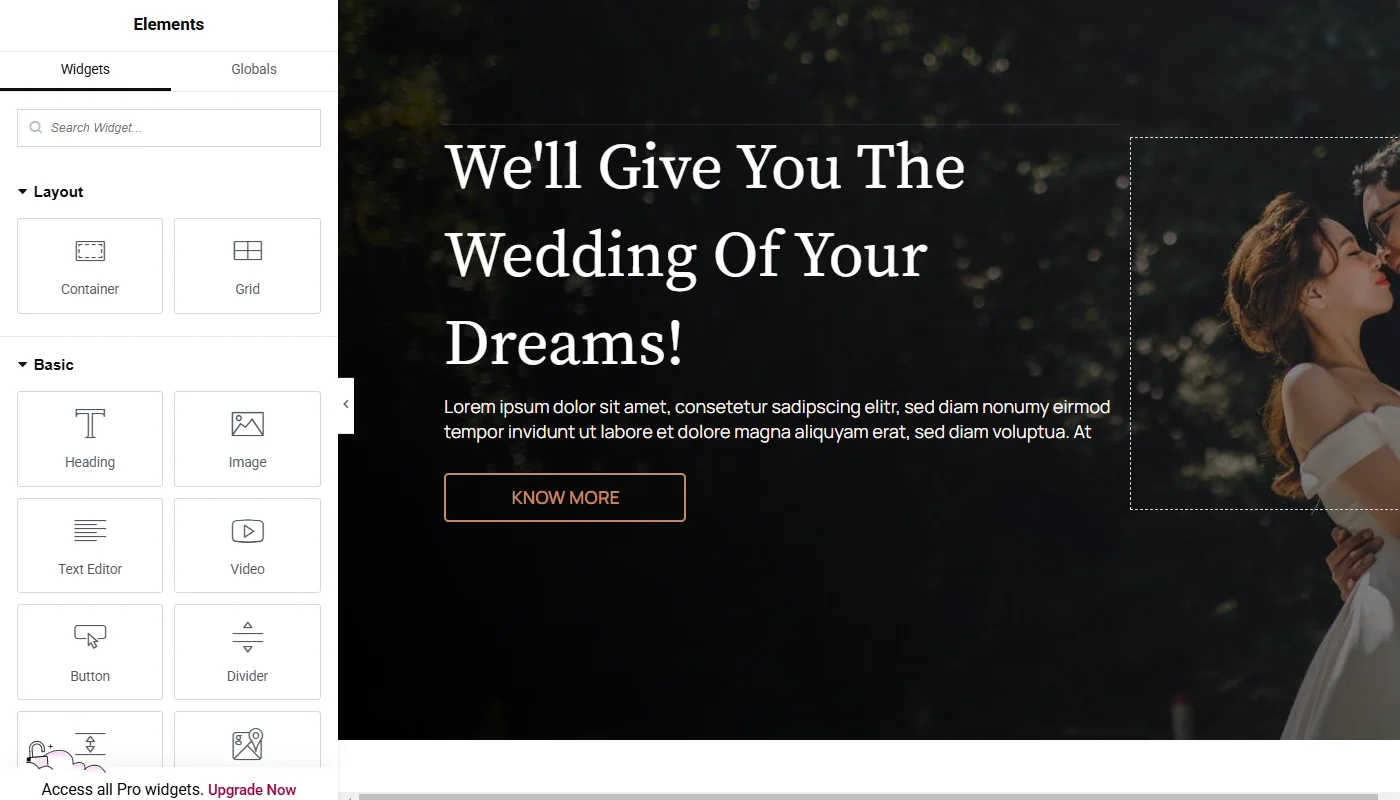
Step 8: Edit Your Content with Elementor
Once you have customized the menus, you can edit the main content of your website by following these steps.
Click on “ Edit with Elementor“.

You get plenty of customizer options for your website, like typography settings, images, videos, buttons, etc.
Step 9: Publish Your Business Website
Once you have customized it, click the Update button. Your business is now live, and you can enjoy your wedding website.
Similarly, the Responsive Plus plugin offers various other templates using which you can make magazine websites, travel websites, blog websites and more.
FAQ
To create a free wedding website with WordPress, you can use the free WordPress platform, choose a free theme like Responsive, and host it on WordPress.com. However, free options have limited features.
Yes, WordPress allows you to create your own website easily without coding. You can customize and design a site with intuitive tools, themes, and plugins to match your needs.
Creating a wedding website on WordPress can be free using free themes, plugins, and hosting options. However, premium themes, hosting, or domains may incur costs.
A good wedding website URL is simple, memorable, and relevant, such as [YourName]and[PartnerName].com or [YourWeddingDate].com. Make sure it reflects your wedding theme or details.
Conclusion
Creating a wedding website with WordPress is straightforward and rewarding. It allows you to showcase your business or personal wedding details professionally.
By following the outlined steps—choosing a domain, selecting hosting, installing WordPress, customizing a theme, and adding essential content—you can build a beautiful and functional website tailored to your needs.
If you liked this article, you can also consider reading:
- What is Elementor? Ultimate Guide for Beginners
- Best WordPress Themes With Pre-Built Elementor Templates
- Best WordPress Website Examples
- Create A Professional Financial Consulting Website with WordPress
Want to create a Wedding website with WordPress? Grab the Responsive Theme now!


