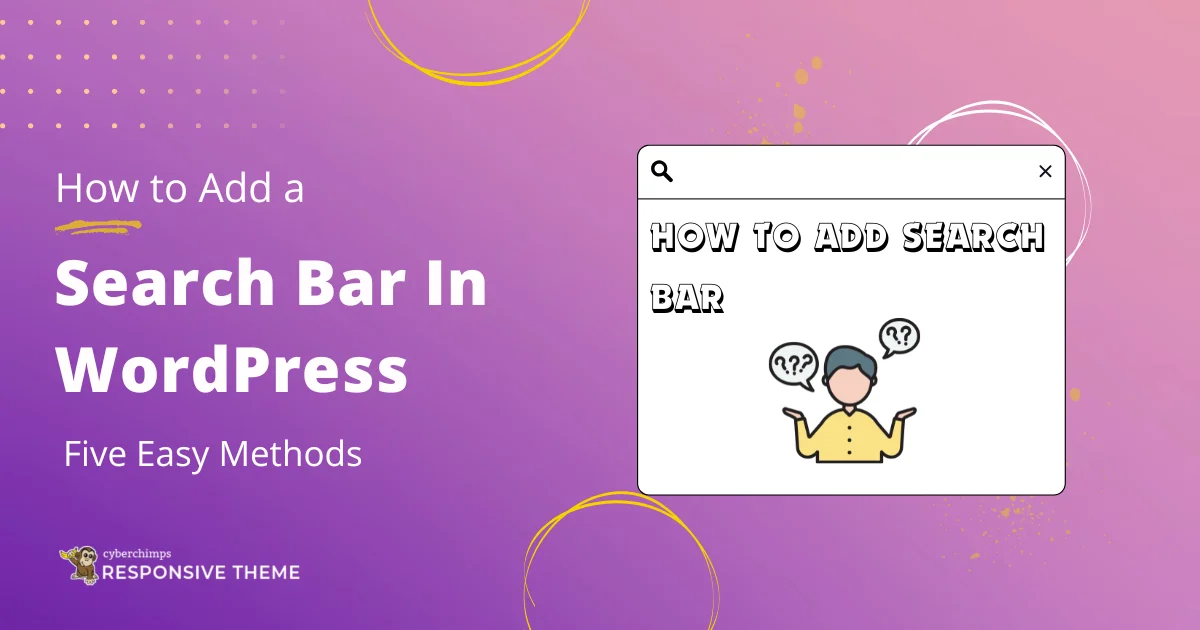
Wondering how to add a search bar to a WordPress website?
Unusually, when a visitor lands on your website, his or her sight, by default, first goes on your website header. As the phrase goes, the first impression is the last; if your user finds something missing, they might not engage any further.
While I say this, it’s a strong recommendation and essential UX practice to include a search bar on your website,
Well, if you are wondering why and how will you be able to do it with ease, then this article is for you.
This article will not only answer your doubts in detail but also will provide you with a step-by-step handbook that ensures you can easily add a search bar to your WordPress site.
Remember to read through till the end!
Why Adding a Search Bar is Important?
Let’s directly dive into the first question first.
Why do you need a search bar on your website? Well, I feel the reason is reasonably practical. The basics of UX studies and practice suggest adding a search bar to your website:
- Enhances user experience with a fast and efficient browsing experience.
- Improves navigation while users look for something specific on your site.
- It keeps users engaged and spends more time on your site, improving the likelihood of conversions.
- Contributes to the betterment of the overall website’s accessibility and performance score backed by solid surveys and user behavior studies that found:
Moreover, there have been numerous studies that found the need for a functional search box on any website:
- Nearly 30% of website users tend to use a search bar when they land on your website. The absence of a poor search experience leads to disappointment in these users, which might also lead to these customers bouncing back and never returning to your site.
- When users land on your site, they are most likely to have some specific intent or expectations, and when they want them fulfilled, they use the search box to find it directly.
A study by BigCommerce found that nearly 72% of websites have an unoptimized or nonfunctional search box. The result is simple user disbelief in your business. Moreover, this increases the likelihood of these users landing on your competitor’s websites.
- You may say the third reason or study is directly or indirectly related to your business growth and profits. A study conducted by Neil Patel and the team found that people who use the search feature on your website successfully are more likely to convert than regular users, with a likelihood of around 216%.
Huge, ain’t it? Moreover, these users also tend to spend 2.6 times more than other users on your website. Hence, you can say having a functional search box on your site means having more business in your revenue box.
Well, with all these surveys and studies combined, it’s clear why your WordPress website must have a search box.
Ways to Add a Search Bar in WordPress
Now, with all the research and facts that we know about why your website must have a search bar, let’s explore some easy ways that will help you add it to you WordPress site.
During the preparation of this guide, I used multiple methods and strategies. Based on my study and experience, I have found five methods that are easy to perform.
You can use any of these at your convenience.
1. Using Theme
I found this method the most convenient when adding it to the list.
The WordPress repository boasts over 50000 themes that offer you the basic framework. Moreover, with the customization panels of these themes, you can build your site from scratch and add the required functionalities.
However, you must note that not all WordPress themes offer the same functionality and features. Moreover, many of them don’t even provide you with the feature to add a search box.
While researching, I tried nine to ten themes, some of which were useful. One theme that I found most convenient and would also suggest you use is the Responsive Theme by Cyberchimps.

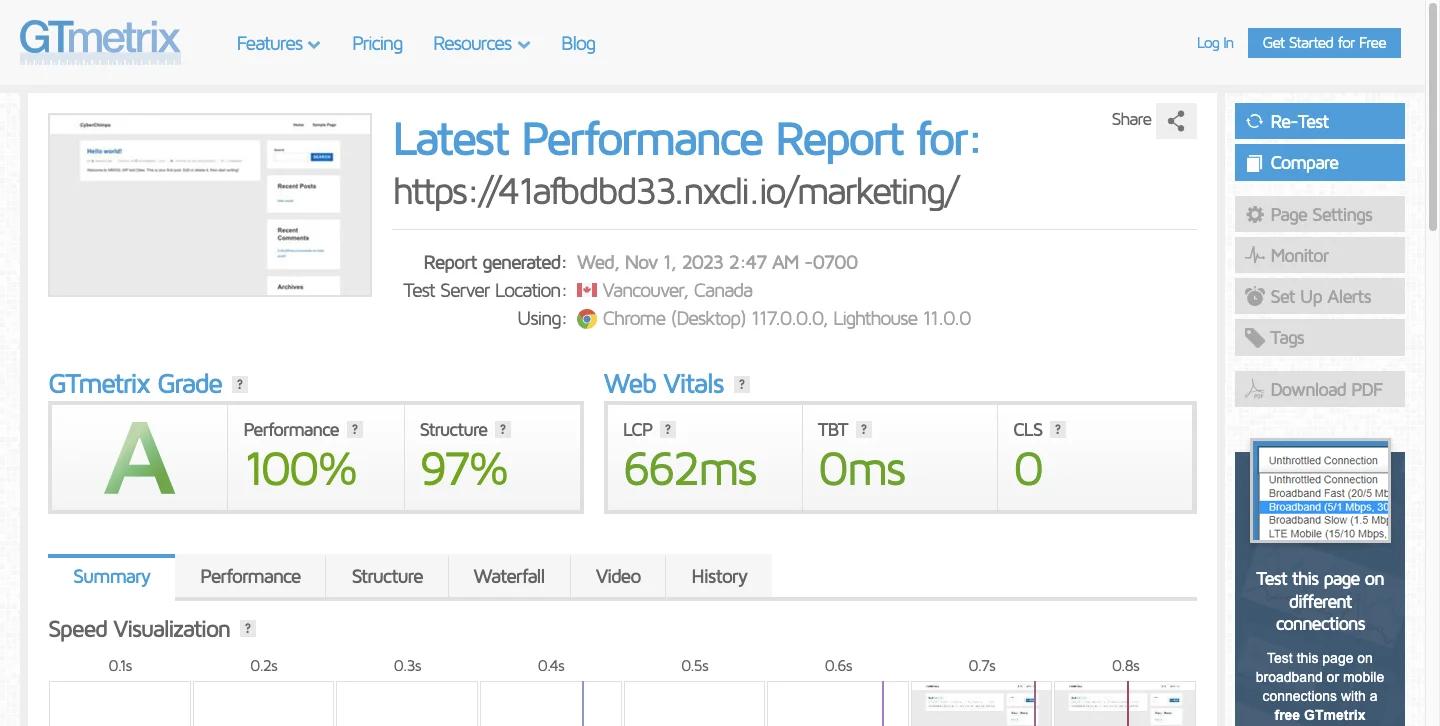
Developed by Cyberchimps, it is a simple yet feature-rich versatile theme that is fast and lightweight and boasts a high GTMetrix score of 100%,.
The theme is rated five-star by more than 500 people and serves diverse requirements.
Features of Responsive Theme
1. Design and Customization
The Responsive theme offers extensive customization options, allowing you to edit and modify all of your website’s elements.
Additionally, the theme integrates seamlessly with its sister plugin:
Responsive Plus – Starter templates: This plugin offers 250+ WordPress starter templates single click import for Elementor and Gutenberg sites.
Responsive Addons for Elementor: It provides over 80 highly functional widgets to design and add versatile functionalities if you are using Elementor page builder to develop your website.
Responsive Blocks: This plugin offers 50+ Gutenberg Blocks to add functional features to your site if you are using WordPress’s classic website builder.
2. Speed and Performance
The Responsive Theme is lightweight and designed to encourage high performance.
To check the site’s speed test, we imported ten templates to our dummy site and tested the page speed after each import. Each time, with all the pages, our dummy site weighed less than 100 KB and loaded in less than 2 seconds.
3. Mobile Friendliness
As the name suggests, the theme is responsive and allows you to customize your site for all types of devices with its customizer.
4. Plugin Compatibility
The theme is compatible with and works smoothly with all popular third-party plugins.
5. SEO Friendliness
Built to ensure semantic search practices, the Responsive theme promotes search engine visibility.
Furthermore, the theme includes schema microdata and SEO-enhancing features, which assist crawlers in better-comprehending websites.
How to Add a Search Bar in WordPress Using the Responsive Theme
Follow the following steps to add a search bar in WordPress using the Responsive theme:
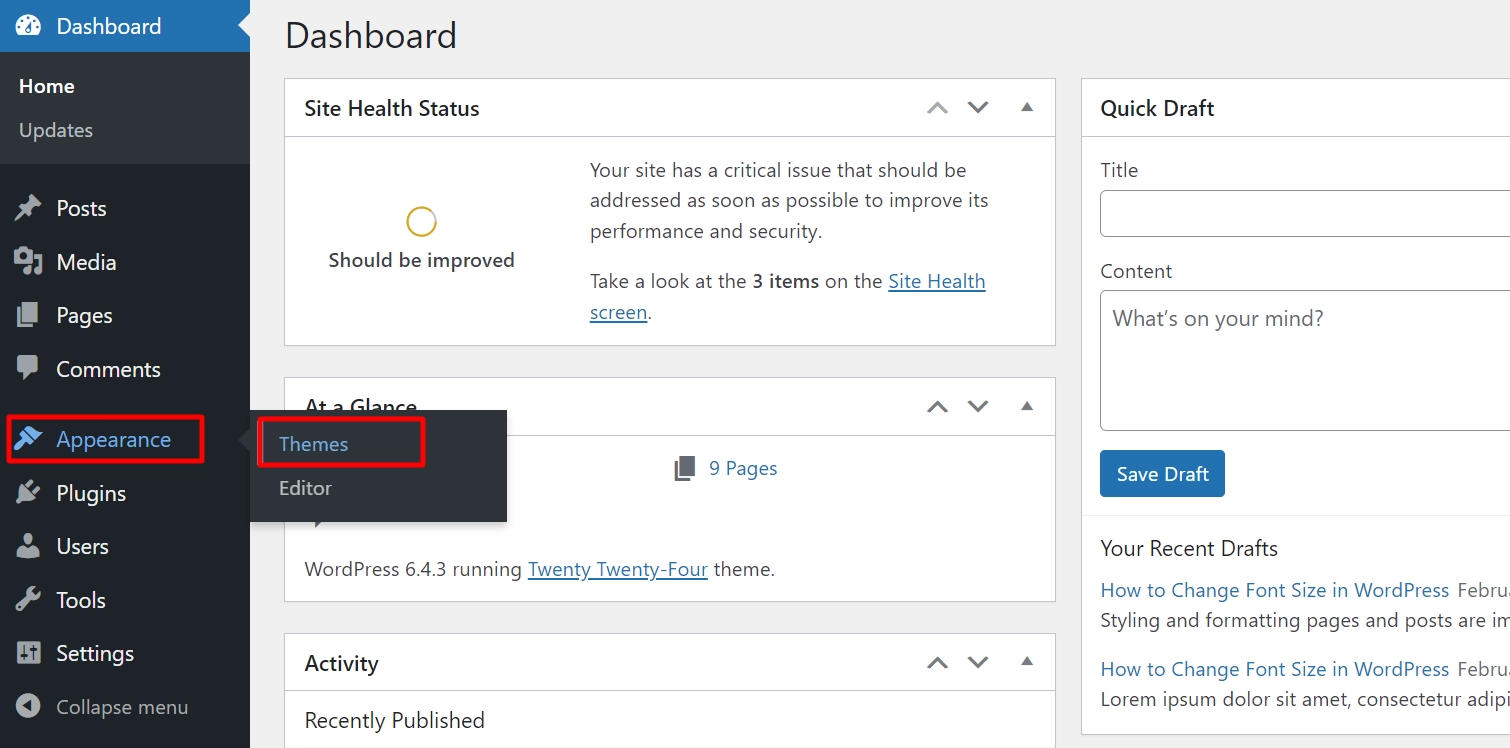
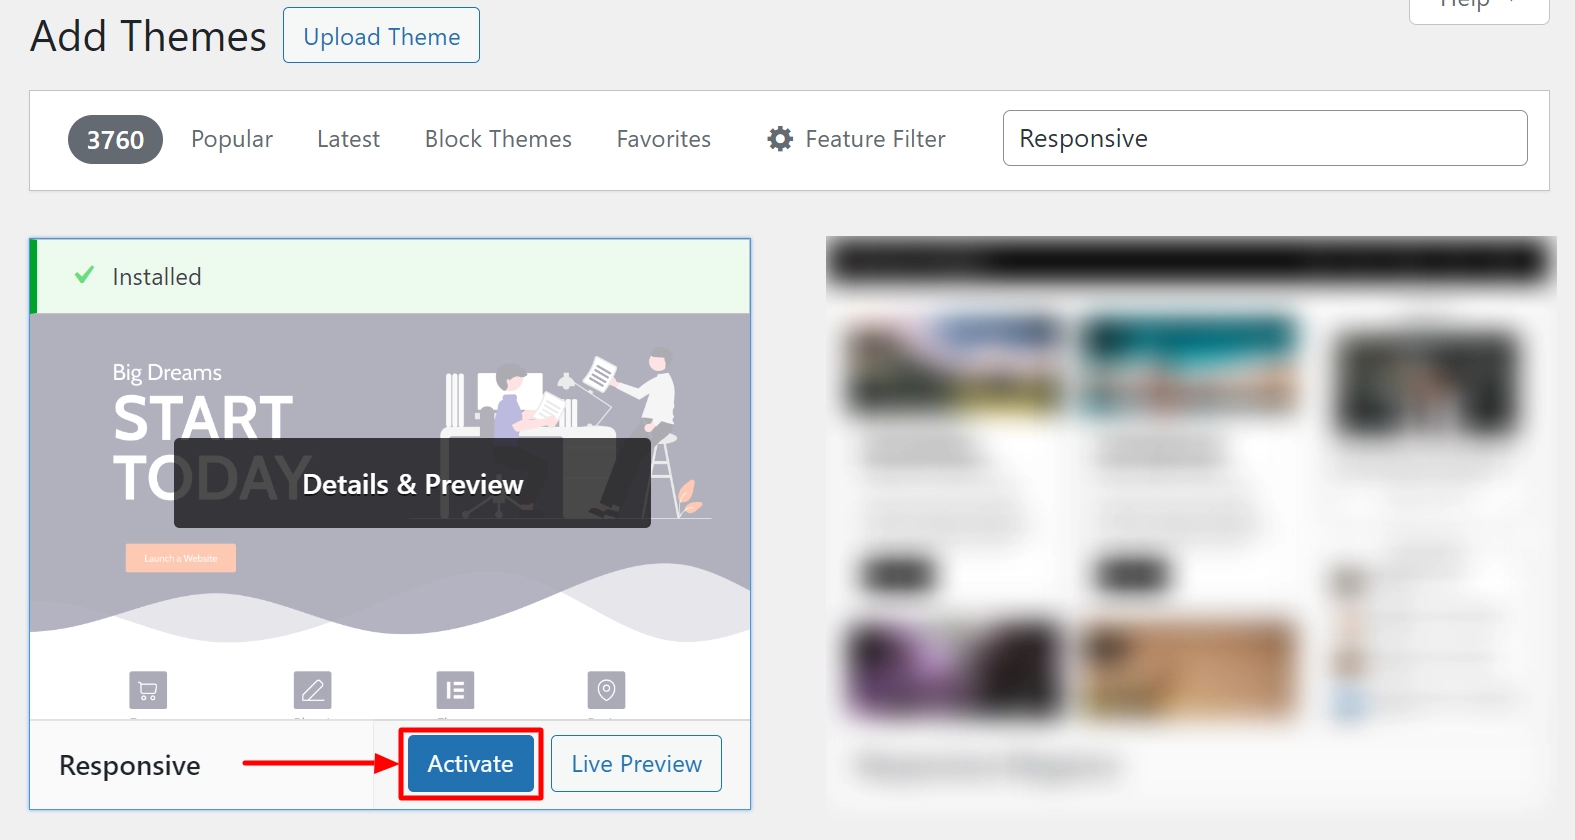
Step 1: Install and Activate the Responsive Theme
Go to your WordPress dashboard and navigate to Appearance > Themes.
Next, click Add New.
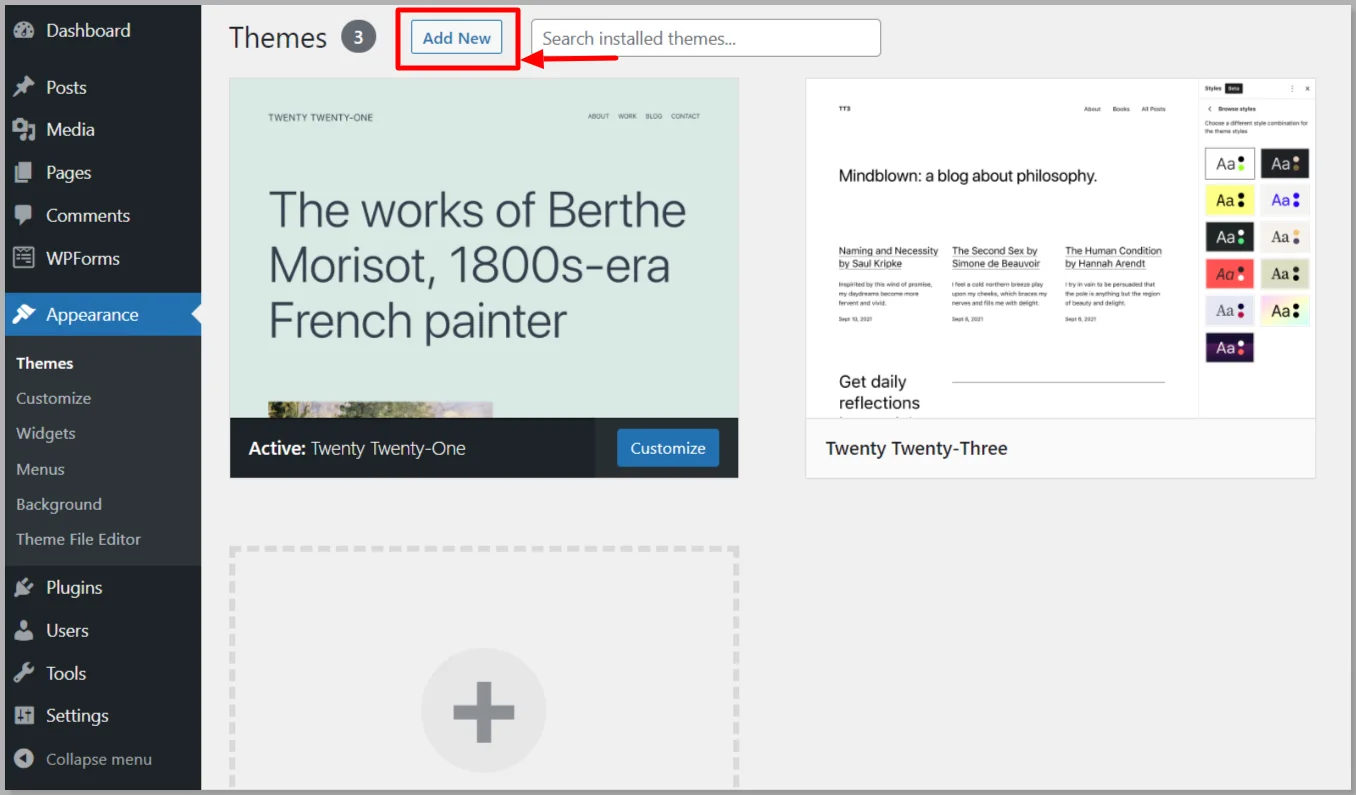
Search for the Responsive Theme and click Install.

Click Install Now and then Activate.
Step 2: Add the Search Widget
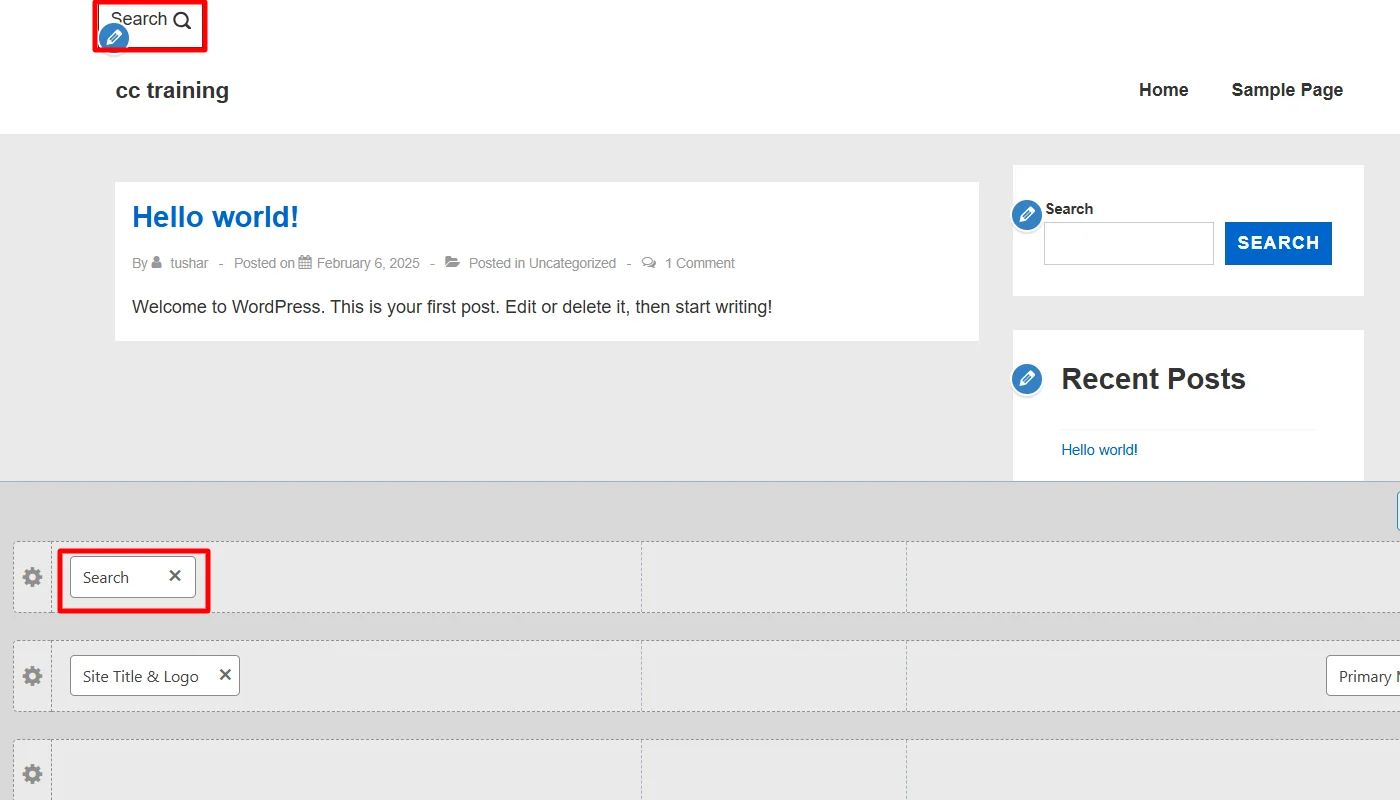
Once the theme is active, navigate to the WordPress Dashboard and click Appearance > Customize.
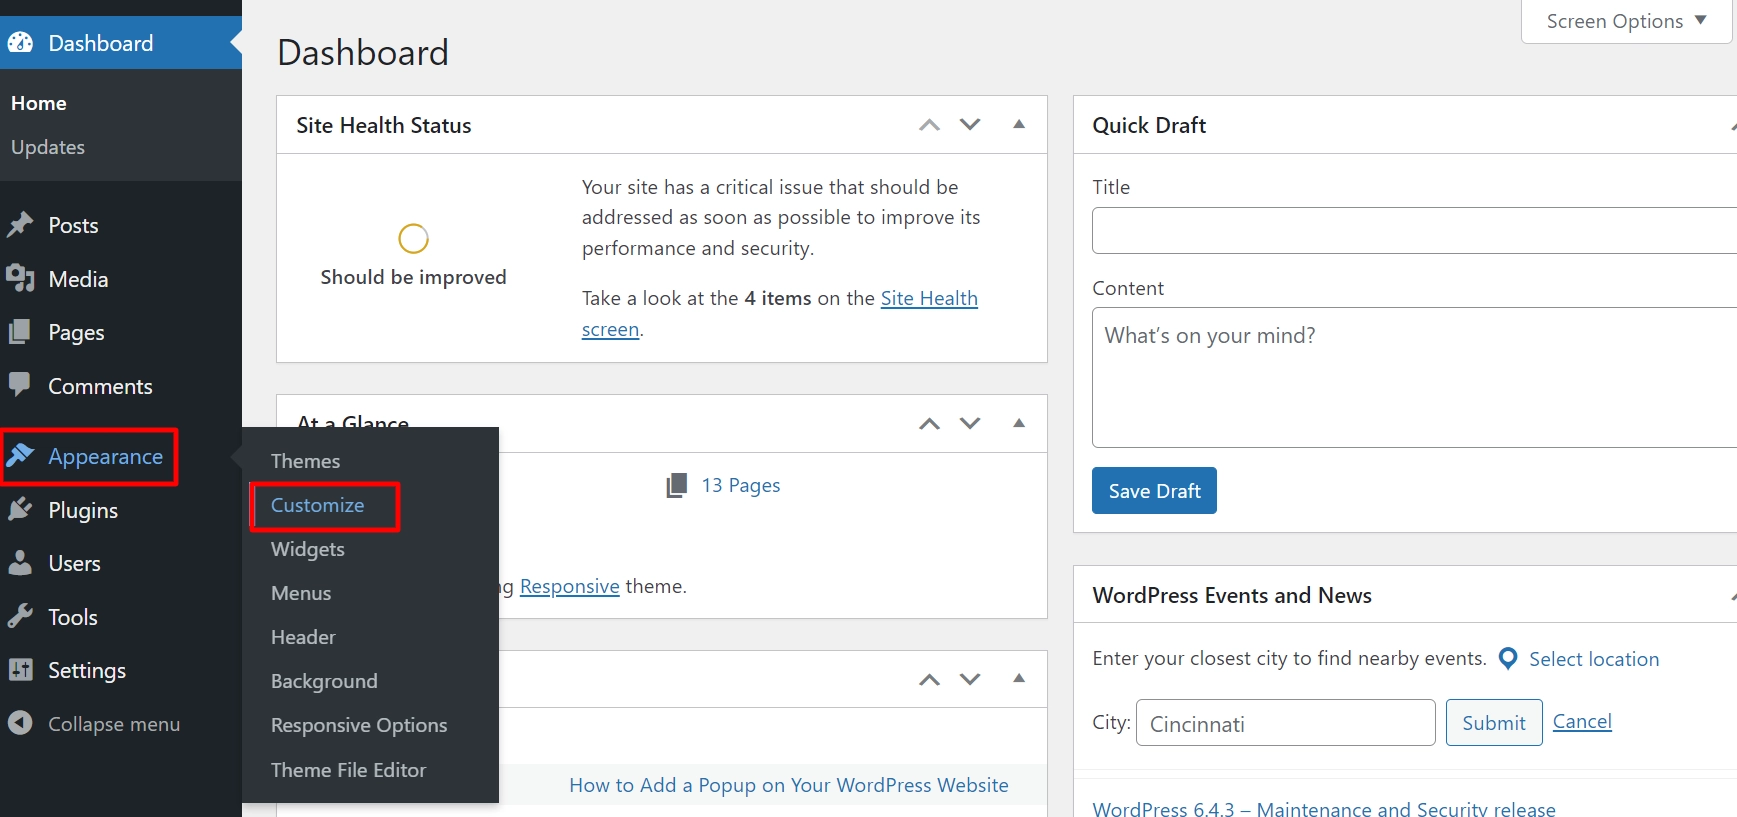
From the customizer, click on Header.
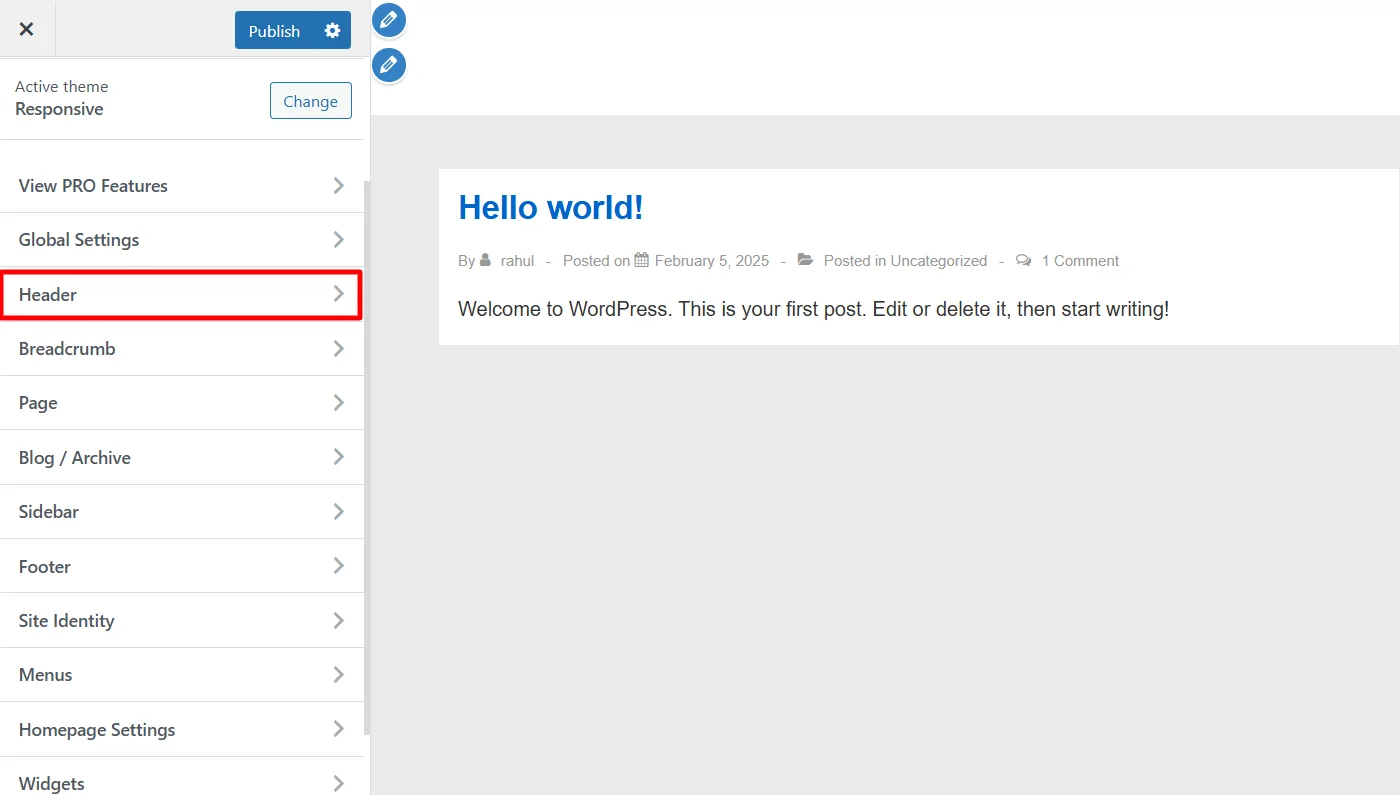
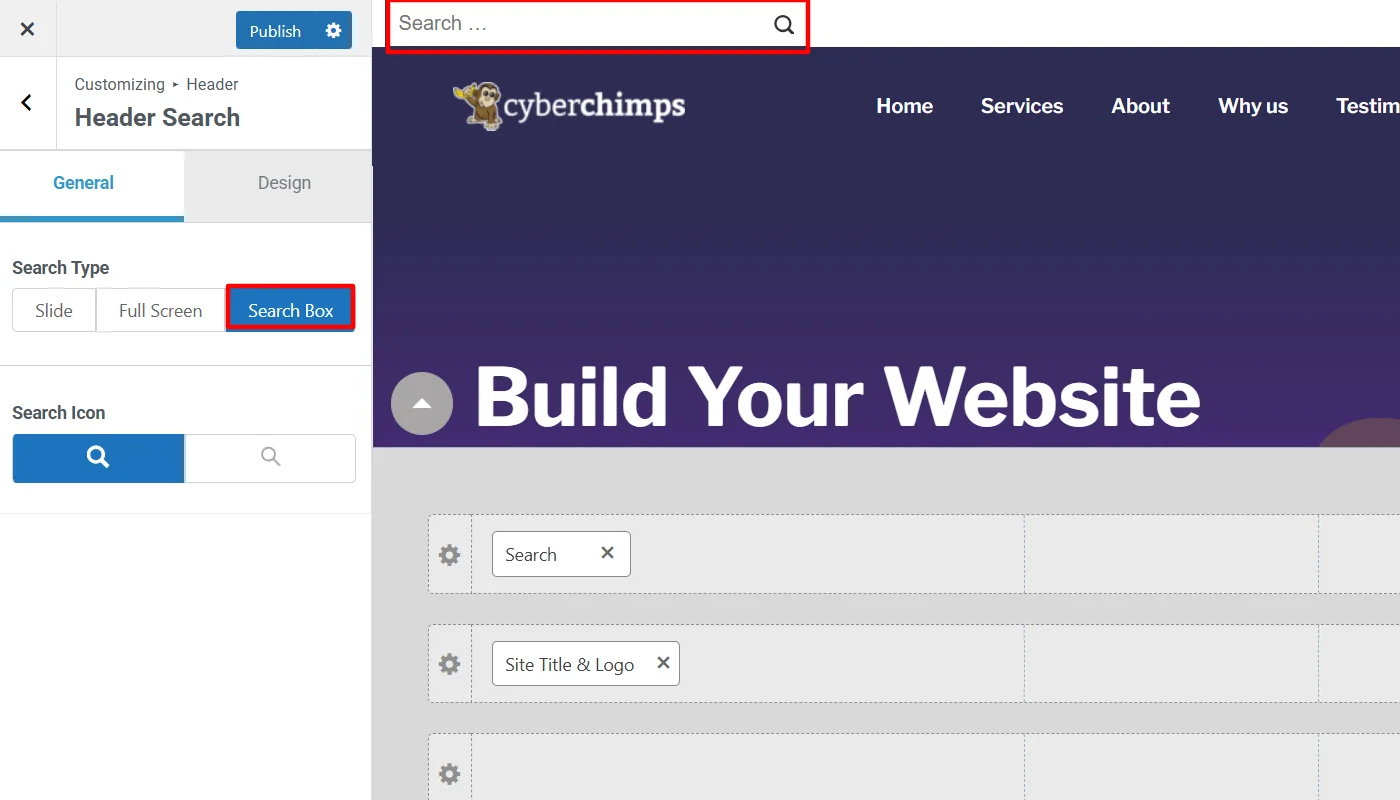
The header settings contain various widgets that can be added to the page. Locate the Search Bar widget, drag and drop it, and align it to a suitable location on your website header.
The responsive theme’s customizers control allows you to add the widget to different locations in the header. You can drag the widget among different rows and positions to align it wherever you want.
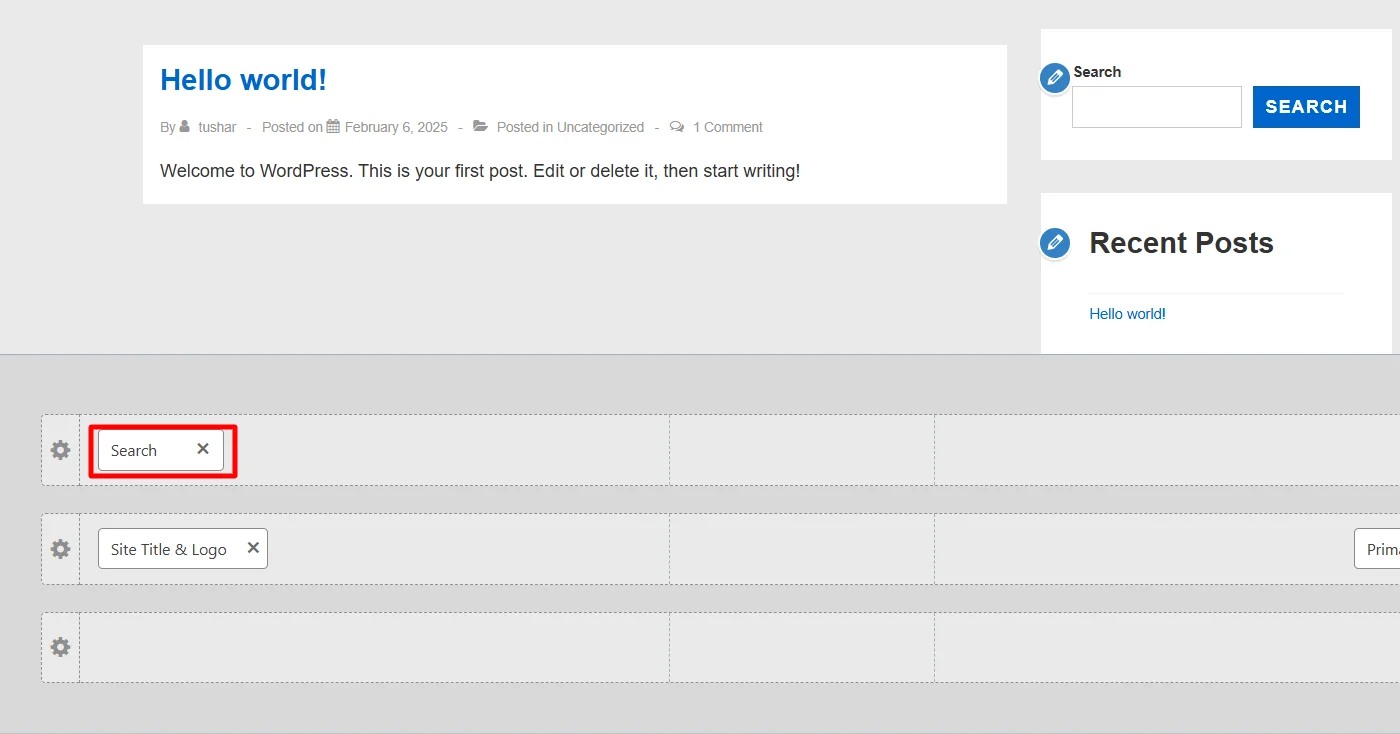
In the image example below, we have aligned the search widget in the top header in the left corner. Meanwhile, the other widgets, including the site title, logo, and primary menu, are in the middle.
Further, the Cyberchimps Responsive theme also allows you to customize. To customize the appearance of the search box, click on the widget where you aligned it.
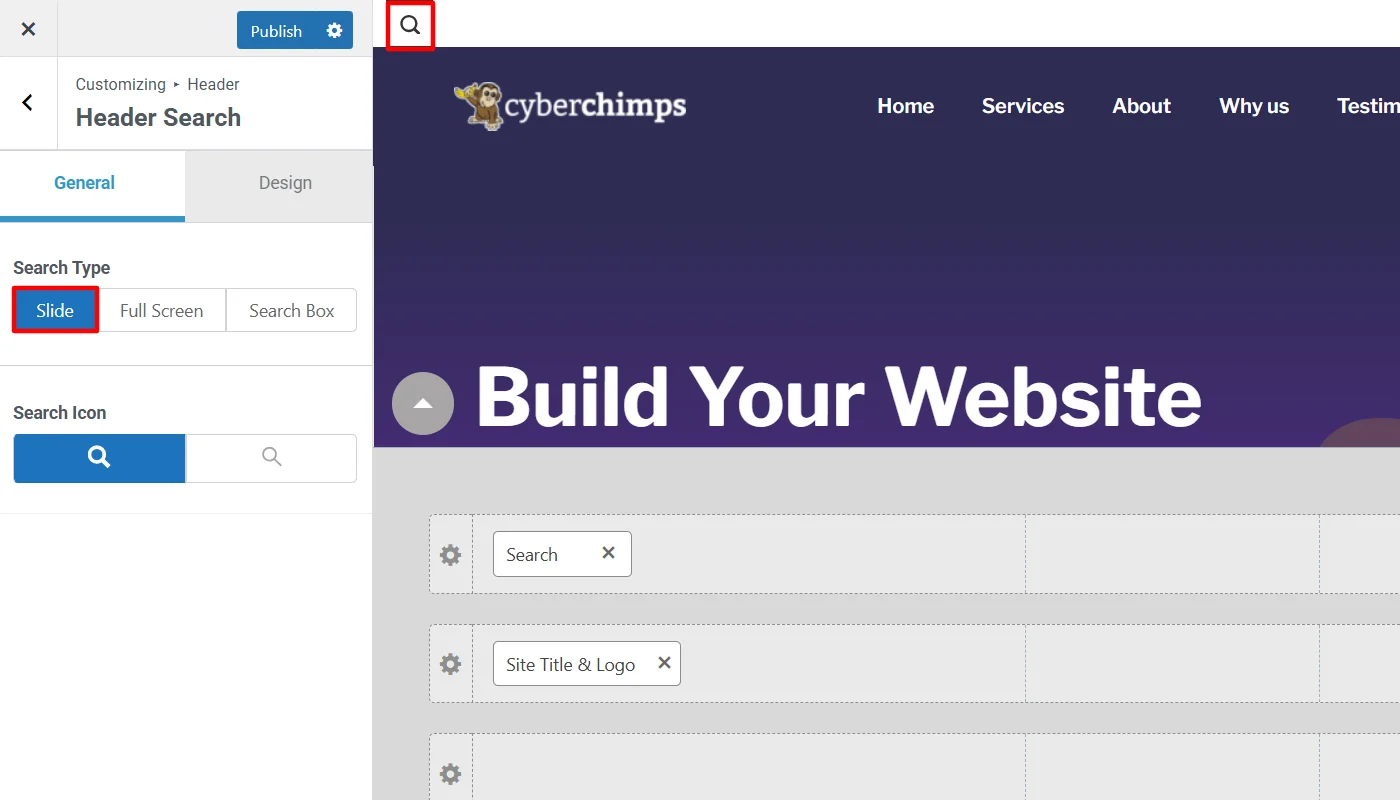
The search bar offered by Responsive Theme Customizer are available in three different types:
1. Slide: This appearance provides you with a small search icon at the top left of your website, which users can click and can use the search bar.
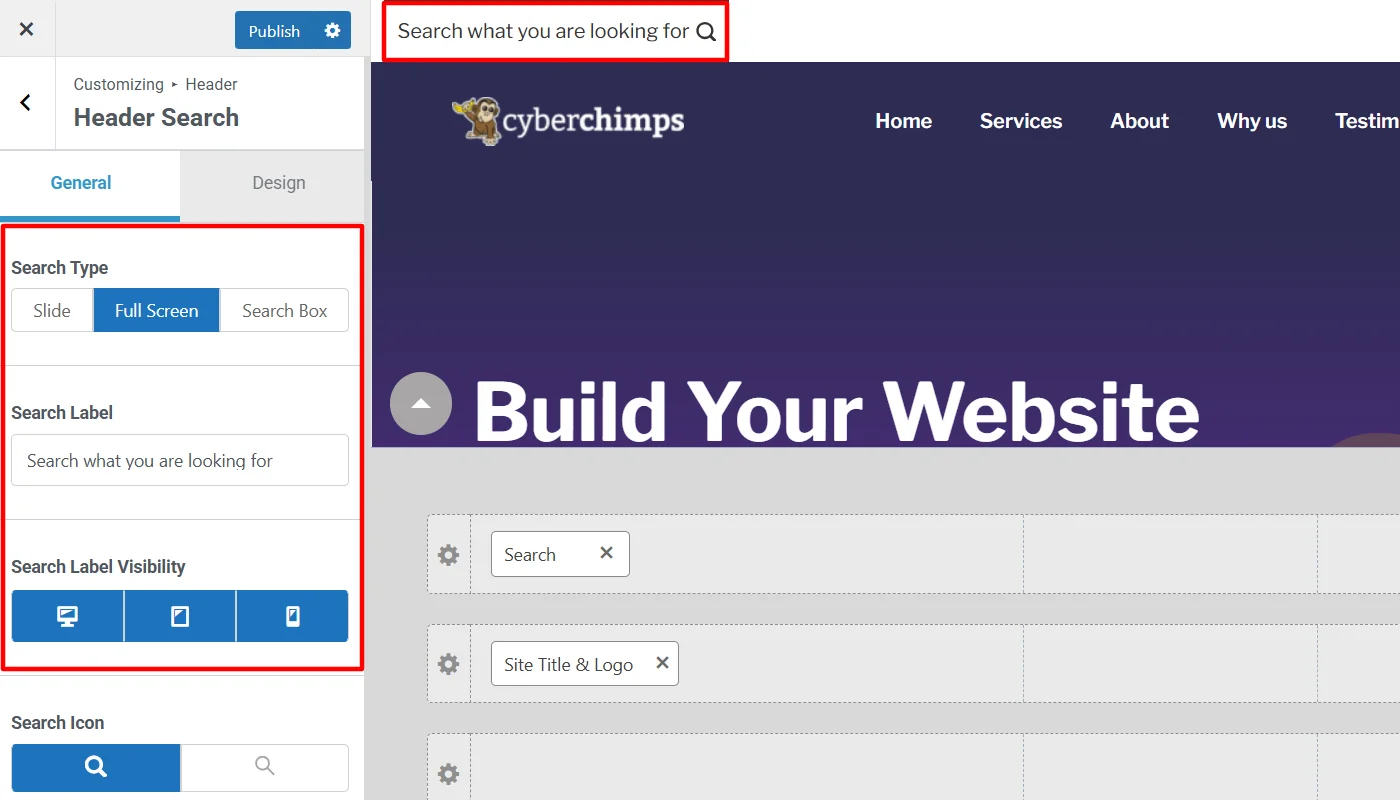
2. Full screen: If you choose this search bar display, the search box appears in the top left of the website with any customized message in the search screen (The message you want to display can be enabled and disabled depending on size screens)
3. Search box: The search box appearance gives a simple search panel display to the left of your screen with a text display of the search.
Further, whatever appearance you choose for the search bar can be better styled and designed by clicking on Design, that gives you the following options:
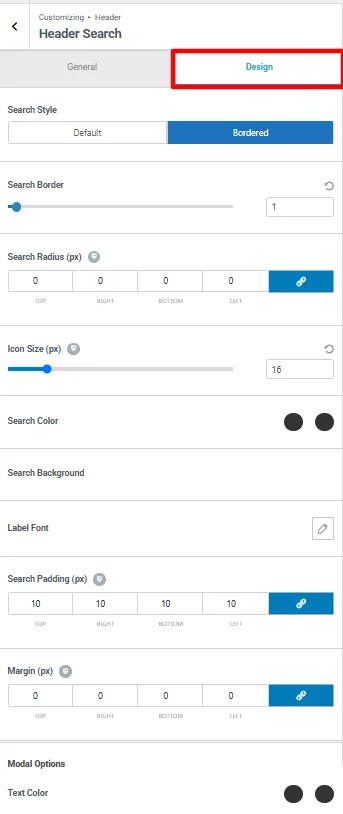
Syle: Allows you to set the appearance of style bar either with the default look or add a border.
Border: If you choose the bordered style this allows you to adjust the thickness of the border.
Radius: This allows you to adjust the radius of your search bar from each corner.
Icon Size: Lets you adjust the size of search icon size in the search bar.
Search Color: It allows you to set the color of the search bar.
Search Background: With this option you can set a specific background color of search bar when someone hovers over the search bar.
Label Font: This allows you to set the font and typography of the text in search bar.
Search Padding: Helps you set suitable padding for search box.
Margin: This allows you set the margin width of the search bar.
2. Using Widget Panel
The Widget Panel is suitable for users who prefer a straightforward method of improving their website’s usability without extensively modifying page layouts.
This method is ideal for those who want to add a search bar quickly and easily without using any page builder, but before we understand how to add a search bar using a widget panel, let’s understand it better.
What is the Widget Panel?
The WordPress Widget Panel is a built-in feature that allows users to add various elements to their website’s sidebar, footer, and other widget-ready areas. It provides a simple and efficient way to customize site functionality without needing additional plugins or coding.
These widgets can include recent posts, categories, custom HTML, and, most importantly, a search bar.
How to Add a Search Bar in WordPress Using the Widget Panel
Using the widget panel, let’s break down the step-by-step process to add a search bar.
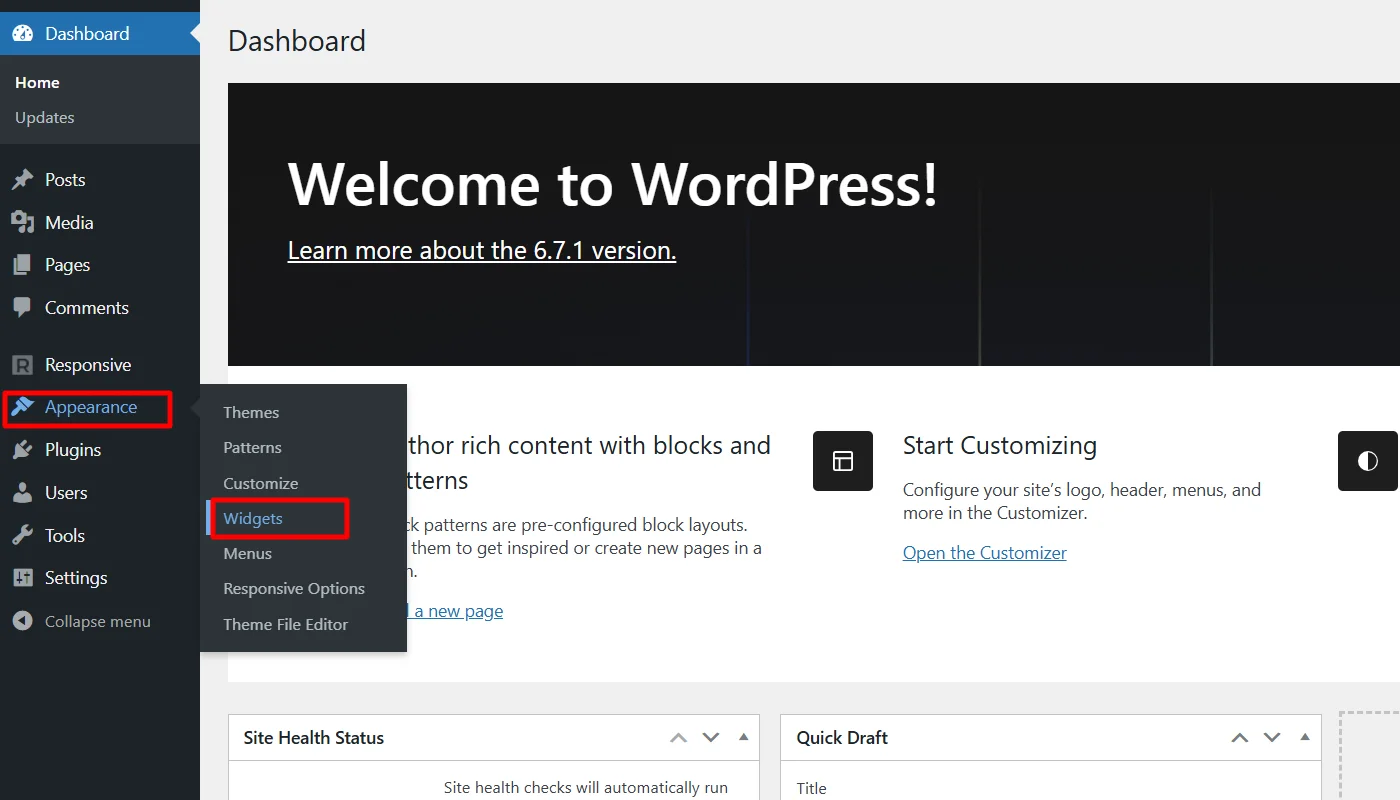
Step 1: Access the Widget Panel
Go to your WordPress dashboard and navigate to Appearance > Widgets.
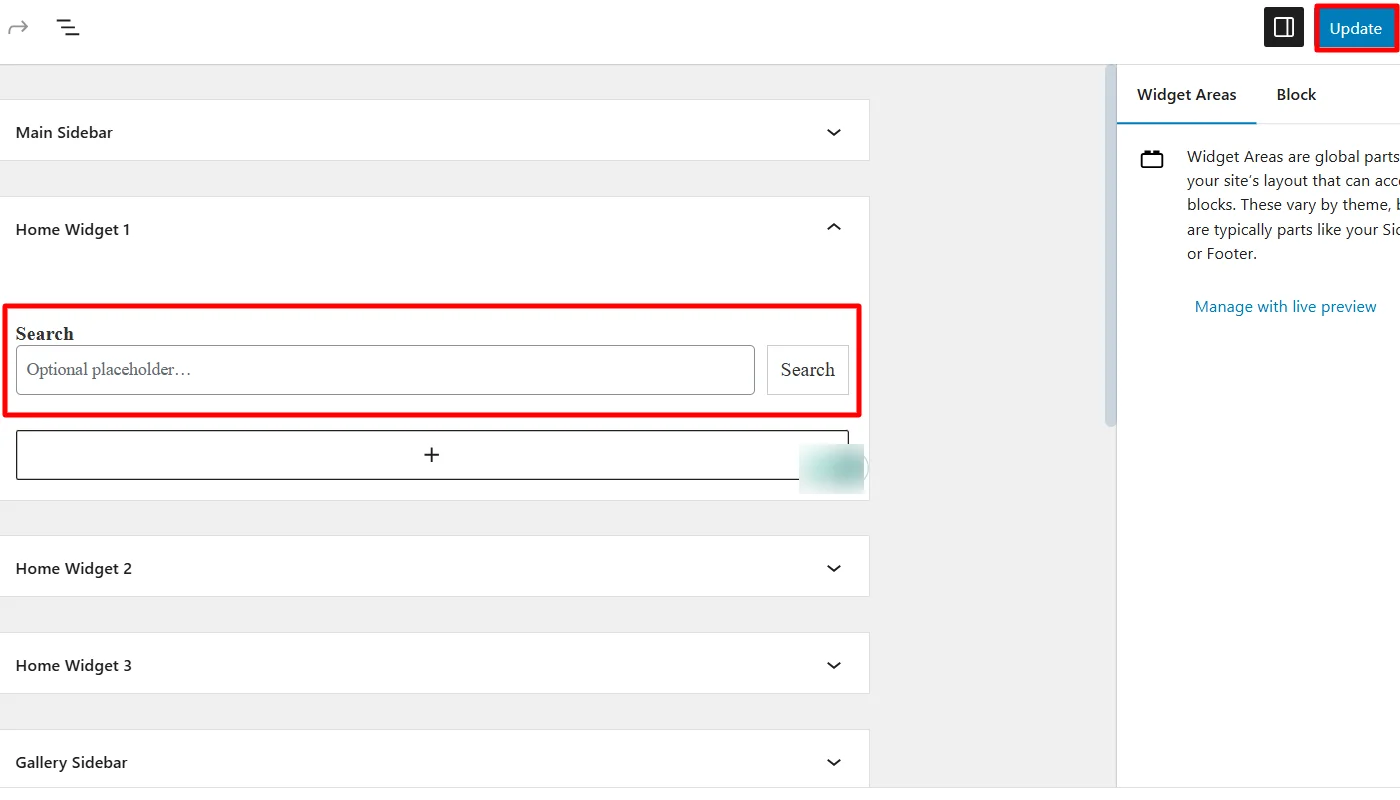
Step 2: Add the Search Widget
In the Widgets panel, and click on (+)
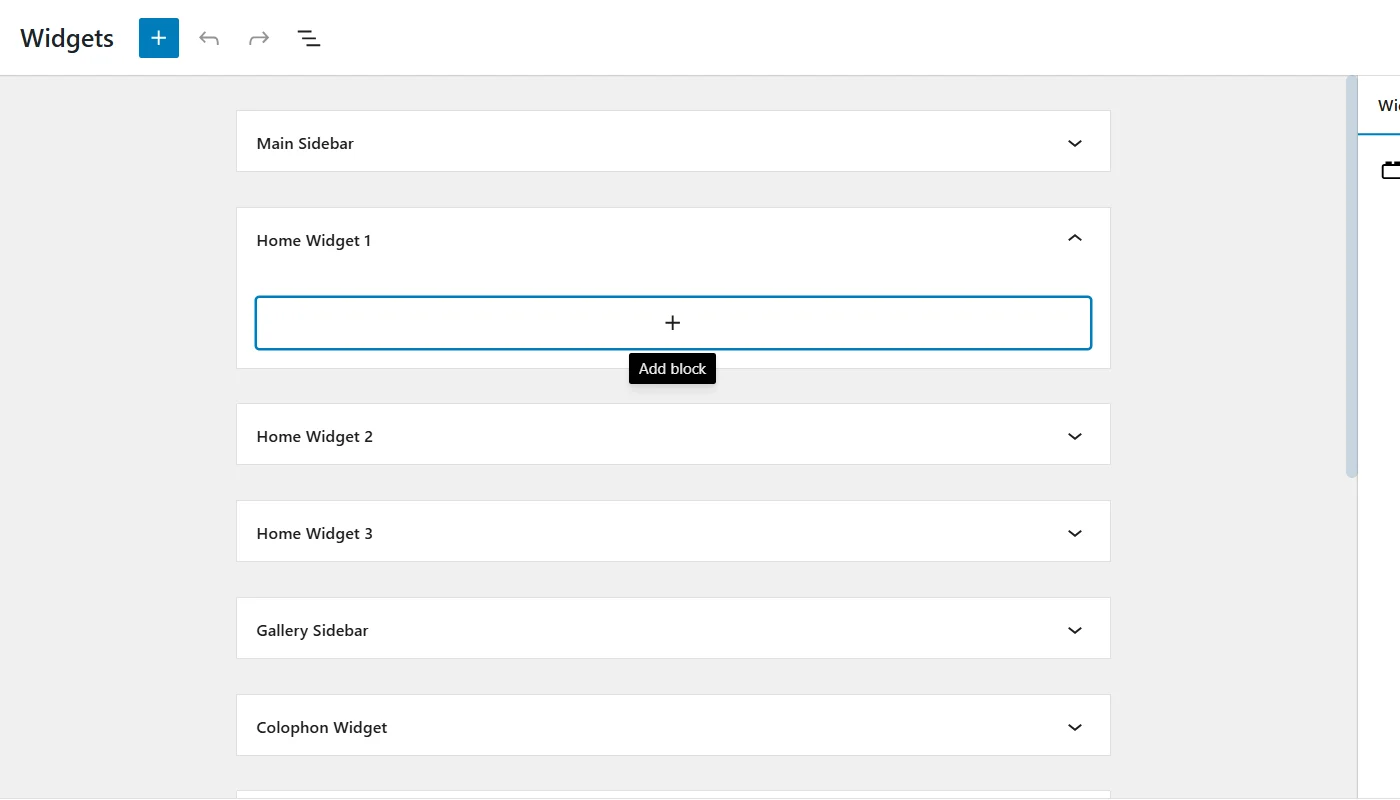
Next, please search for the Search widget.
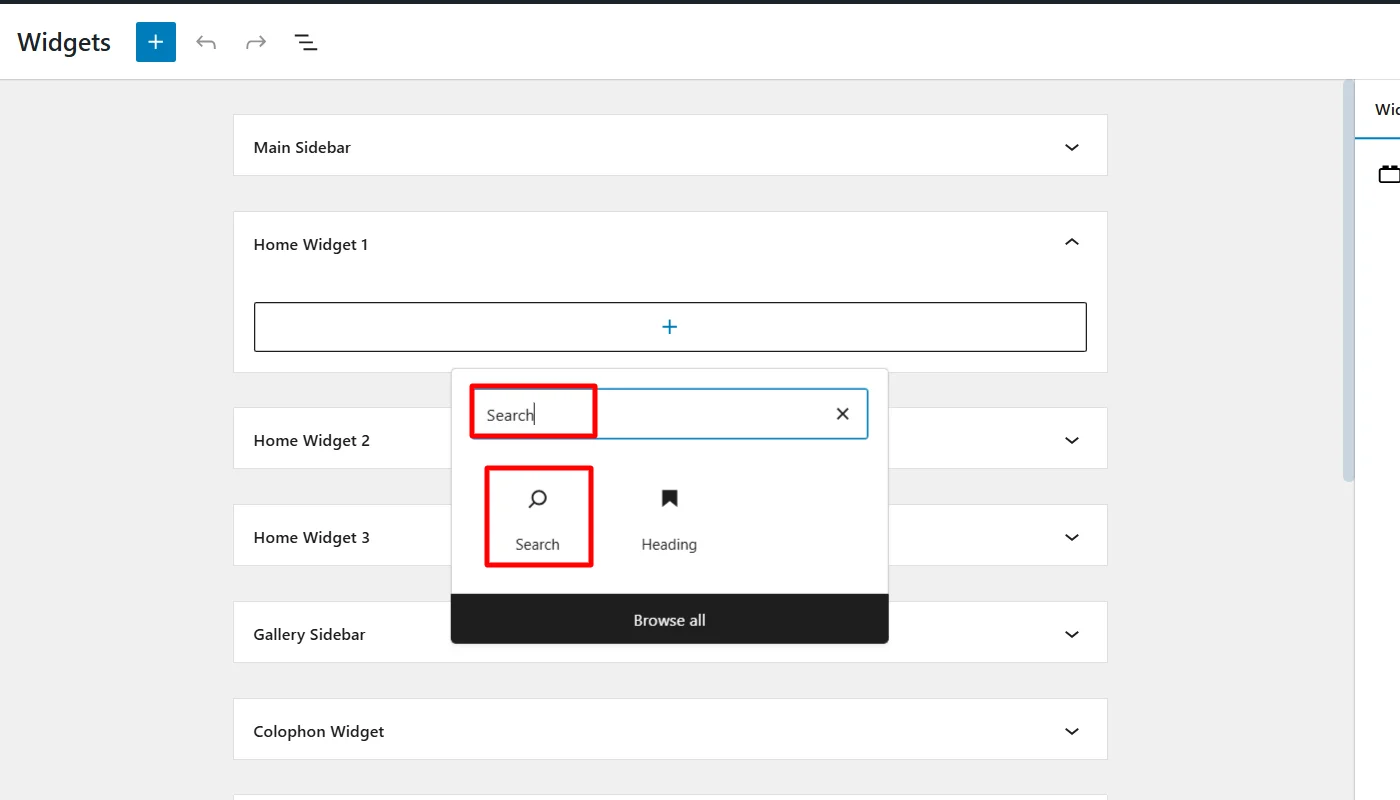
Once found, click on the widget icon to add and click Update.
3. Using Elementor
With Elementor, you can build responsive websites, add widgets, and enhance functionality with numerous features and integrations. Elementor also offers a basic search bar widget to add to your website.
What is Elementor?

Elementor, as it is popularly known, is one of the most powerful WordPress page builders. Its drag-and-drop interface allows you to create stunning websites.
It offers a user-friendly experience, making it easy for beginners and professionals to design and customize web pages without any coding knowledge.
How to Add a Search Bar in WordPress Using Elementor
Adding a search bar is simple if you’re using Elementor to design your WordPress website. Follow these steps to integrate a search bar using Elementor:
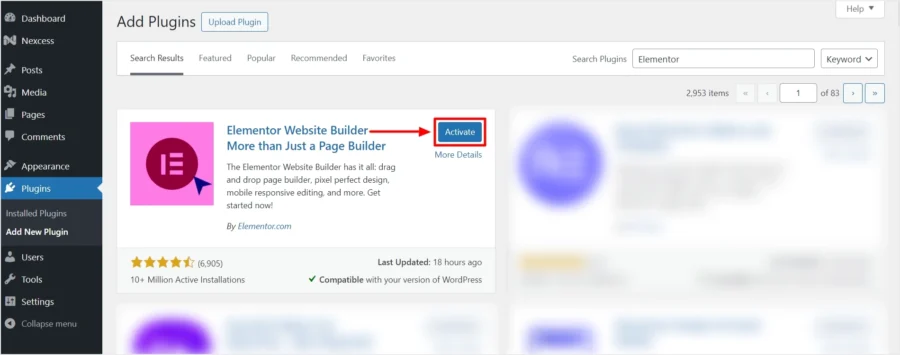
Step 1: Install and Activate Elementor
If you haven’t installed Elementor yet, follow these steps:
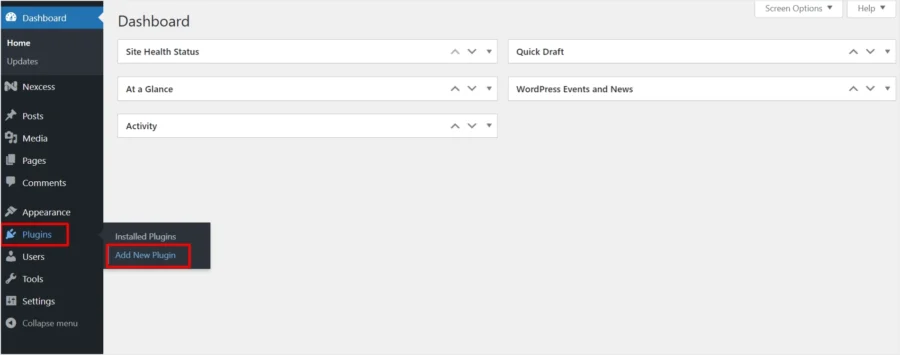
Go to your WordPress dashboard, navigate to Plugins > Add New Plugin.
Search for Elementor Website Builder.
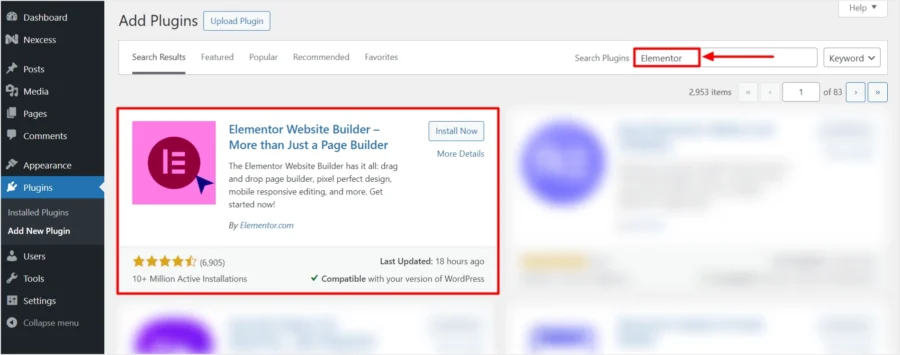
Click Install Now.

Activate the plugin.
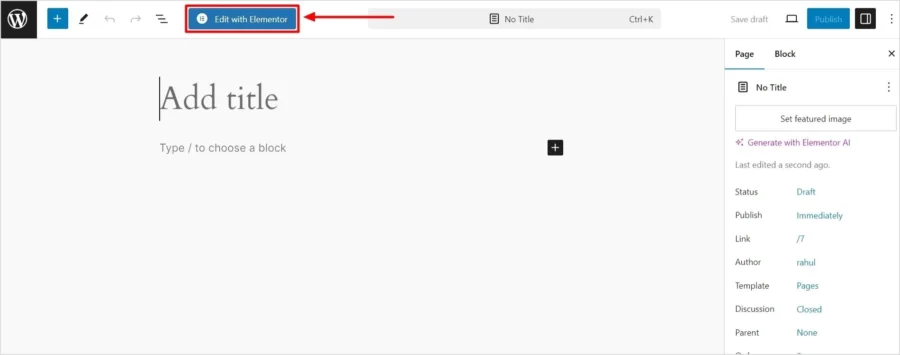
Step 2: Open the Page in Elementor
Go to Pages or Posts in your WordPress dashboard.
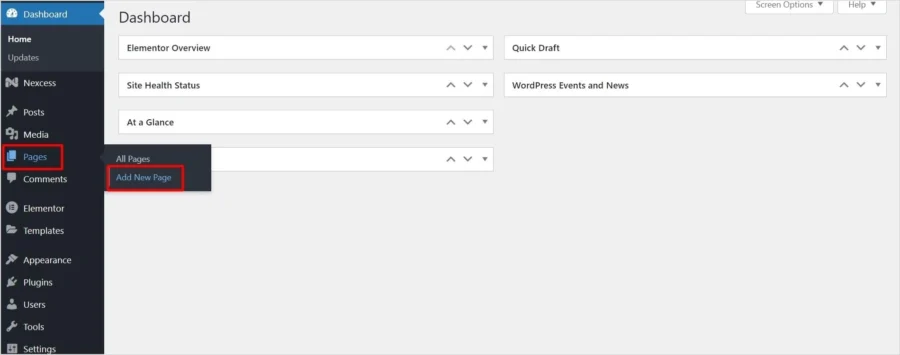
Select the page you want to edit and click Edit with Elementor.
Step 3: Add the Search Widget
Inside the Elementor editor, look for the Search widget in the Elementor panel.
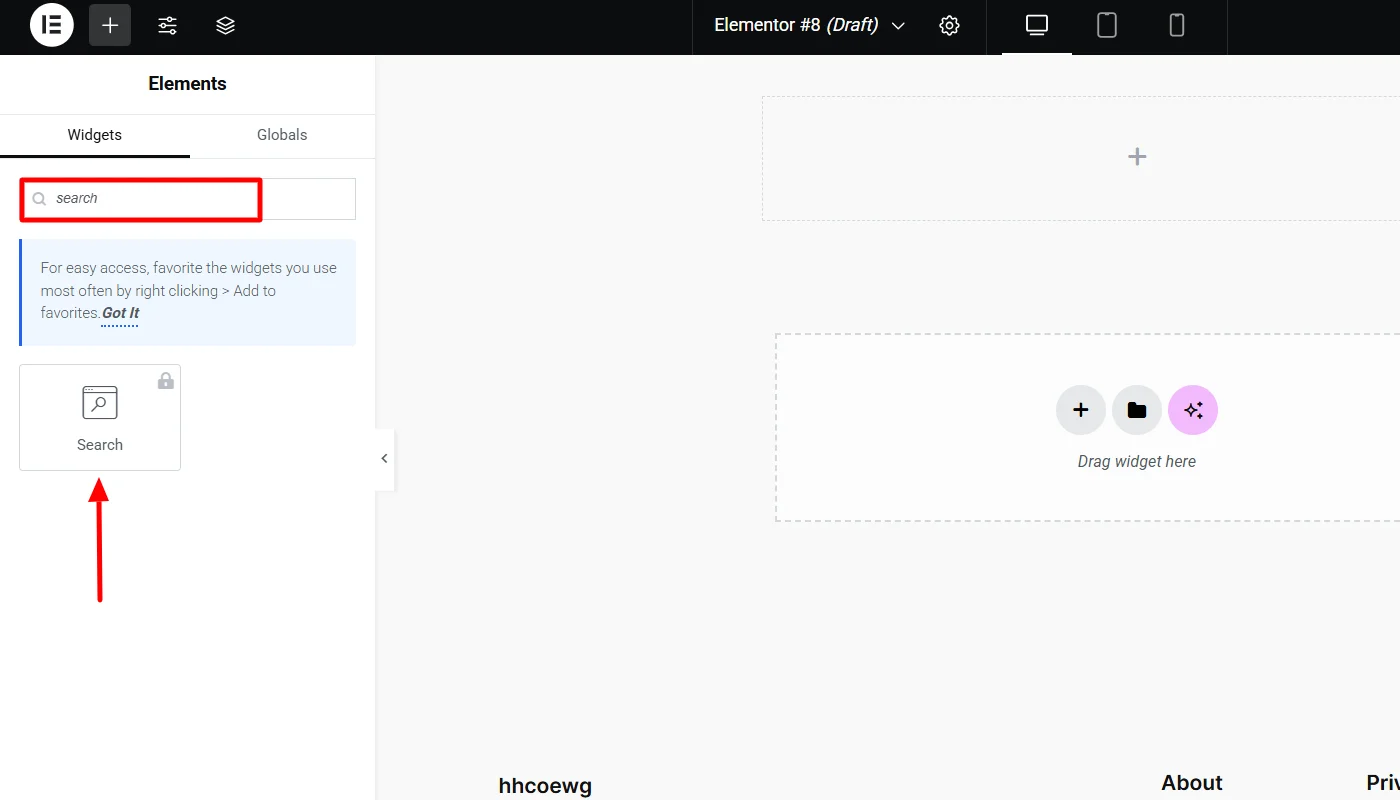
Drag and drop the Search widget onto your page where you want the search bar to appear.
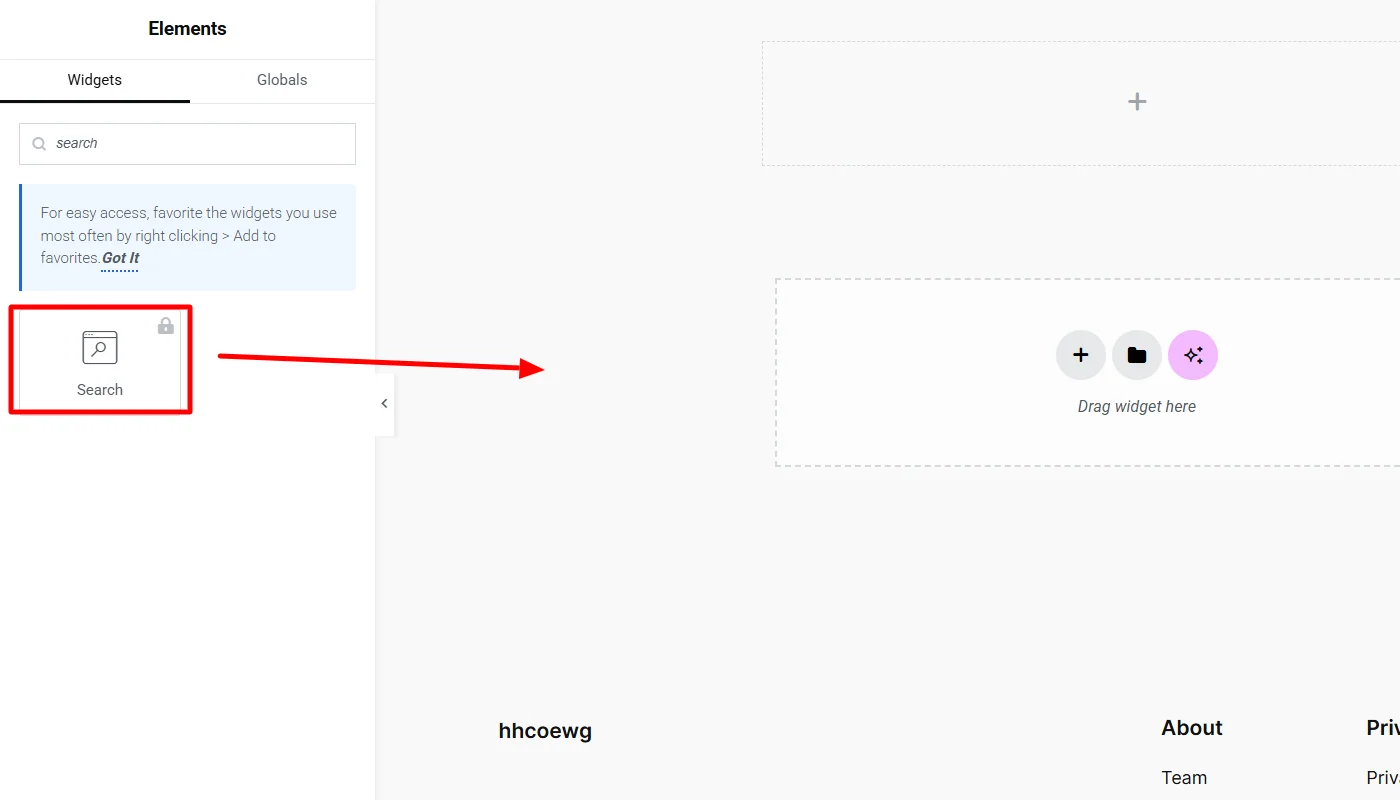
It is important to note that adding the search widget from Elementor is available only in its pro version. Once added, you can customize the search bar settings, including placeholder text, button style, and alignment.
(If you want to use an Elementor-powered search widget to your website for free, you can consider using the Responsive Addons for Elementor. You can take help of the tutorial on How To Add Search Bar To Elementor Website.
4. Using a Plugin
While the above methods add a search bar with basic functionalities, you might also integrate advanced search bar widgets into your website.
The search bar plays a crucial role in improving website navigation. You can add an advanced search Interface to your site with an advanced search bar.
While various third-party plugins are available, installing and using the Responsive Blocks Addons (RBA) offers a more straightforward solution.
What is Responsive Block Addons Plugin?
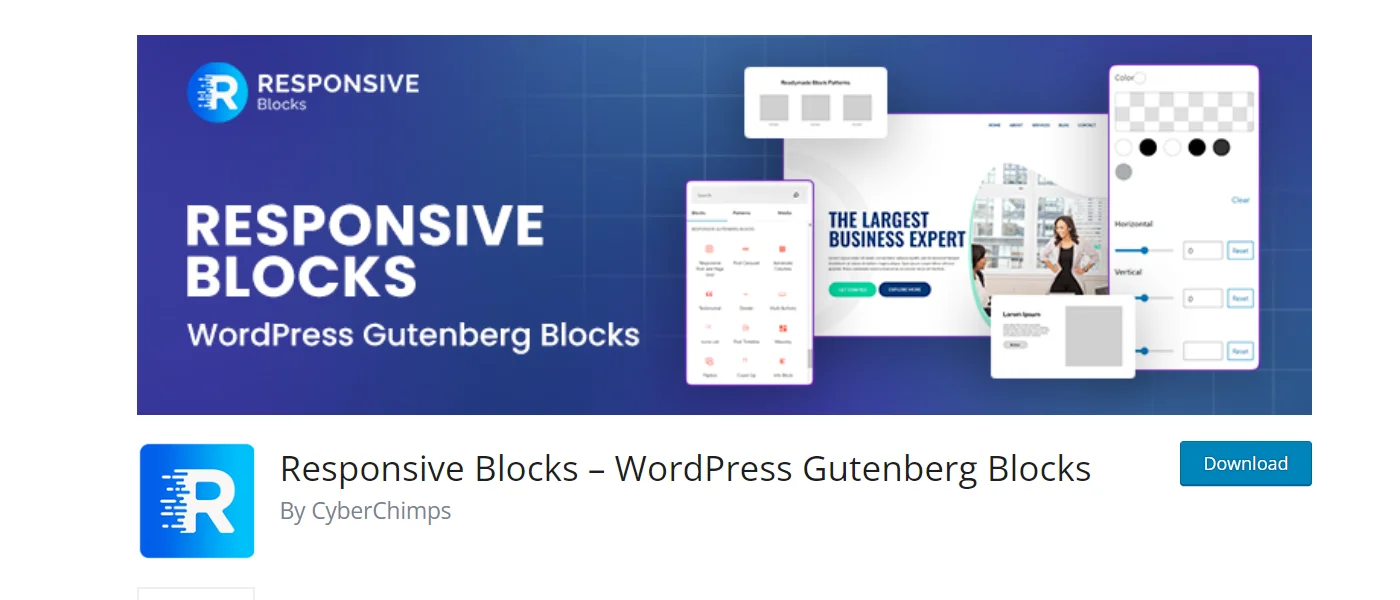
Responsive Blocks is a feature-rich WordPress Gutenberg blocks plugin. It offers a library of over 50 highly functional widgets that extend the capabilities of the Gutenberg block editor.
In addition, the plugin offers 100+ free Gutenberg website templates, which allow you to create a ready-to-use website with a single import click.
Moreover, Responsive Blocks is designed to be intuitive and user-friendly, allowing you to create a feature-rich website easily.
Features of Responsive Blocks
- Simple and easy to use
- 50+ extensive Gutenberg widgets
- 100+ ready-to-use website templates
- Drag-and-drop interface
- Regular updates and support
How to Add a Search Bar in WordPress Using Elementor
Follow these steps to integrate a search bar using Responsive Blocks:
Step 1: Install and Activate Responsive Blocks
If you haven’t installed Elementor yet, follow these steps:
Go to your WordPress dashboard and navigate to Plugins > Add New.
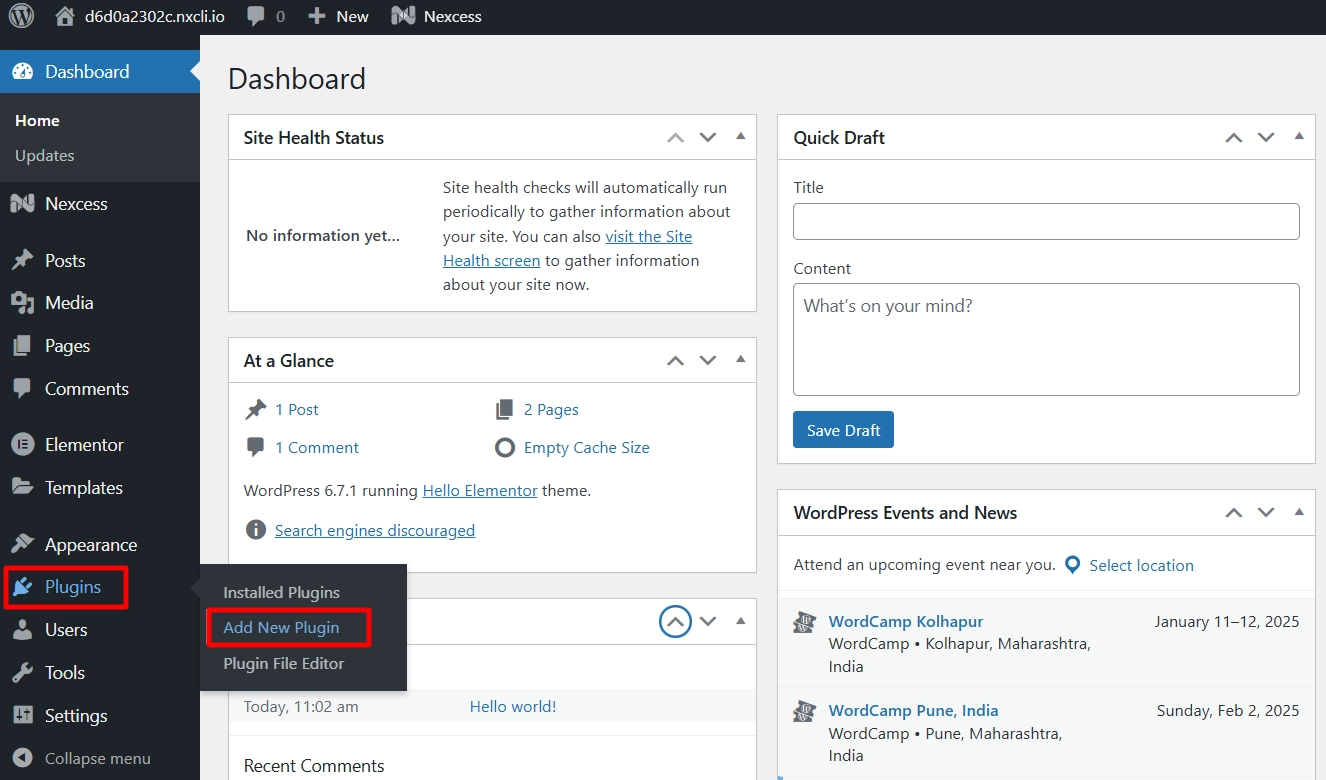
Search for Responsive Blocks and click Install Now
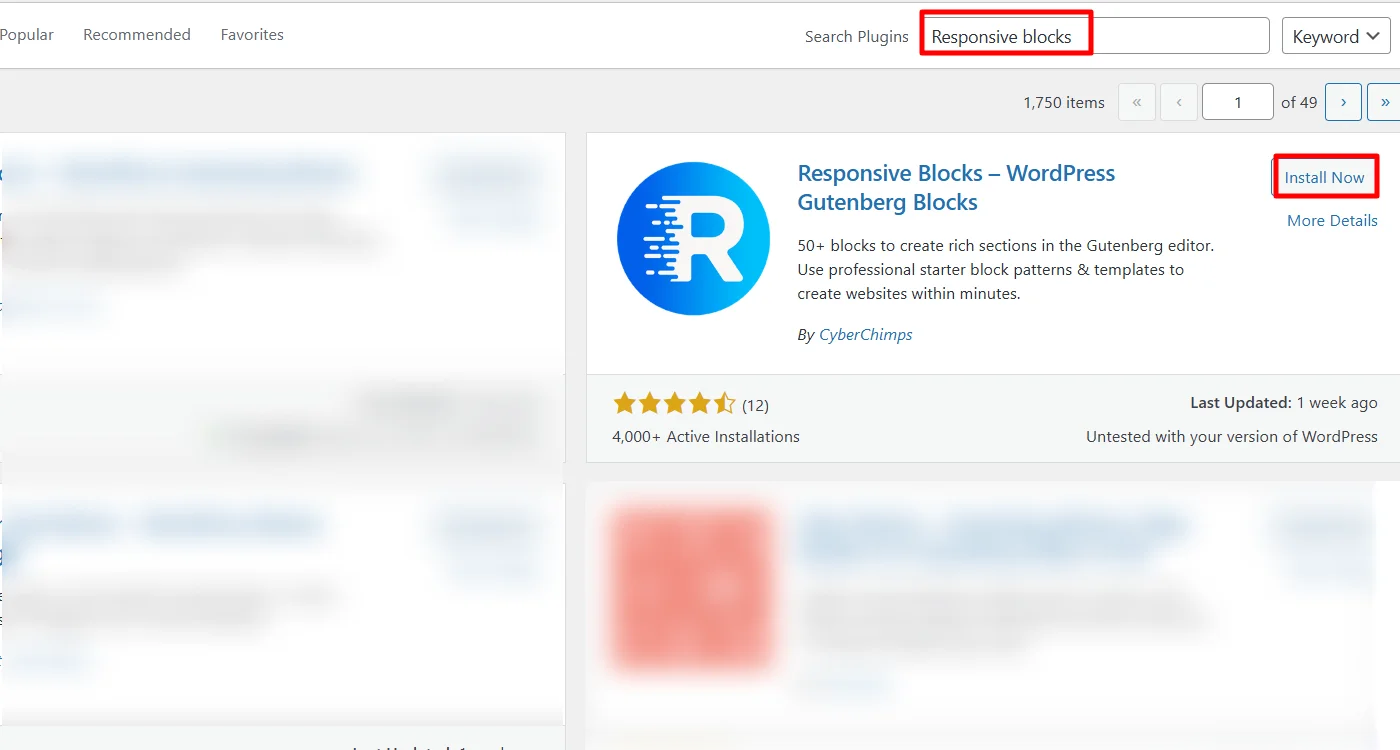
Next, Activate the plugin.

Step 2: Open the Page and Add Search Bar
Go to Pages or Posts in your WordPress dashboard.

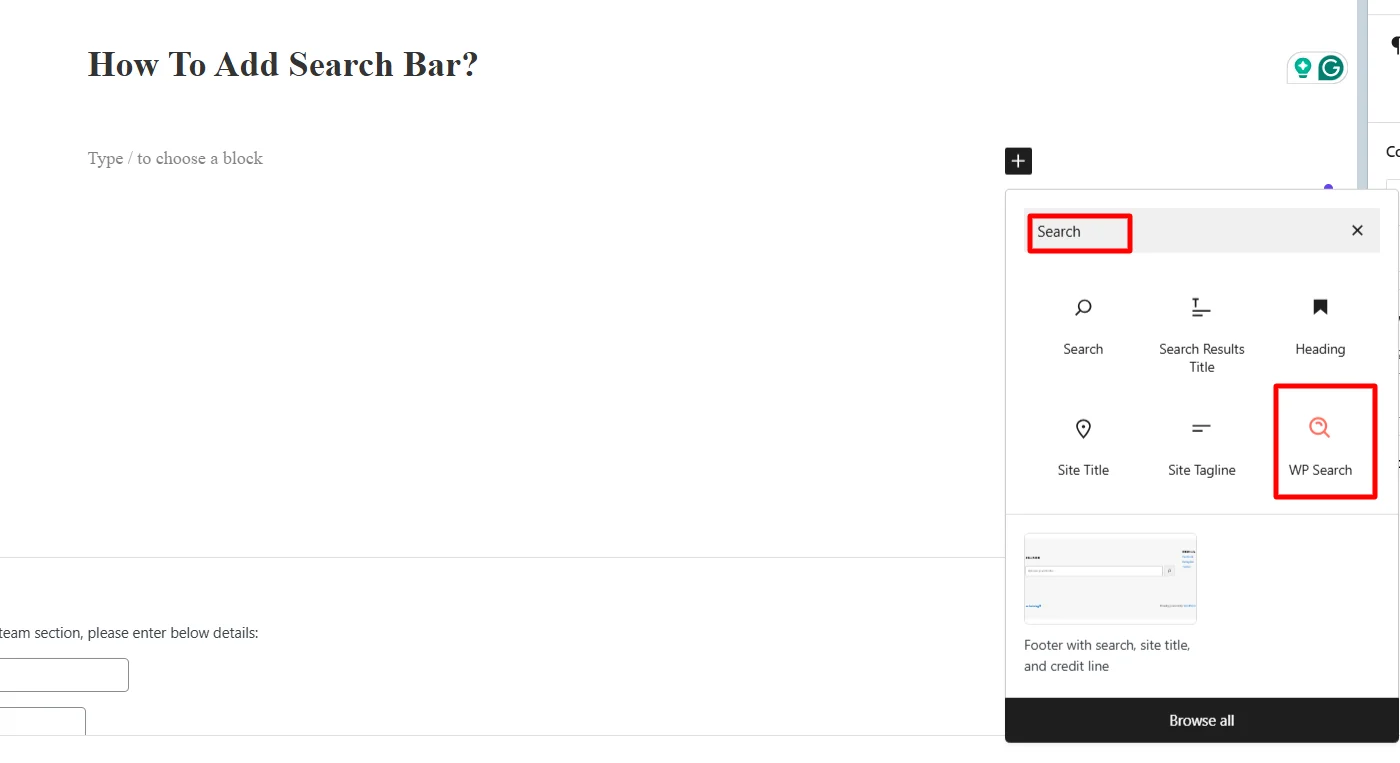
Click the (+) button to add the widget inside the page editor.
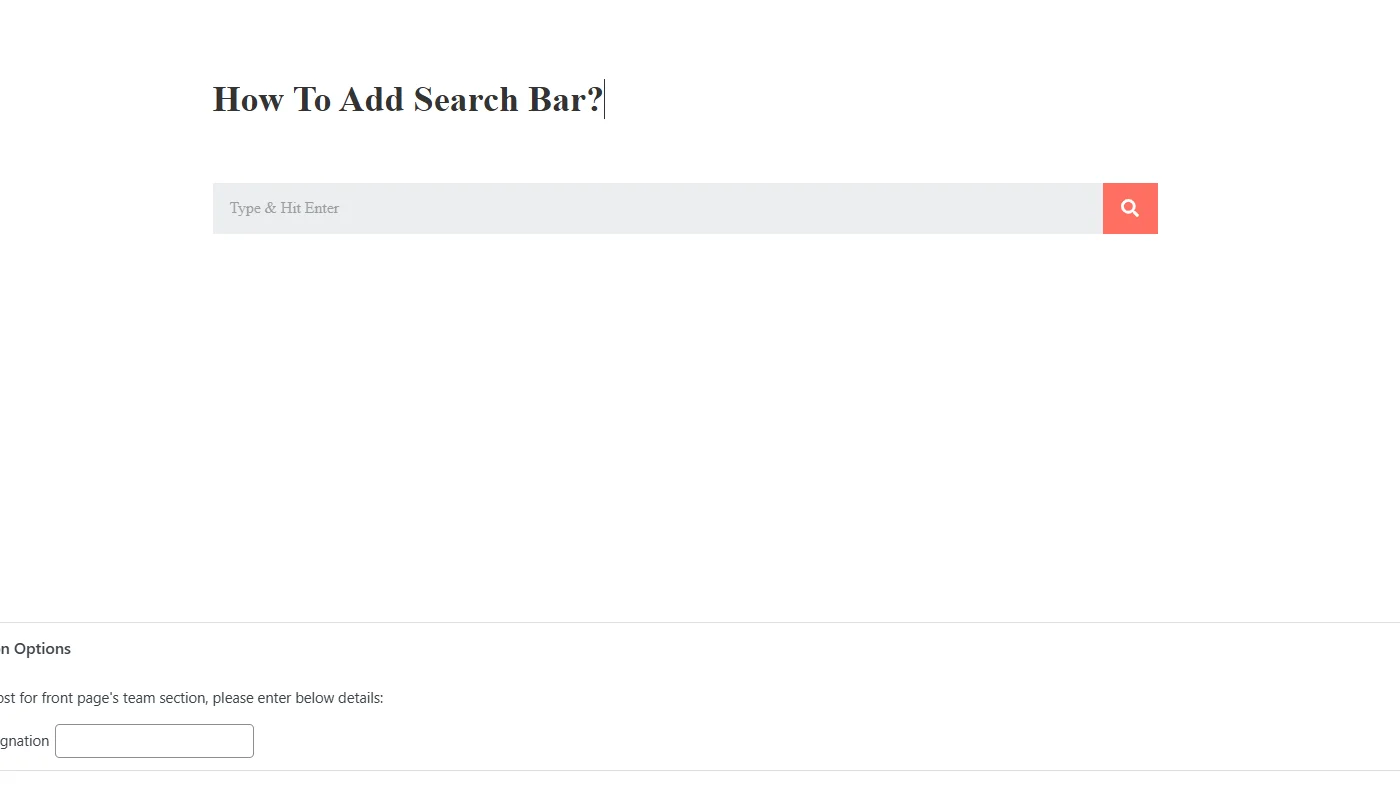
Next, search for the WP Search Form block in the panel and Click on the Search Block icon on your page where you want the search bar to appear.
The Search Block looks like this when added, which can be further customized
5. Add Search Bar Manually Using Header.php
Header.php, you can manually add a search bar to your WordPress theme without using plugins or page builders. This method provides greater flexibility and allows for custom styling.
What is Header.php?
The header.php file is a core theme file in WordPress that controls the structure and content of the website’s header section.
It typically includes elements like the site logo, navigation menu, and sometimes a search bar. Modifying this file allows you to manually insert a search bar directly into your site’s header, giving you full control over its placement and styling.
Using header.php is a great method for those who prefer a hands-on approach and want to integrate a search bar seamlessly into their WordPress theme.
How to Add a Search Bar in WordPress Using Header.php
If you want to add a search bar to your WordPress theme manually, follow these steps:
Step 1: Access the Theme Editor
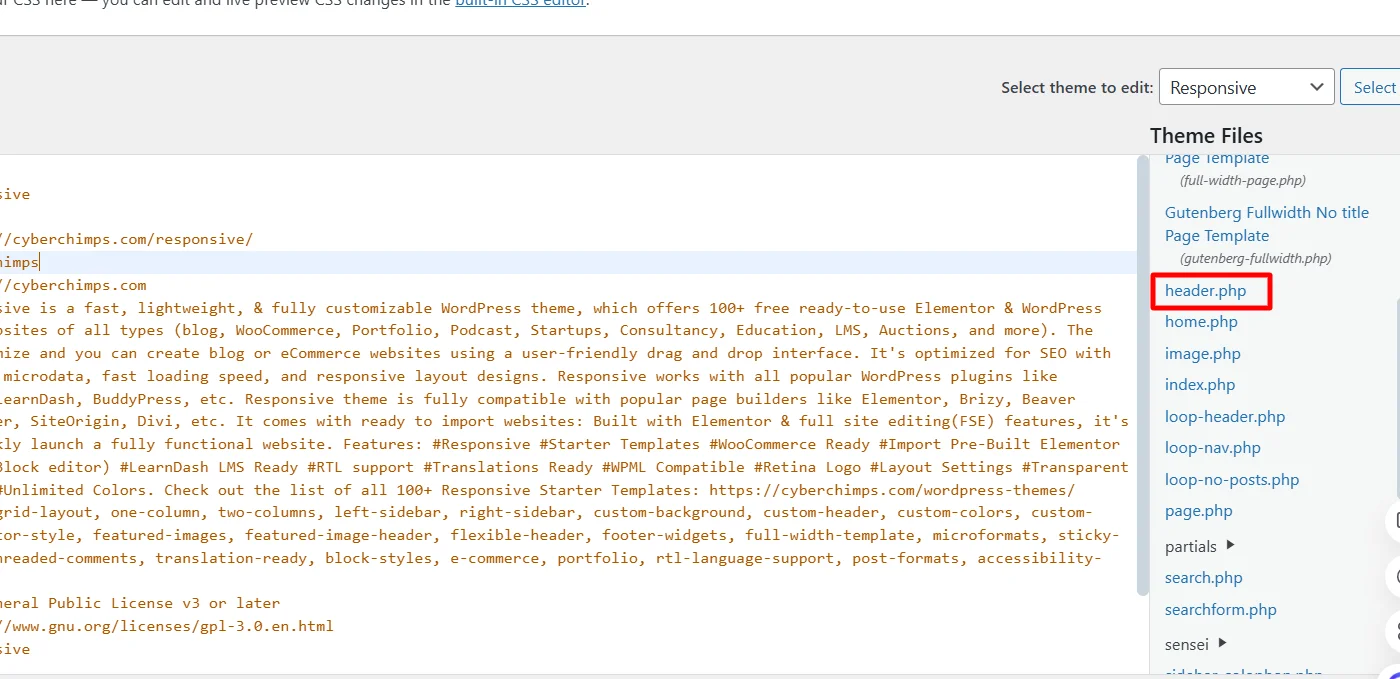
Go to your WordPress dashboard and navigate to Appearance > Theme File Editor.
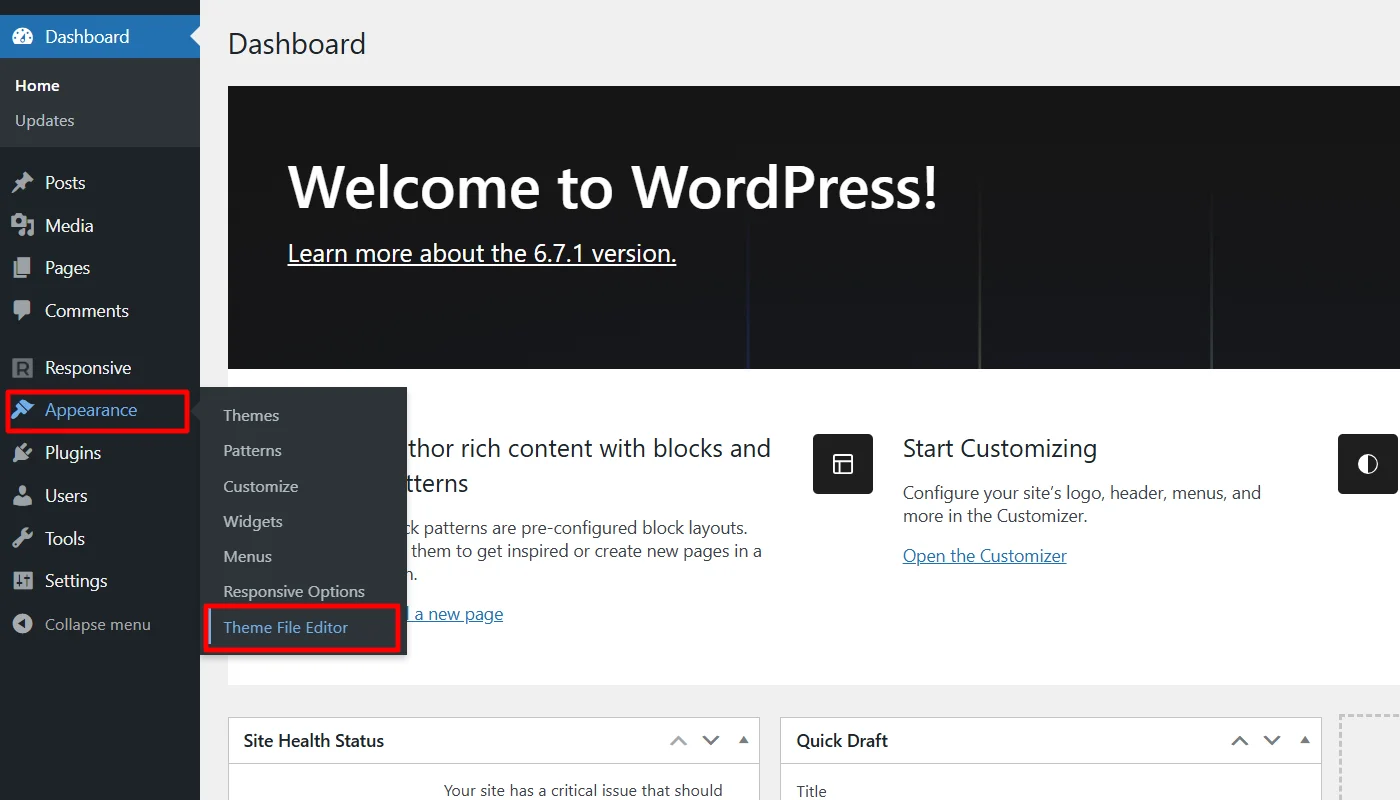
In the right panel, locate and click on header.php.
Step 2: Insert the Search Form Code
Find the section where you want to insert the search bar (usually within the <header> tag).
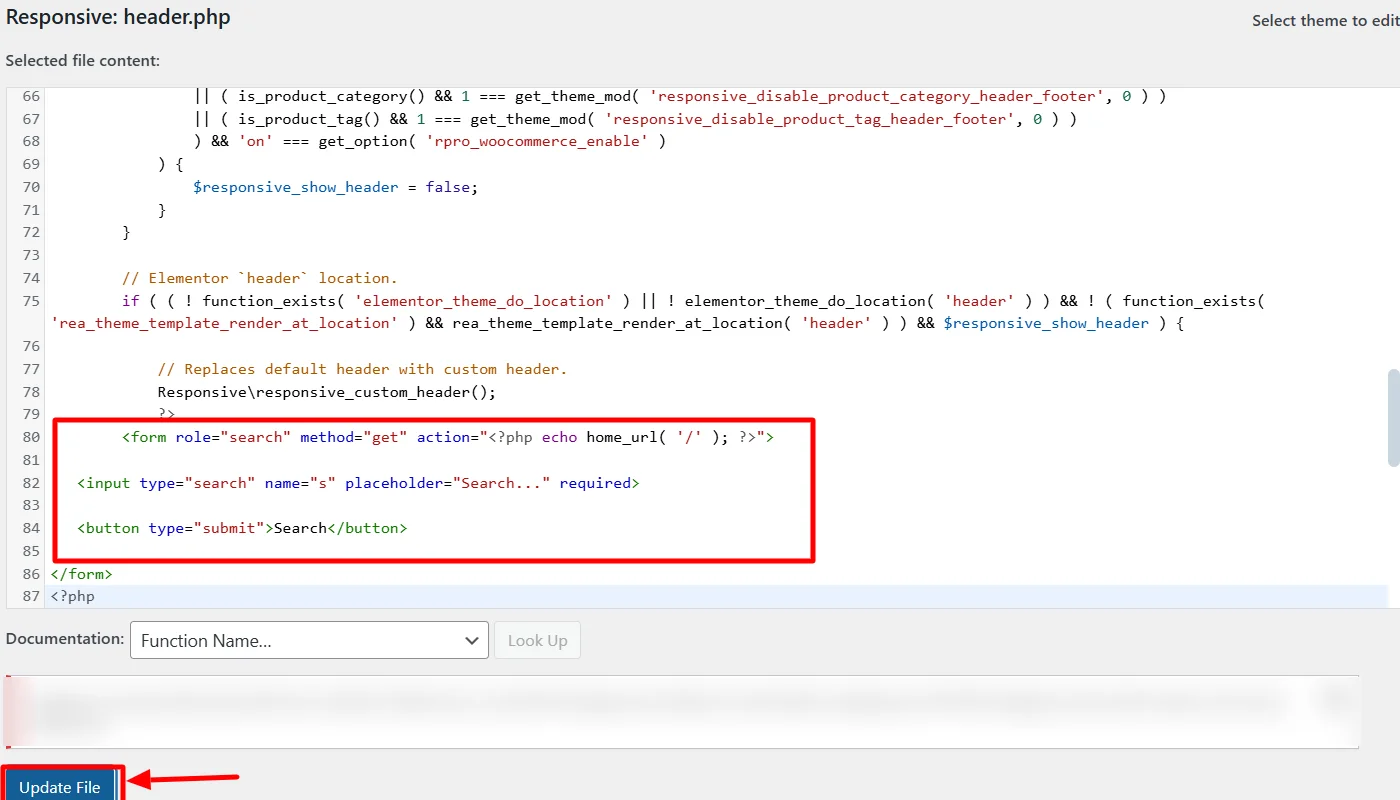
Add the following PHP code snippet:
<form role="search" method="get" action="<?php echo home_url( '/' ); ?>">

   <input type="search" name="s" placeholder="Search..." required>

   <button type="submit">Search</button>

</form>
Step 3: Style the Search Bar (Optional)
To customize the appearance, add the following CSS to your theme’s style.css file:
form[role="search"] {
    display: flex;
    align-items: center;
    border: 1px solid #ccc;
    padding: 5px;
    border-radius: 5px;
}

form[role="search"] input {
    border: none;
    padding: 5px;
    flex-grow: 1;
}

form[role="search"] button {
    background: #0073aa;
    color: white;
    border: none;
    padding: 5px 10px;
    cursor: pointer;
}
FAQ
A search bar is a user-friendly tool that allows visitors to find specific content on a website quickly. It improves navigation, enhances user experience, and boosts engagement by helping users access relevant information without browsing multiple pages.
You can add a search bar in WordPress using multiple methods, including Elementor, the Widget Panel, or manually editing the header.php file. WordPress also provides built-in search widgets that can be added to sidebars, headers, or footers for easy accessibility.
To add a custom search bar without a plugin, you can manually insert a search form in your theme’s header.php file using PHP and HTML. You can then style it with CSS to match your website’s design for a fully customized appearance.
Conclusion
Adding a search bar to your WordPress site is a simple yet powerful way to enhance user experience, improve navigation, and increase engagement.
A well-placed search bar makes it easier for visitors to find relevant content, which can lead to better retention and higher conversions.
Choose the method that best suits your website’s design and functionality, and you’ll be taking steps toward making it more user-friendly and efficient.
Further, if you liked this article, you can also consider reading:
- 5 Ways To Get Quality Backlinks To Your Website
- Elementskit Alternatives That Will Elevate Your Elementor Website
- How to Add an Author Box to your Elementor Website
Grab the Cyberchimps Responsive Theme to create a responsive website for any niche.


