
Want to add business hours to your website using Elementor?
To establish a great website, it’s crucial to do more than simply display products and services. It’s about presenting essential information to your site visitors in an easy-to-understand manner.
Ensuring your audience has quick access to vital information, particularly details that can significantly influence their decision to engage with your business, is a key element in this process.
This easy-to-use tool lets customers promptly discover your opening hours, simplifying their interactions with your business.
In this article, we will study the clear-cut steps for effortlessly adding a business hour widget onto your Elementor site.
What is Elementor Business Hour Widget?

The business hour widget is a functional tool that showcases a business’s operating hours directly on its website. It’s essential for customers as it allows them to easily access opening hours without navigating multiple pages or contacting the organization directly.
Business hour widget is customizable, enabling businesses to showcase their regular and special hours for holidays or events.
It’s particularly advantageous for businesses with flexible hours, such as those operating seasonally or closing on specific holidays.
In summary, adding a business hour widget is an intelligent approach to enhance customer communication.
Why Should You Add Business Hours to WordPress Website?
Adding an Elementor business hour widget to your website provides numerous advantages, including enhanced user experience and customer satisfaction. It’s a simple yet effective addition that can significantly enhance your website’s functionality and customer engagement.
Here are some benefits of adding a free business hour widget to your website:
- Enhanced Customer Convenience: By prominently displaying your operating hours, you make it easier for customers to access this important information, increasing the likelihood of them choosing to visit your organization.
- Reduced Confusion: This widget can provide clarity, especially for businesses with fluctuating hours, preventing potential customers from showing up when the organization is closed.
- Improved User Experience: A strategically placed widget can contribute to a more user-friendly website, leading to higher visitor satisfaction and potentially longer visits.
- Increased Trust and Professionalism: Displaying accurate office hours builds customer trust and leaves a professional impression.
- Mobile Optimization: The widget is designed to be responsive, ensuring that customers can easily view your hours on any device, including smartphones and tablets.
- Time-Saving: Providing this information upfront saves time for your customers and your staff, reducing the number of inquiries about operating hours.
- SEO Benefits: Integrating this widget can improve your website’s search engine optimization (SEO), as search engines tend to favor websites offering users clear, relevant information.
Next, let’s check what you’ll need for adding an Elementor business hour.
Things You’ll Need for Adding Free Business Hours in Elementor
Ensure you have the specified plugins for inserting a free business hour widget onto your site.
1. Elementor Page Builder

Elementor is a widely used WordPress page builder plugin that enables users to design and personalize websites without coding.
Its drag-and-drop interface is attractive to beginners and caters to experienced users with its robust features.
The real-time editing feature lets users see changes instantly and seamlessly integrates with most WordPress themes.
Elementor has become an essential tool for web designers and developers because of its adaptability, user-friendliness, and extensive collection of design elements, which facilitate the rapid and efficient creation of high-quality websites.
2. Responsive Addons for Elementor

Responsive Addons for Elementor serves as a plugin that amplifies the functionality of the Elementor page builder by offering additional design features and customization choices, specifically concentrating on responsive design.
The plugin includes 80+ Elementor widgets and 250+ Elementor website templates, which further enrich the capabilities of the Elementor page builder.
This plugin allows individuals to adjust how their content is displayed on mobile, tablet, and desktop views, ensuring a smooth user experience across all devices.
These addons are valuable resources for developers and designers who want to optimize their Elementor-built websites for mobile and other devices.
How to Add Business Hours to Your Elementor Site?
[Note: To add a business hour widget, your website must have Elementor plugin activated].
Cyberchimps provides over 250 Elementor website templates that you can use to create your website instantly.
To integrate the business hour widget into your Elementor website, follow the steps below.
Step 1: Installing and Activating Responsive Addons for Elementor Plugin
Navigate to the WordPress dashboard, and from the left-hand menu, select Plugins > Add New Plugin

In the search bar, enter Responsive Addons for Elementor. When the plugin appears, click Install Now button.
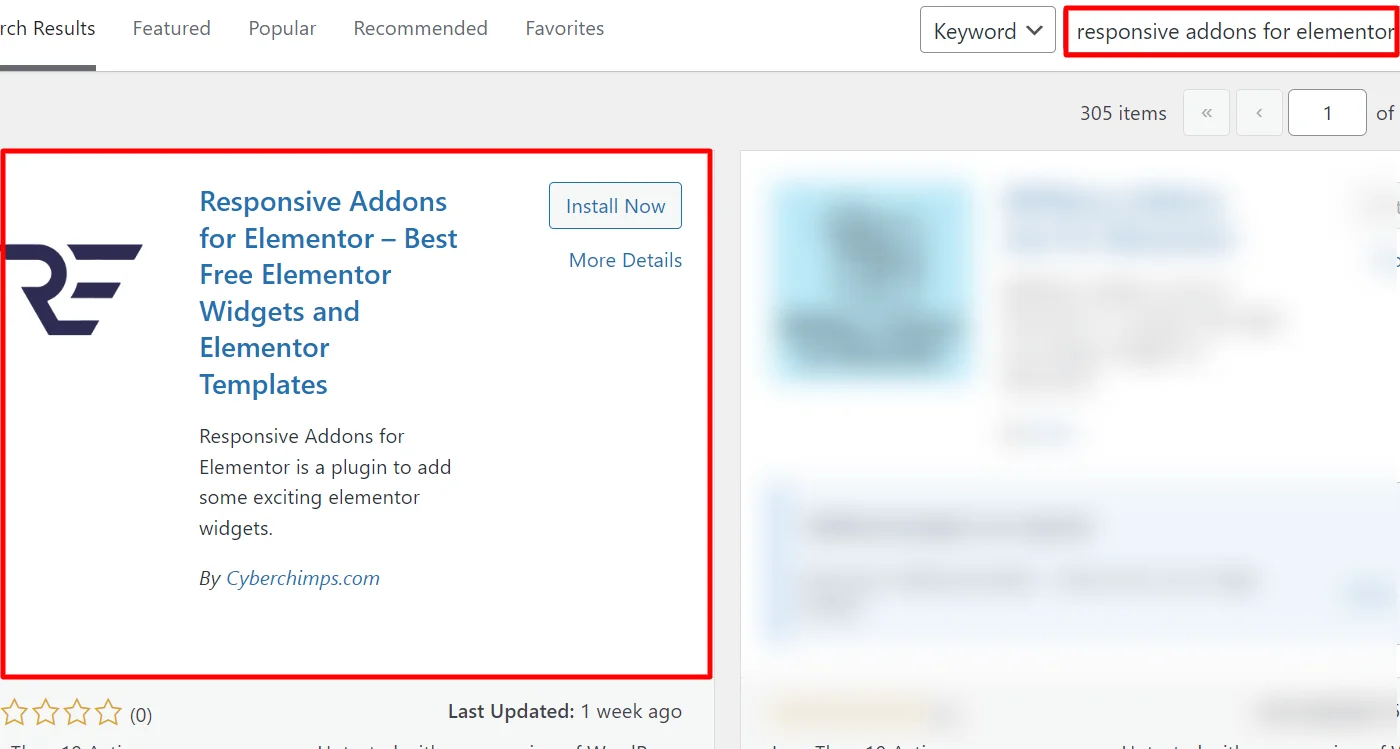
After installing, click on the Activate button to activate the plugin.

Step 2: Adding Business Hour Widget to the Page
To show how to add a business hour widget, we’ll use a pre-made Dental Clinic WordPress Template.

You can explore various other templates from the Responsive Plus collection of free WordPress templates.
Once you’ve navigated to the page, locate and click on Edit with Elementor.

Proceed to the widget search bar and type RAE Business Hour.

Drag and drop the widget onto the page to add it into your design.

Once you drop the widget to the main page, the business hour is successfully added. Now, let’s move towards the customization.
Step 3: Customizing Responsive Addons for Elementor Business Hour Widget
There are various ways you can customize your widget.
Now, let’s delve into the Content section.
Business Hour List

Business Hour Settings
- Title: Fill in the title for your business hour widget.
- Day & Time: Customize the days and times to reflect your business hours accurately.
- Add Item: Use the ‘ADD ITEM’ button to add new items and the ‘X’ button to remove unwanted items.
- Individual Style: Opt for the individual style option for detailed customization of each day.
- Text Color: Set the color of the text.
- Border Type: Customize border type, color, and width according to your needs.
- Background Type: You can modify the background color, add a background image, and adjust the position of the image.
Step 4: Styling the Responsive Addons for Elementor Business Hour Widget
Let’s make our business hour widget look more appealing
Title

Title Style
- Text Color: This lets you customize the text color.
- Typography: Change the design title font using Typography.
- Border Type: You can also incorporate a border color and adjust its width.
- Background Type: It considers altering the background color or adding an image.
- Additional Options: Customizing the margin, padding, and border radius to the title can enhance the overall look.
Hour List

Hour List Style
- Text Color: Utilize text color to enhance visibility and aesthetics.
- Typography: Customize the hour title font using Typography for a distinct appearance.
- Border Type: Incorporate a border with a suitable color and width to add definition.
- Background Type: Personalize the background with color or an image to create a unique ambiance.
- Additional Options: Apply margin, padding, and border-radius to the title for a polished look.
Container

Container Style
- Text Color: Customize the text color.
- Border Type: Set the border color and width for the container.
- Background Type: Modify the background color and add an image.
- Additional Options: Apply margin, padding, and border-radius to the title
How To Use the Business Hours Widget?
Now that you have a clear idea of the settings and functionalities the business hours widget offers let’s explore them in depth and understand how this widget can add functionality to your website.
I have used the dental clinic website template to add and show business timings.
Once I dropped the widget, it looked like this.

As the widget looked very basic, I changed the dummy content in some places.
Additionally, I added color to each day’s text to make it look more appealing, with the option of individual text styling. Also, I added gradient-colored backgrounds in each row as the background with a double black border.
(In the image below, I have shown the customizations made for “Monday.” I made similar changes for other days as well)

For the content settings customizations, I kept the alignments of different texts in default, as they appeared fine.

Next, I moved into the styling part, where I began styling the title. While styling the title, I kept most settings the same, with minor changes in the typography and a border to the title box.

Moreover, I only applied a border to each row for the hourly list styling with a light box shadow. I already styled each business hour row, so any changes I make to the overall business hour styling will not work.
You can apply similar styling or choose the style that suits your needs.

Similarly, I made menial changes to styling content, adding a border and a background color.

After all these changes, the final result appeared below.

After making all the customization changes, click on the publish button to publish the changes.
FAQ
To add business hours to your Elementor site, follow these steps:
1. Install and Activate Responsive Addons for Elementor
2. Open the page where you want to add business hours
3. Edit with Elementor
4. Search for the business hour widget
5. Drag and drop the widget
6. Customize the business hour widget
7. Publish the page
Responsive Addons for Elementor business hour widget allows you to display your business hours with customizable styles in a beautiful tabular way.
Using the Responsive Addons for Elementor plugin, you can effortlessly add the business hour widget to your website at no cost.
Conclusion
Adding a business hour widget to your website with Elementor is a straightforward yet powerful method of improving its functionality and user experience.
Following the easy steps outlined in this guide, you can seamlessly integrate this beneficial feature into your website, contributing to a more polished and user-friendly website.
If you found this article helpful, you may also want to check out:
- How To Add Breadcrumbs To Elementor Website
- How To Add Product Rating To Elementor Website
- How to Add Table Of Contents To Your Elementor Website
If you wish to include a business hour widget on your site, get the Responsive Addons for Elementor today! You might also want to install the Responsive theme, a versatile website theme that can streamline your website creation process.


