
Are you looking to add a media carousel to your Elementor website?
A media carousel is a brilliant widget to showcase images or videos on your website. This helps to enhance your website’s appearance and user experience.
Adding this widget can be challenging if you are new to building a website, but the Responsive Addons for Elementor plugin has simplified this process.
Follow this step-by-step guide for adding a free media carousel to your website.
What is the Elementor Media Carousel Widget?
A media carousel is a widget that you can use on the Elementor page builder to improve the look of your website design. It contains a cluster of images or videos and allows you to display them in a rotational format.
You can easily display them automatically or control them manually. It is a simple way to enhance your user experience and make your website more engaging.
The best part is that anyone using WordPress can easily add this widget to their website using Addons for Elementor plugin.

Why Add a Media Carousel To Your WordPress Website?
Adding a carousel to your WordPress website has several benefits. Here are the essential factors:
- Enhances Design: Adding a WordPress media carousel widget to your website while showcasing images and videos increases its visual appeal.
- Boosts Engagement: Carousels can encourage visitors to interact and spend more time on your website. For example, users can spend more time looking at your images and clicking on them to enlarge them.
- Tells a story: You can also convey some story to your visitors. For example, If you want to show your journey, you can place a slideshow of your pictures.
- Saves Space: Organizing images in a slideshow is better than randomly adding images to your page. No one would like to see cluttered images within the content.
- Showcase variety: Media carousels allow you to showcase various items, such as products, services, portfolio items, and testimonials.
Next, let’s look at the plugins we’ll require to add the widget.
Things You’ll Need for Adding Free Media Carousel in Elementor
If you want to add a free media carousel widget in Elementor, you need the following things.
1. Elementor Page Builder Plugin
Elementor is a widely used page builder plugin for WordPress. It allows WordPress users to design responsive websites.
Elementor has a drag-and-drop feature, making it easy for users to use. This feature lets you arrange the text, images, buttons, and widgets according to your design.
Using this plugin, anyone can create a well-designed responsive website for free, thereby making it a popular choice for building pages on WordPress.
2. Responsive Addons for Elementor
As Elementor’s free plugins are limited, to add a free media carousel widget to your website, you must install the Responsive Addons for Elementor plugin.
The Responsive Addons for Elementor is a free WordPress plugin built for Elementor to improve the website’s functionality. It has over 80 widgets and 150+ Elementor templates.
This plugin has focused on making its widgets compatible with every device while maintaining its functionality. It is a must-have if you want your website to stand out from the crowd and enhance user experience.
How to Add Media Carousel To Your Elementor Website
(Note: To add a media carousel, your website should be built on Elementor builder)
Responsive Addons for Elementor offers numerous customizable widgets to strengthen your website design. We will go through the steps for adding these widgets to your webpage.
Step 1: Installing Responsive Addons for Elementor
Go to your WordPress dashboard and click on Add New Plugin. Search for Responsive Addons for Elementor by Cyberchimps.

Search for Responsive Addons for Elementor by Cyberchimps and click on Install Now button.

After installing the plugin, click on Activate.

That’s it! You have Installed the Responsive Addons for Elementor plugin.
Step 2: Adding RAE Media Carousel Widget to your page
Open the page where you want to add a media carousel in the Elementor editor. For tutorial purposes, we will use an interior design template by Cyberchimps. You can find many such free website templates on the cyberchimps website.
Next, click on Edit with Elementor button.

In the Widgets section, search for Media Carousel.
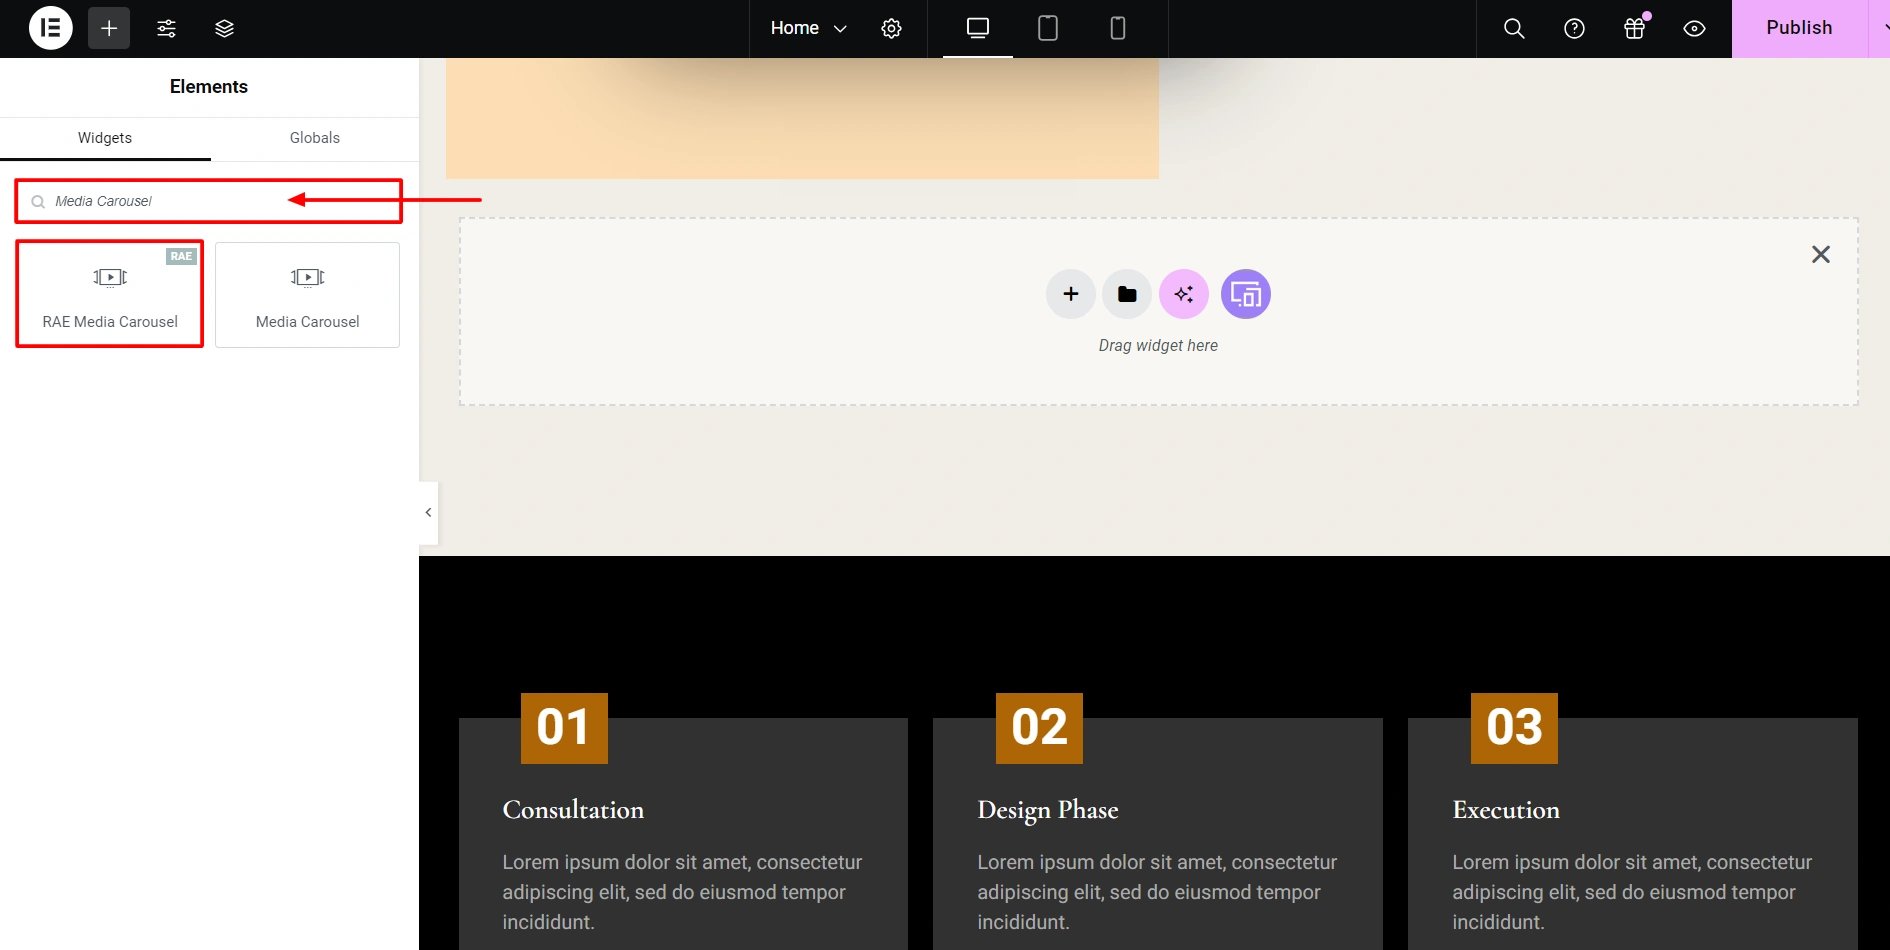
Drag and drop the RAE Media Carousel widget wherever you want on the page.

You’ve now successfully added the widget to your Elementor website.
Step 3: Customizing RAE Media Carousel Widget
Now that you have inserted the Elementor media carousel widget let’s look at its settings. You can customize it according to your webpage design in many different ways.
You can customize the slides in the content section.

Slides
- Skin: Select the type of carousel you want to add from the dropdown menu.
- Items: You can add images or videos to the slides. Switch the toggle to add videos.
- Add media by clicking on the blank section.
- You can give a link to your media from the link section.
- Add more items to your carousel by clicking Add Item.

- Effect: Select the type of effect you want your images to change.
- Slides Per View: Choose the number of media files you want to see at a time.
- Slides to scroll: Set how many slides are scrolled per swipe.
- Height & Width: Adjust the dimensions of the media files if you want to change them.

Additional Options
- Arrows: Decide whether to show the arrows or not.
- Pagination: Select the type of pagination you want to display on the carousel.
- Transition Duration: This option lets you choose the duration of the transition.
- Autoplay: If you want the images to rotate automatically, turn this option on. And set the following options accordingly.
- Overlay: This will allow you to display the image caption or description while hovering.
- Image Resolution: Select the suitable image resolution for the carousel.
- Image Fit: Choose the fit of the image.
Step 3: Style Settings of RAE Media Carousel

Style
- Slides
- Space Between: Adjust the space between the media files.
- Background Color: Add the background colors as per your color scheme.
- Border Size: Add borders to the carousel.
- Border Radius: If the rounded borders go with your webpage design, you can add them using this option.

- Navigation
- Arrows: Adjust the size and color of the swiping arrows.
- Pagination: This shows the visitors which image they are. Customize its position, size, and color here.
- Play Icon: If you add a video to the media, it will have the play button. You can use this play with these settings to change the button features.
- Shadow: Add and customize the shadow of the widget using this option.
How to Use Media Carousel Widget
We will now show you how to use the media carousel widget and add a section to our website.
To begin with, I added the slide content. I selected a few images for the carousel using the Coverflow skin, which gives the section a 3D effect. I kept all other settings to default, with two slides per view and four slides to scroll.
Moreover, I did not change the height and width, but you must change them according to the images you want to use in the carousel.

Next, to adjust the additional settings, I kept most settings to their default options. By default, the arrows setting was previously toggled, and I changed the pagination settings to fraction
To customize the transition, I did not make many changes. All the settings were toggled on by default, with a transition speed of 5000, which is decent; thus, I kept it the same.
Moreover, I used an icon as a cover to give a more user-friendly visual with image resolution, full, and image fit set to cover.

After the slide’s content was customized, I moved into styling it, reducing the slide distance to 0 and adding a thin black border with a radius 25.

To style the navigation, I increased the arrow size to 50 and changed it to black to make it better visible. For the pagination, I slightly increased the size and positioned it inside.

Remaining I kept the overlay setting and lightbox setting to default giving the widget a mAtching overall website appeal.
At the end the free Elementor media carousel is ready to go live on the website and looked like this.

FAQ
To add a media carousel to your Elementor website, you must install the Responsive Addons for Elementor plugin. While editing your page, search for the media carousel widget and add it to the page.
The media carousel Widget is an Elementor tool showcasing images, videos, portfolios, or products. It can enhance the user experience and design of the webpage.
Yes, using Responsive addons for Elementor plugin, you can add a media carousel for free in Elementor. This plugin doesn’t need a premium subscription and is free to use.
Conclusion
Using the Responsive Addons for Elementor plugin, you can add a media carousel widget to your Elementor website, enhancing its visual appeal and user engagement.
Following these steps, you can create an appealing media carousel and improve your website performance with little effort.
Moreover, if you liked reading this article, you can check out our other guides.
- How to Add Business Hours To Your Elementor Website
- How to add a slider to your Elementor Website
- How to Add Table Of Contents To Your Elementor Website
- How to Add a Content Switcher To Your Elementor Website
- How to Add Content Ticker To Your Elementor Website
Download the Responsive Addons for Elementor plugin now and get access to over 80 such plugins.


