
Are you wondering how to create a portfolio on your Elementor website?
Don’t worry, this article will help you create one for your website.
A portfolio is more than just a website section for creative professionals like photographers, event managers, designers, and artists. It’s a window into their world of creativity.
This article will guide you through the step-by-step process of creating a portfolio for your WordPress site. It empowers and enhances your website’s portfolio presentation with a single click.
So, let’s get started!
Tools Required to Create a Portfolio With Elementor
Now that you are familiar with the basic concepts of a portfolio website, let’s explore the tools required to create a portfolio WordPress website.
The primary tool you’ll need is a WordPress plugin that is easy to integrate with a page builder like Elementor, which specializes in creating user-friendly website features.
Cyberchimps’ Responsive Addons for Elementor is a popular plugin that offers extensive features. Coming with 80+ Elementor widgets and 150+ WordPress website templates, you can make use of this free plugin and easily create a beautiful portfolio website.
It provides a dedicated portfolio widget for Elementor that you can drag and drop onto your Elementor site.
Furthermore, it has a simple yet attractive portfolio layout with clickable photos, a colored overlay, and a title.
What makes the Responsive Addons for Elementor’s Portfolio widget better than Elementor’s Portfolio widget?
Here are the advantages of using Responsive Addons for Elementor:
- It has filterable grids that make it easy for visitors to find what they want.
- You can customize your portfolio widget with flexible layout options, including column adjustment.
- The creative layout makes a long-lasting impression on your visitors.
- Provides more design and styling options for the portfolio widget.
Please note that you can only use this portfolio widget if your making a website on Elementor page builder.
Creating a Portfolio On Your Elementor Website
To create a portfolio on your Elementor Website, follow the following steps:
Note: To use the RAE portfolio widget, you must have a website template that is built with Elementor page builder
Step 1: Install and Activate Responsive Addons for Elementor
Navigate through your WordPress Admin dashboard and go to Plugins > Add New Plugin.

Go to search bar and search Responsive Addons for Elementor.

Next, click on Install Now and download the plugin.

Click on Activate to activate the plugin.

Once the plugin is active, open the page where you want to create portfolio wordpress. Here we are using the Responsive theme by CyberChimps.
Navigate to WP Dashboard > Pages > New page.
You will see these settings in the sidebar while using the Responsive theme.
Select No Sidebar under the sidebar position, set the page layout style to default, and set the transparent header as default.
Click on Edit with Elementor.

Step 2: Adding the Portfolio Widget
After opening the Elementor editor, click the gear icon and set the page layout to Elementor Canvas.

Next, search RAE Portfolio on the search bar provided.

Drag and drop the RAE Portfolio Widget in the section where you want to add the portfolio section.

This is how you can easily create a portfolio section on your website. Next, let’s look at how you can customize the widget to your needs.
Step 3: Customizing The Portfolio Widget
Now it’s time to customize the Elementor Portfolio Widget.
There are various options available to customize the Responsive Addons for Elementor free portfolio widget.
Editing the Layout

- Columns: Specify the number of columns you want to display in the portfolio widget.
- Posts Per Page: select how many posts you want to display on the widget.
- Image Size: Define the size of the images. (Zoom in and zoom out)
- Item Ratio: Set the ratio of the items.
- Show Title: Choose whether to display or hide the title. The title will be shown when you hover over the images.
- Title HTML Tag: Wrap the title with a tag, such as H1 to H6, span, div, or paragraph.
Editing the Query

Choose the source from which the widget will display the content. You can select from posts, pages, custom post types (if available), manual selection, current query, and related. Depending on the chosen source, you will be provided with options to filter the results.
Here, you can see I have selected the source as a page.

The options for filtering include:

- Include By: Term or Author— Use the search and select function to choose which ones to include.
- Date: Choose from All, Past Day, Past Week, Past Month, Past Quarter, Past Year, or select Custom to specify before or after dates.
- Order By: Set the order in which the posts will be displayed, with options including Date, Title, Menu Order, or Random.
- Order: Choose between DESC (descending) or ASC (ascending).
- Ignore Sticky Posts: Select Yes or No.
- Query ID: Assign a unique ID to your query to enable server-side filtering.
The options for filtering exclude:

- Exclude By: To exclude, select from Current Post, Manual Selection, Term, or Author, then use Search and Select for Manual, Term, or Author choices.
- Avoid Duplicates: Choose Yes or No. Select Yes to avoid displaying duplicate posts on the front end only.
- Offset: Use this setting to skip over posts (e.g., “2” to skip over 2 posts).
- Date: Choose from All, Past Day, Past Week, Past Month, Past Quarter, Past Year, and Custom (Choose Before or After dates).
- Order By: Select from Date, Title, Menu Order, or Random.
- Order: Choose between DESC (descending) or ASC (ascending).
- Ignore Sticky Posts: Select Yes or No.
- Query ID: Provide a custom unique ID for your Query to allow server-side filtering.
Editing the Filter Bar

- Show: Enable this option to display the filter bar above the portfolio. It allows users to filter portfolio items based on available taxonomy terms.
- Taxonomy: Select the taxonomy used to filter and display items. You can choose from Categories, Tags, or any taxonomy associated with a custom post type.
Note: If you’ve selected Pages as the post type, the filter bar and taxonomy options will not display results. These features work only with post types that support taxonomies, such as Posts or Custom Post Types (e.g., Portfolio, Products).
Step 4: Styling the RAE Portfolio Widget
Styling the Item Section of the Portfolio Widget

- Column Gap: Set the exact gap between columns.
- Row Gap: Set the exact gap between rows of items.
- Border Radius: Set the border radius to control the corner roundness of the images.
Styling the Item Overlay Section of the Portfolio Widget

- Background Color: This setting allows you to choose the overlay’s background color when hovering over the image.
- Color: This setting enables you to select the color of the post’s title, which is visible within the overlay when you hover over the image.
- Typography: With this option, you can customize the typography of the title.
Customizing the Filter Bar in the Portfolio Widget
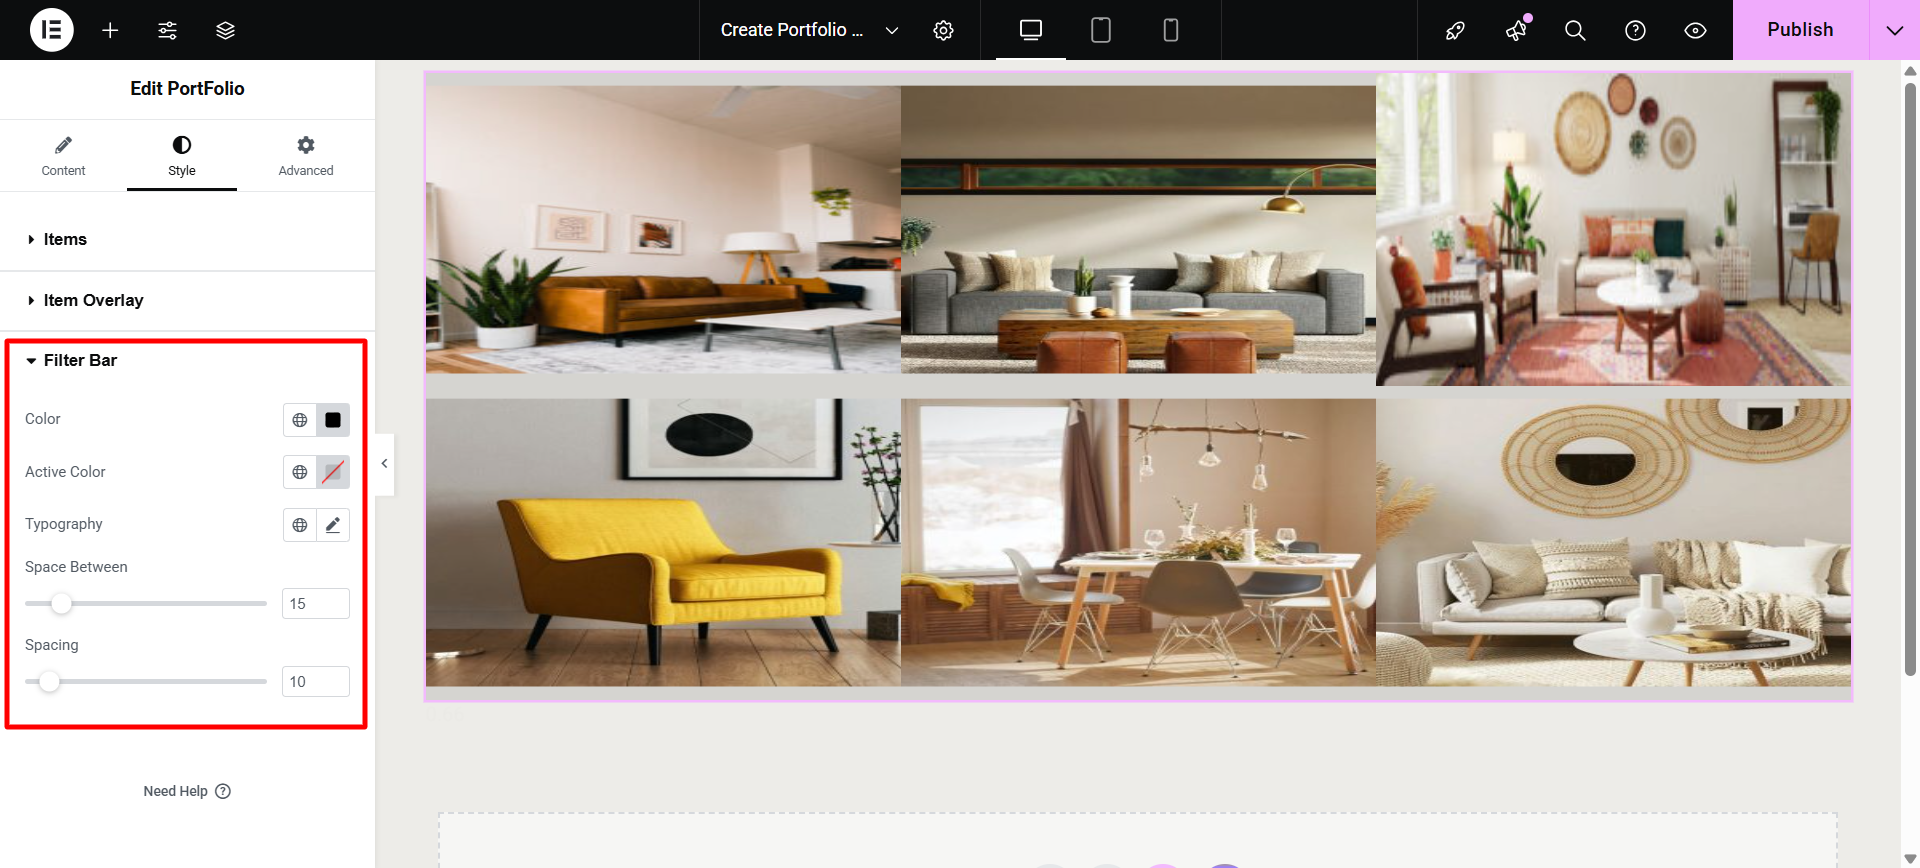
The Filter Bar enables users to sort and view portfolio items by taxonomy terms, such as categories or tags (if available).
Available Settings:
- Color: Set the text color for the filter options.
- Active Color: Define the color of the currently selected filter (active term). It helps highlight which filter is applied.
- Typography: Customize the font family, size, weight, and other text properties of the filter terms.
- Space Between: Adjust the spacing between filter items.
- Spacing: Controls the vertical spacing (margin/padding) between the filter bar and the portfolio grid below it.
Following the above steps, you can easily add, customize, and style an Elementor portfolio widget.
FAQ
Yes, you can use free Elementor add-on plugins like Responsive Addons For Elementor to create portfolio section for your website.
The best plugin to add a portfolio for your WordPress website is Responsive Addons For Elementor.
Install and activate the Responsive Addons for the Elementor plugin on your WordPress dashboard. Then, search for the RAE Portfolio Widget. Drag and drop the Portfolio Widget element onto your Elementor page and customize according to your needs.
Conclusion
It takes a lot of time and work to assemble a strong portfolio. However, using Elementor’s portfolio widget, you can add a portfolio to the website in minutes.
Using the Elementor portfolio widget, you can showcase your work to the public, increase lead generation, set yourself apart from competitors, and create numerous opportunities for yourself.
We recommend to use the RAE portfolio widget by Responsive Addons for Elementor for adding a stunning portfolio to your Elementor website.
If you liked this article, we suggest you to read these articles as well:
- How To Create Flip Box Overlays And Hovers In WordPress
- How To Create A Countdown Timer For Your WordPress Website
- How To Create An Image Gallery In WordPress
Thinking of making a stunning website on WordPress, grab the Responsive theme now!


