Are you thinking of starting a blog on WordPress?
By now, you must have read that starting your blog is a beautiful journey.
After reading some blogging income reports, you might also be inspired to start a blog.
Whatever the reason may be, starting a WordPress blog can be exciting.
Back then, I started writing on Blogger until I discovered WordPress.
I had no idea where to begin.
If you’re overwhelmed about getting started, don’t worry—you’re not alone.
In this guide, I’ll walk you through every step of the process. We’ll cover everything from choosing the perfect domain name to crafting your first post.
By the time you’re done, you’ll have your own WordPress blog, ready to share with the world.
Let’s dive in.
- Pick a Blog Topic
- Step 1: Choose a Domain Name and a Web Hosting Plan
- Step 2: Installing WordPress
- Start by Choosing a WordPress Theme
- Set a Correct Permalink Structure
- Install WordPress Plugins
- How to Install Plugins
- Adding Essential Pages for Your Blog
- Are You Wondering Why Create Pages First?
- Write Your First Blog Article
- Setting Your Blog’s SEO
- Start a WordPress Blog FAQ
Pick a Blog Topic
What is the most challenging task in setting up a blog?
Is it setting your hosting or publishing your first blog post?
None!
The most challenging part of setting up a blog is choosing a topic.
Some experts say to write topics you’re passionate about and other advice to document your journey.
However, your topic can be different and may vary depending on your goals.
For instance, a student may start a blog to generate income, while a business owner may write blog posts to promote their business.
Here, business owners also write articles to promote the business, not for their passion and liking.
Here’s a tip to pick a topic for your blog.
Look for a topic that meets your goal in the short term and long term.
For instance, if you’re a student, your short-term goal can be learning how to blog. Here, you can select a subject or an area where you wish to develop expertise. In the process of mastering your subject, you can aid your learning by writing articles on your blog.
If you’ve been running a local business for a long time, you may choose a topic to promote your business online. This topic automatically aligns with your business goals, and you can hire an in-house blogger/writer to run and maintain your website.
Let’s now turn our focus to learning some technical things.
Starting with choosing a content management system.
Step 1: Choose a Domain Name and a Web Hosting Plan
Before you start building your blog on WordPress, you should know the history of WordPress, and you should need to have the following 2 things:
- A domain name
- A web hosting plan
Let’s look at how you can go about buying both:
A Domain Name
A domain name is the online equivalent of the physical address. It’s how your visitors will find you. For example, www.cyberchimps.com is the domain name of CyberChimps.
On a piece of paper, brainstorm and come up with a lot of ideas to decide on a domain name. The domain name should be easy to remember, spell and should not be a homonym as it helps to avoid any confusion. Try using a business name generator if you need more ideas.
Also, go for .com as the domain extension, as .com extensions are easy to remember.
Use a service like Instant Domain Search to verify the availability of your domain name. If the domain name of your choice isn’t available, go back to your brainstorming list and try out other names.
A Web Hosting Plan
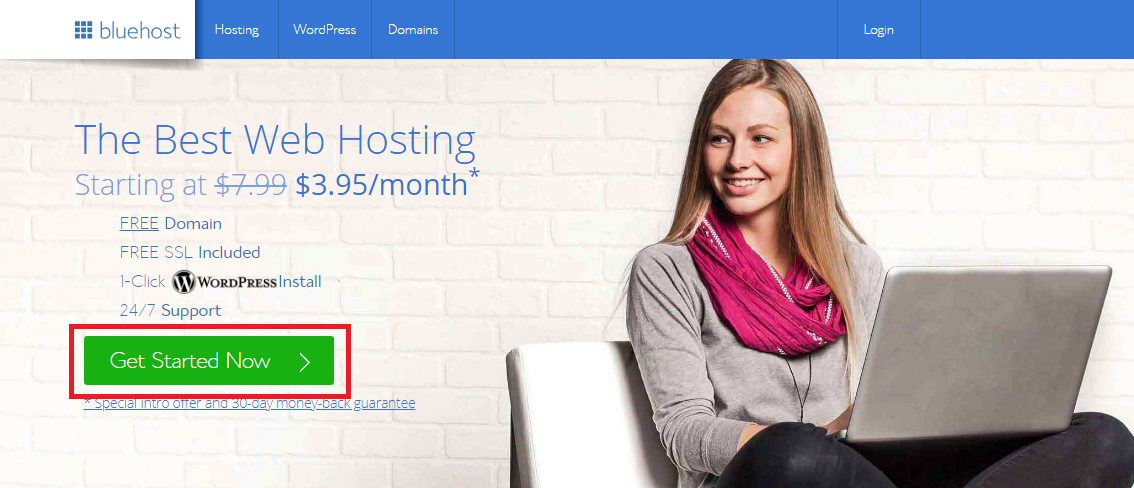
A web hosting plan allows you to store the website files in its server so that the website visitors can access your website. There are plenty of web hosts to choose from, but we will stick to Bluehost for this article.
Click on the Get Started Now button when you land on the homepage of Bluehost:
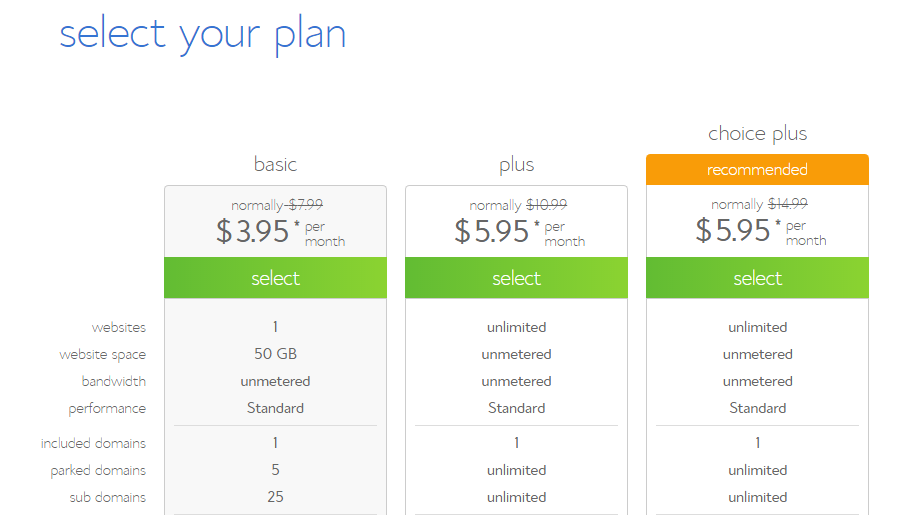
Upon clicking, you would be taken to their pricing page where you will see 3 different pricing options. If you’re just starting out, we would recommend you to go for the basic plan. You can always upgrade if the need arises.
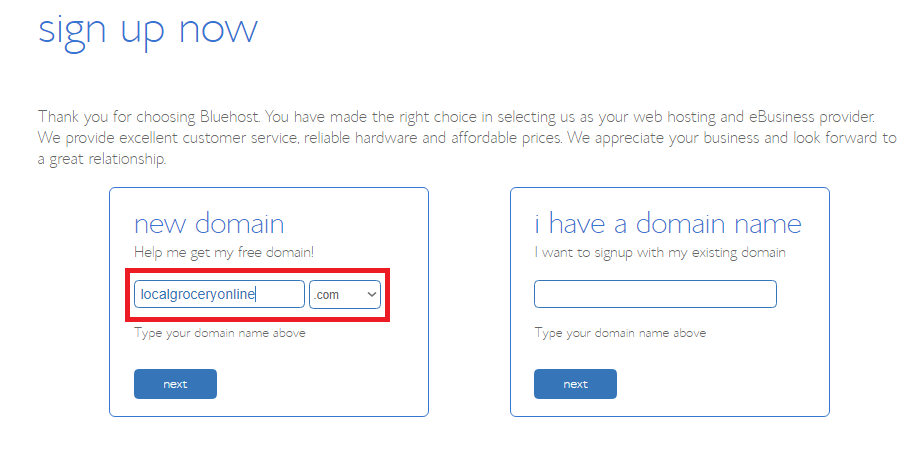
After selecting the plan, you need to enter the domain name that you have shortlisted.
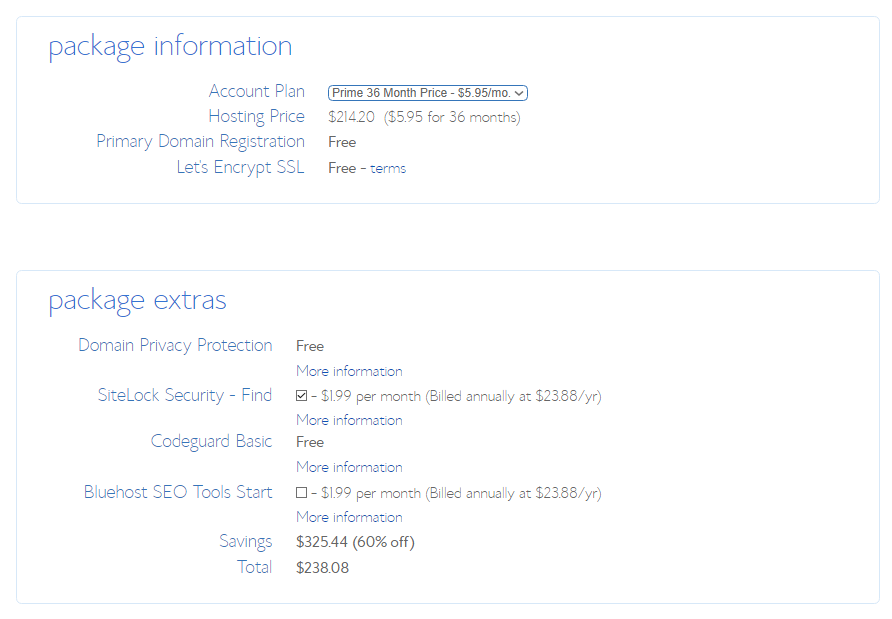
On the payment page, you’ll see the summary of your purchases and will be shown a few add-ons under the package extras section. Out of those select only Domain Privacy Protection as it keeps your account details private.
After completing the payment, you’ll receive a confirmation/registration mail. Now, you are all set to install WordPress.
Step 2: Installing WordPress
Installing WordPress on Bluehost is a simple task. Bluehost and other major web hosts offer a feature called 1-Click Installation that allows you to install WordPress with a single click. Here is how you can install WordPress on Bluehost
- Log into your web hosting service provider (In this case Bluehost)
- Go to the control panel
- Under the Website section, click on Install WordPress
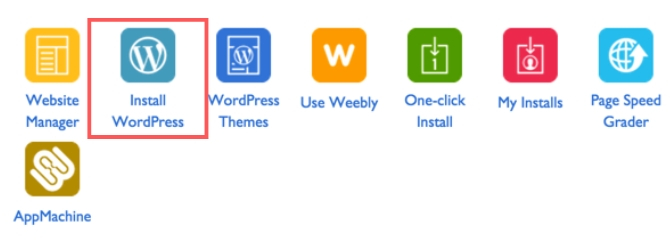
- Choose the domain where you would like to install WordPress
- Enter the site name (Not the domain name), admin username and password, and click on Install Now
Tip: The site name should be like a brand name for the blog. For example, if you write poetry, a poet’s musings could be the site name
You have now successfully installed WordPress. You can now build and customize your newly setup WordPress blog!
Log into Your WordPress Website Dashboard
Start by logging in to your WordPress website.
To find your login URL, open a new window in your browser and type your website name `www.yourwebsite.com/wp-admin` or `/wp-login.php` into your website URL.
– Example: `www.yourwebsite.com/wp-admin` or `www.yourwebsite.com/wp-login.php`.
Enter Your Username or Email Address you used while setting up WordPress. Likewise, enter your case-sensitive password.
After entering your details, click Login to access the WordPress dashboard.
Start by Choosing a WordPress Theme
Let’s start by setting up the look and feel of your website.
For this, you need to install and activate a theme in WordPress.
What is a theme in WordPress? You may ask. It’s a collection of CSS and PHP files responsible for styling your website’s parts.
Using a WordPress theme customizer, you can create your website’s header, footer, and sidebar.
Install and Activate a WordPress Theme
Let’s quickly see how to set a theme in WordPress.
From your admin dashboard, go to Appearance and click Themes.
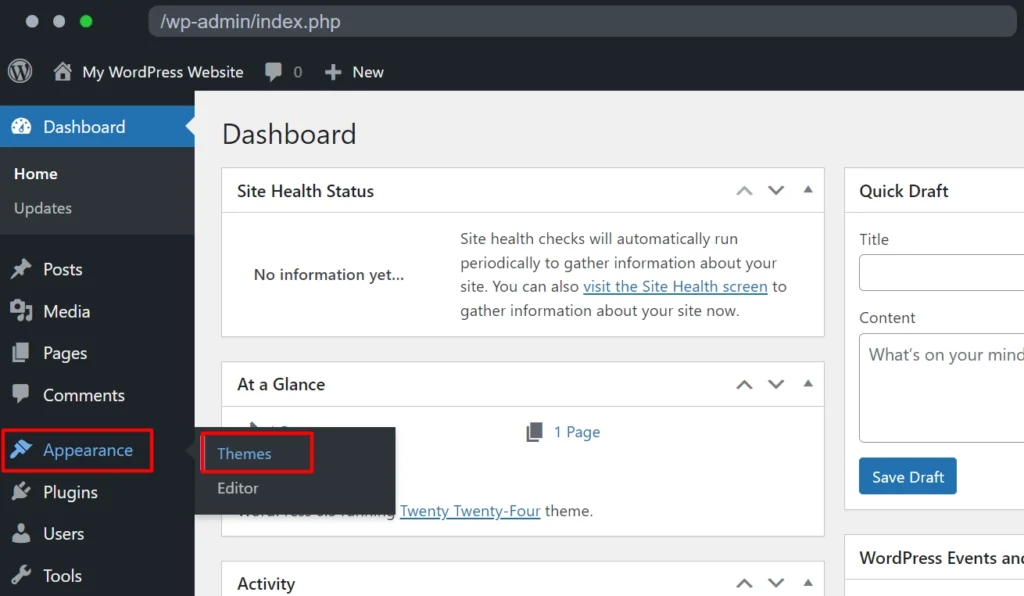
Click Add New on the Themes page.
Enter the theme name you wish to use in the “Search theme” field.
For example, we looked for a well-known Responsive theme.
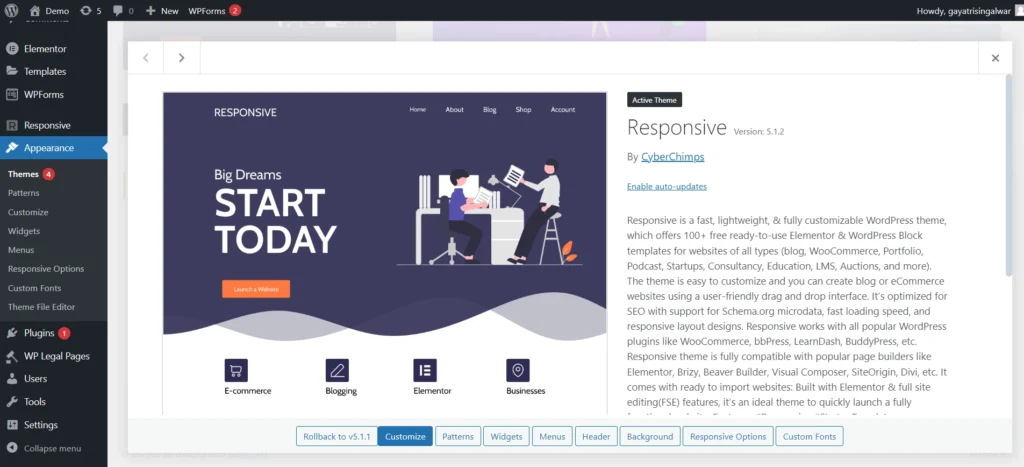
It is one of the best WordPress themes, offering 250+ starter block editors and complete customization to simplify building websites.
Click Install to begin the installation process.
Once the installation is complete, click on the Activate button.
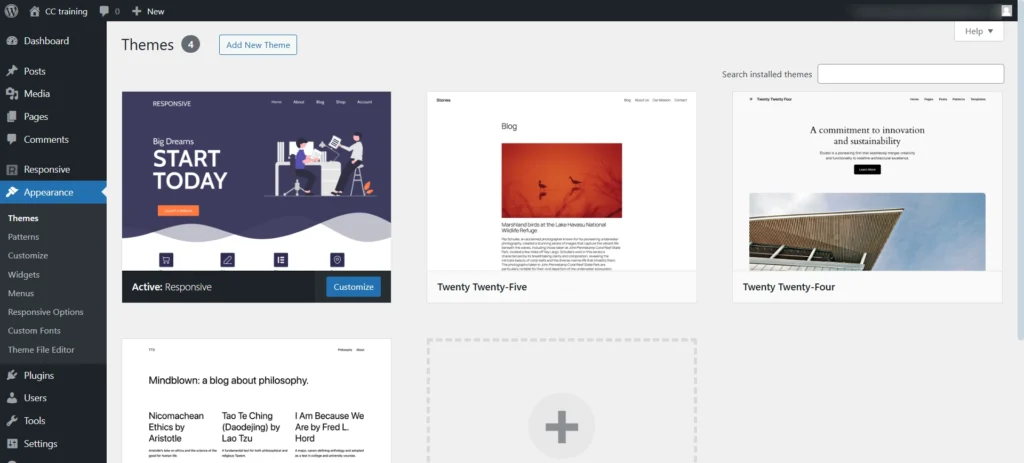
That’s all you need to do to install and activate a WordPress theme on your website.
Set a Correct Permalink Structure
Permalinks are URLs for your blog posts and pages.
By default, WordPress sets the link in the following format:
yourwebsitedomain.com/?p=123

It’s the default setting on a newly installed WordPress setup. We do not know why they do this.
But for any reason, this will not help your readers find your content in the search engines.
Before publishing anything, you need to change the permalink structure to the correct format.
Here’s how you can do it:
- From your website admin dashboard, hover over Settings
- Click Permalinks
- Under Common Settings, set the option to Post name
Your links will now look like this:
- yourdomain.com/easy-pasta-recipes
- www.yourdomain.com/fitness-tips
- yourdomain.com/digital-marketing-strategies
- subdomain.yourdomain.com/starting-a-small-business
This clean and organized structure improves readability for your audience and enhances search engine optimization (SEO) for platforms like Google.
Install WordPress Plugins
WordPress is a content management system.
It gives you a dashboard to log in to publish your posts and media.
But you may need additional functionalities.
And that can be added via plugins.
A plugin is software that lets you add a specific feature to your website. For example, you can use plugins to improve SEO, enhance security, create contact forms, or even integrate social media.
Now, you will need a set of plugins.
Let’s list a few that will set the pace for your blog.
An SEO plugin
Focus on search engine optimization (SEO) to improve your blog’s search engine rankings.
The term sounds scary, but with a little effort, every day will enhance your rank over time.
You can select any of these:
- Yoast SEO
- Rankmath
- SEOPress
All three plugins enable you to:
- Create XML sitemaps for better crawling by search engines.
- Add meta titles and descriptions to posts and pages.
- Improve on-page SEO with user-friendly guidance.
An Anti-spam plugin
Publishing blog posts often attract spam comments, making it hard to identify genuine ones manually.
Akismet Anti-Spam simplifies this by filtering out spam and showing only legitimate comments.
You can review the spam list and restore any comments mistakenly flagged.
A Backup plugin
Backups are essential for ensuring you don’t lose your content in case of unexpected issues.
Here are some recommended backup plugins:
- UpdraftPlus
- BackupBuddy
- Duplicator
Caching Plugins
Improve your site’s performance and speed with caching plugins.
Popular options include:
- WP Rocket
- W3 Total Cache
- LiteSpeed Cache
Contact Form Plugin
Add an easy way for visitors to contact you with plugins like:
- Contact Form 7
- Ninja Forms
And some essential functionality plugins.
How to Install Plugins
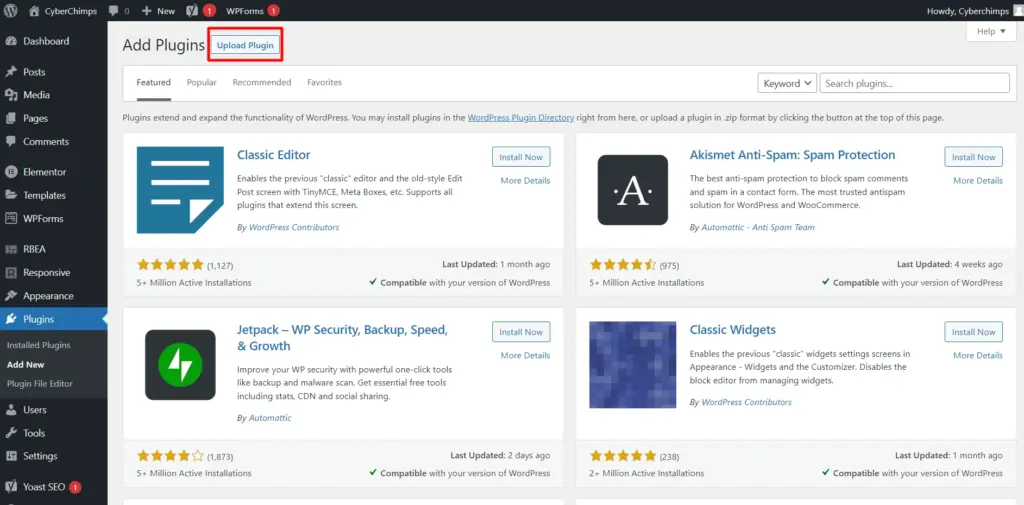
Here’s a step-by-step guide to installing a plugin:
- Log in to Your WordPress Dashboard
- Navigate to Plugins > Add New
- Search for the desired plugin in the search bar.
- Click Install Now next to the plugin you want.
- Once installed, click Activate to enable it on your site.
For premium plugins, download the plugin file from the developer’s website and upload it by clicking Upload Plugin in the “Add New” section.
Adding Essential Pages for Your Blog
Let’s build some pages before you go ahead and start writing your first article.
Adding new pages in WordPress is easy.
It’s similar to adding new posts.
For your new blog, you should have at least four pages:
1. Homepage
A homepage is where your visitors will usually land.
You can add the below sections on your homepage:
- A customized page that explains about you and your blog
- Your latest post
- Your blog posts in reverse chronological order
Go with the one that will appeal to your audience.
Remember, you can experiment and tweak things to see what works.
2. About Page
You started this blog to let people know about your story.
Your About page should talk about you! And your blog.
Please take it as an opportunity to discuss your passion, art, or craft.
Let your readers know how you start and how you intend to use the blog.
Explain who the blog is for, write your bio, and discuss what type of content your readers can expect.
3. Blog Page
Your blog page is your main page.
Here, users should find all your blog articles in reverse chronological order.
If you write about different topics, you can categorize them so that the visitors won’t get jumbled in the stream of posts.
4. Contact Page
Make it easy for your visitors to get in touch with you.
The contact page should ideally have a contact form, your email ID (optional as you might get a lot of spam emails), and links to your social media profiles.
Are You Wondering Why Create Pages First?
The difference between pages and posts is that a page in WordPress is a static entity, whereas a post is a dynamic entity.
Posts can be categorized, whereas pages are organized hierarchically.
Let’s start writing.
Write Your First Blog Article
Now that you have the basic blog setup ready, you can write your first blog article.
Creating a blog post in WordPress is very simple.
From your admin dashboard, go to Posts.
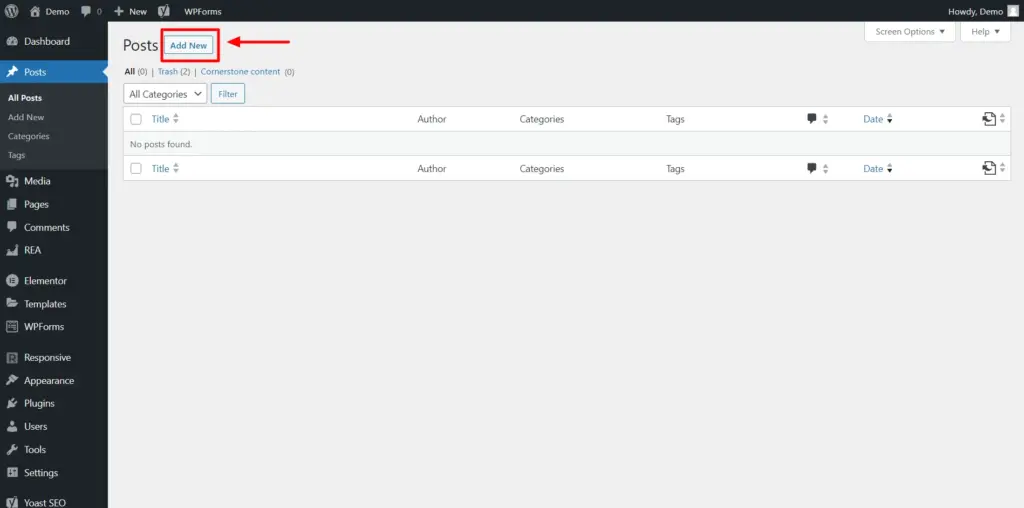
Click on the Add New button to see a text editor where you can write a blog post.
To add text, you just need to click and type. To add content like an image, video, or headings, you can add the required WordPress blocks from the “All blocks” panel.
If you’re new to the WordPress block editor, here is a complete guide to help you understand how it works.
Setting Your Blog’s SEO
You can write great content on your blog.
Still, people will never find it. Period!
If you want people to find your blog, you must learn SEOaddons. This way, you can rank in search engines like Google.
Learning SEO takes time, but we’ll help you cover the basics so you’ll have a good start when setting up your first blog.
If you have not installed an SEO plugin, you can install the Yoast SEO plugin by going into Plugins > Add new > type SEO in the search bar.
Look for the Yoast SEO plugin and install it.
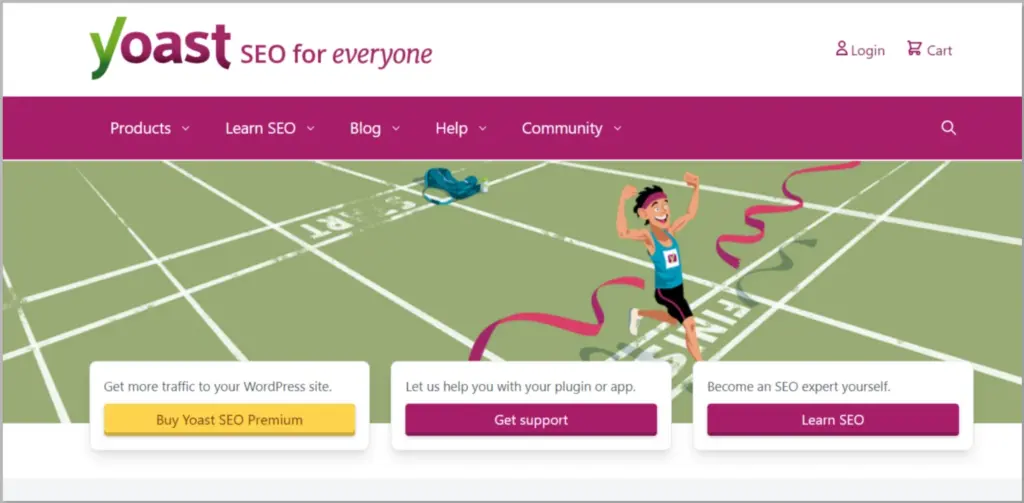
It’s free and a good plugin to set the basics of SEO for your blog.
Make Sure Your Site Is Visible to Search Engines.
To make your blog discoverable by search engines like Google and Bing, follow these steps to ensure the necessary setting is disabled:
- In your WordPress dashboard, navigate to the left-hand menu.
- Hover over Settings and click on Reading.
- Verify that the “Discourage search engines from indexing this site” checkbox is unchecked.

This will allow search engines to index your site correctly.
Start a WordPress Blog FAQ
A blog is a website where people regularly publish content. Content is usually in the form of articles, posts, and media like images and videos.
Blogs can include personal life blogs, technical tutorials, recipe articles, news, and more. Readers engage with the content and can share it on social media.
You can start a blog as a hobby or use a blog as your journal.
Blogs can also help you make money. If your blog website serves particular types of content, you can use affiliate links to promote products and services and display ads to earn money from your website.
You can use your blog to document your passion, share your learnings, establish authority in your niche, and establish a continuous learning process that helps you grow professionally.
Definitely yes.
You can monetize your blog through various methods like:
1. Display ads,
2. Affiliate marketing,
3. Sponsored posts, or
4. Selling products and services like eBooks or courses.
5. Offer memberships,
6. Hosting paid webinars,
With quality content and consistency, blogging can become a profitable venture.
You can download WordPress CMS for free on your local computer. However, if you wish to publish your website on the Internet, you’ll need to buy a hosting plan.
WordPress bloggers can make money through ads, sponsored posts, and selling or recommending products using affiliate links.
WordPress does not directly pay for content written. Earnings depend on factors like traffic, authority, and content usefulness.
WordPress is an advanced platform for bloggers who wish to establish themselves as an authority in their niche or industry. It has more features than bloggers.
Blogger is a straightforward platform designed specifically for blogging. It can also be used to write because it has a simpler interface and fewer options.
Conclusion: Key Takeways
- Pick a topic that you want to write about
- Buy a domain name and hosting to publish your blog on the internet
- Download and install WordPress on your hosting
- Setup WordPress theme, plugins, and permalink structure
- Make essential pages
- Write your first blog article
- Set up your Google Search Console and Google Analytics account
- Promote your article on social media
- Start an Email list
- Find ways to make money with your blog


