↓ Skip to Main Content
Cyberchimps Logo

Main Navigation

  • Templates
  • Features
  • Plugins
    • Responsive Plus
    • Starter Templates
    • Addons for Elementor
    • Responsive Blocks
  • Go Pro
  • Blog
  • Pricing
  • Login

Installation & Updates

5
  • How to Create Your Account on Cyberchimps Responsive
  • FIX: Uploaded-file-exceeds-the-upload_max_filesize
  • Getting Error – The theme is missing the style.css stylesheet?
  • How to Install Responsive Theme
  • How to Download & Install Responsive Starter Template Plugin?

Responsive Theme Walkthrough

13
  • Show Last Updated or Published Dates on Your Blog Posts
  • Create a Header Using Responsive Theme’s Header Builder
  • Create a Footer Using Responsive Theme’s Footer Builder
  • Responsive Theme Typography Presets
  • How To Create A Sticky Header Using Cyberchimps Responsive Theme
  • How To Change The Copyright Footer Text In WordPress
  • How To Change Breadcrumbs Icon in Responsive Theme
  • How to adjust the width of sidebars from the customizer
  • Resize Logo From Theme Customizer
  • How to Add Breadcrumbs Using Responsive Theme?
  • Responsive Theme Settings
  • How to Add Related Posts Using Responsive Theme
  • Responsive Theme Widgets

FAQ

8
  • How To Enable Debug Log In WordPress
  • Download A .zip File Without Unzipping In Safari
  • How To Create An Admin User For Support In WordPress
  • Upgrading to 4.0.0 +
  • Upgrading to 4.1
  • Facing issues in importing Yoga Instructor Pro?
  • Yoast Seo Breadcrumb support in the theme
  • Updating to 4.2.0 results in the blank front end

Pre Sales / Billing FAQ

2
  • Billing FAQ
  • Pre Sales FAQ
View Categories
  • Home
  • Docs
  • Responsive Theme
  • Responsive Theme Walkthrough
  • Create a Footer Using Responsive Theme’s Footer Builder

Create a Footer Using Responsive Theme’s Footer Builder

A well-designed footer is a crucial element of any website. Similar to the header, it appears on most pages and posts but is located at the bottom, making it the last section visitors see before leaving your site. 

Many overlook its significance, but an effective footer can enhance user engagement, improve conversions, boost subscriptions, and conveniently provide essential information

Visitors often expect to find key details in the footer, such as:

  • Company information
  • Contact details
  • Social media links
  • Navigation links to important pages
  • Call-to-action buttons

A well-structured footer allows users to explore additional content and easily navigate your site, reducing the need to scroll back to the top.

Implementing a Footer Using the Cyberchimps Responsive Theme #

This guide will walk you through creating and customizing a footer using the Cyberchimps Responsive Theme in WordPress.

Prerequisites #

Before proceeding, ensure you have installed and activated the Cyberchimps Responsive Theme. If you need guidance on installation, refer to this documentation on how to install the Responsive theme.

Accessing the Footer Customization Options #

To begin customizing your footer, follow these steps:

  1. Navigate to your WordPress dashboard. Click on Responsive from the left panel and select Customize Footer Option. Alternatively, hover over Appearance and click on Customize.
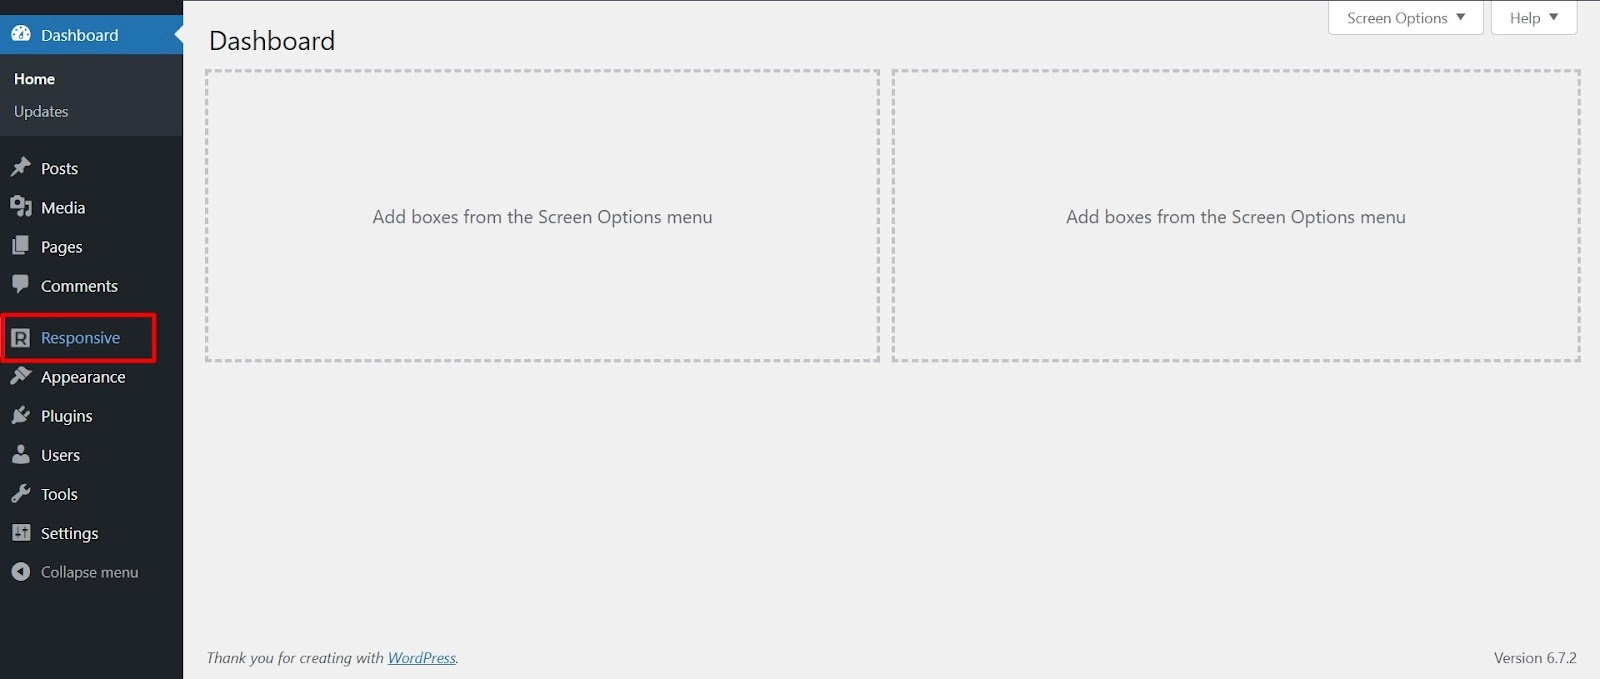
Click on Responsive from the left hand panel
  1. Select Customize Footer Options to open the footer settings.
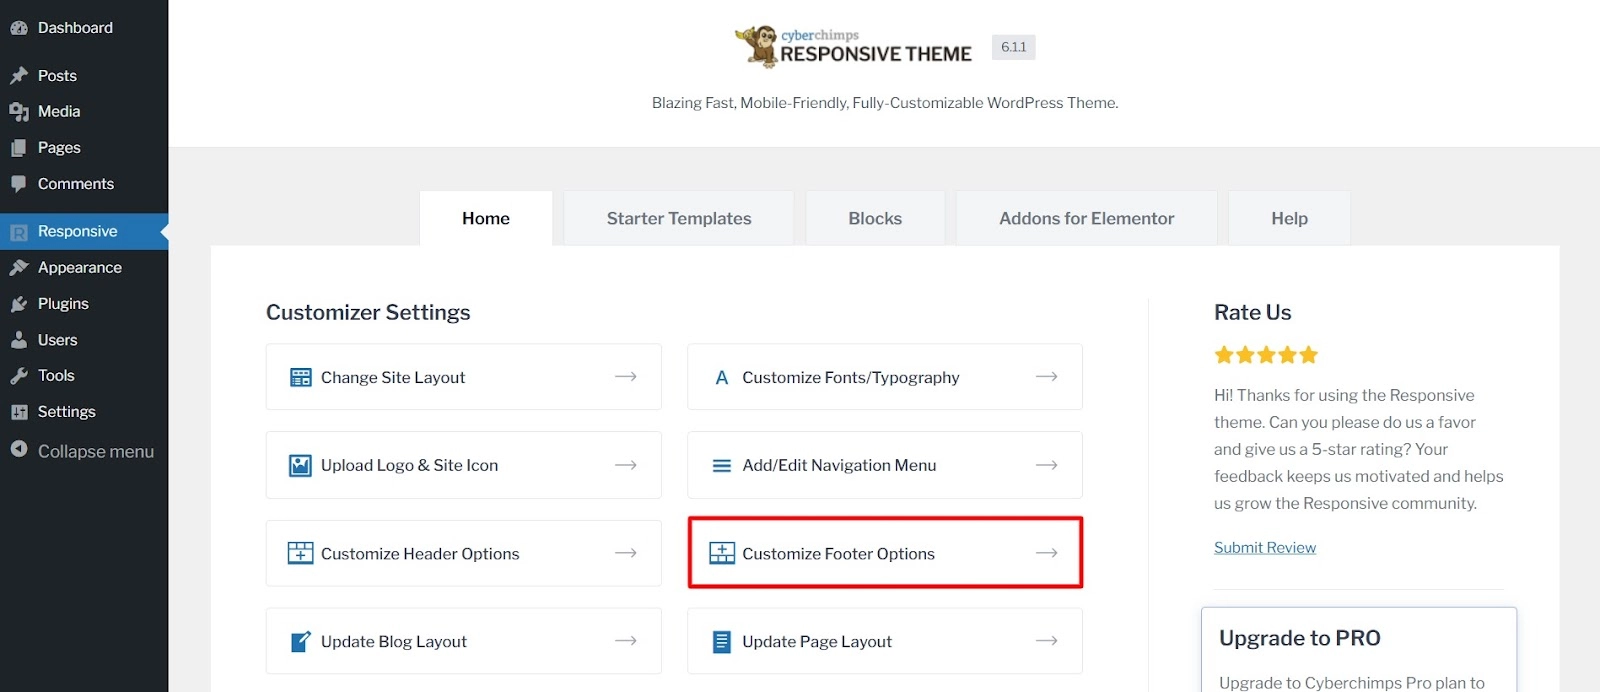
Select Customize Footer Options

Understanding the Footer Builder #

Once inside the Footer Builder, you will see two main sections:

  • Left Sidebar: Displays a list of all active footer elements. The panel is divided into two parts: General tab and design tab.
  • Live Preview: This shows how your footer elements appear in real-time.
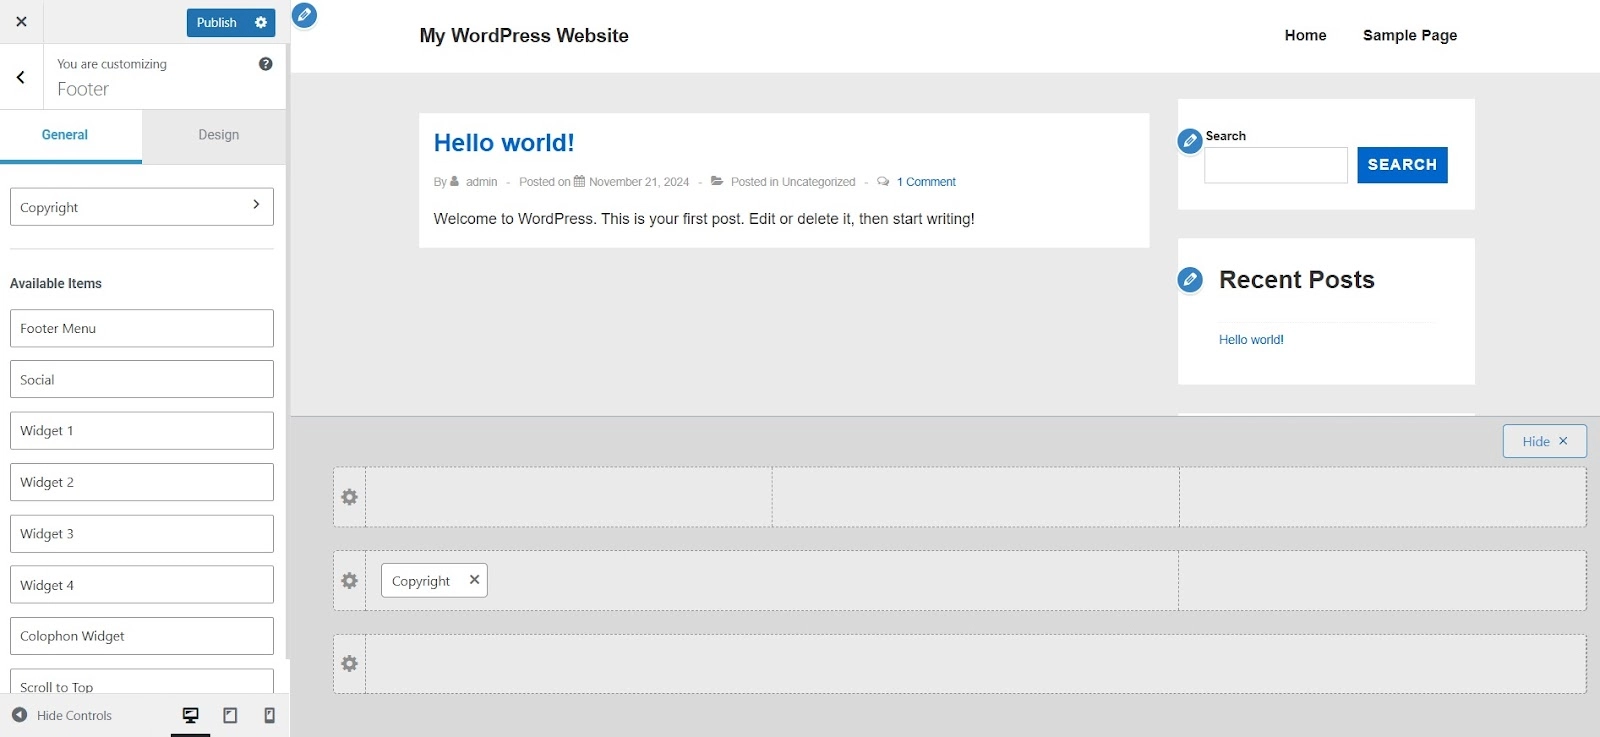
Footer Overview

You can modify different footer sections and see instant changes using the Visual Footer Builder.

The Footer Builder is divided into three parts: Above Footer, Primary Footer, Below Footer.

Adding the Copyright Section #

The Copyright section allows you to display copyright information and customize its appearance. You can:
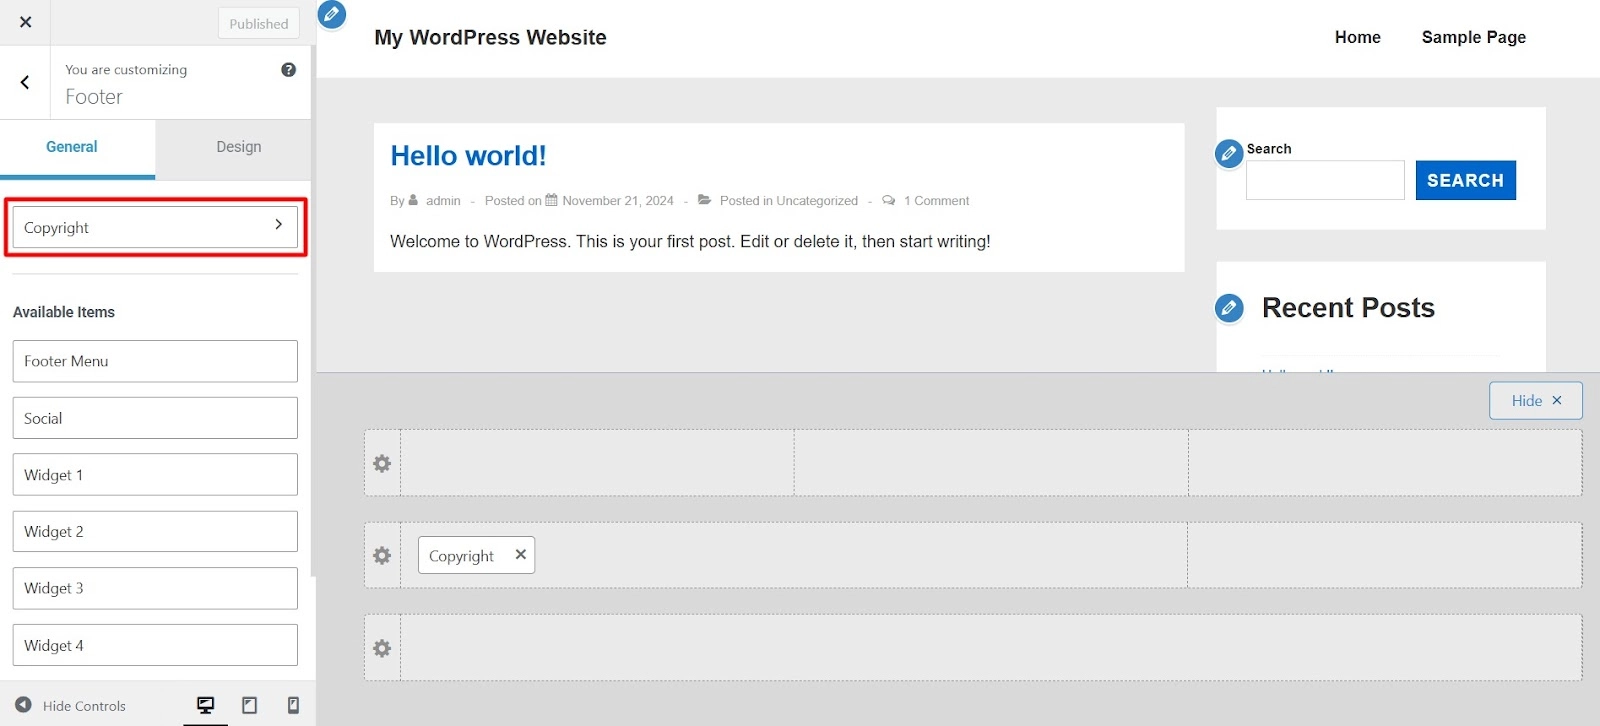
Adding the copyright section
  • Add custom text and style it with different fonts, italicization, and colors.
  • Include useful shortcodes for dynamic content.
Copyright settings

Styling the Copyright Section #

  • Adjust text alignment to suit your design preferences.
  • Hide or display copyright text on different devices (desktop, tablet, mobile).

Customizing Footer Design #

In the Design tab, you can personalize the overall look of your footer by adjusting the following settings:
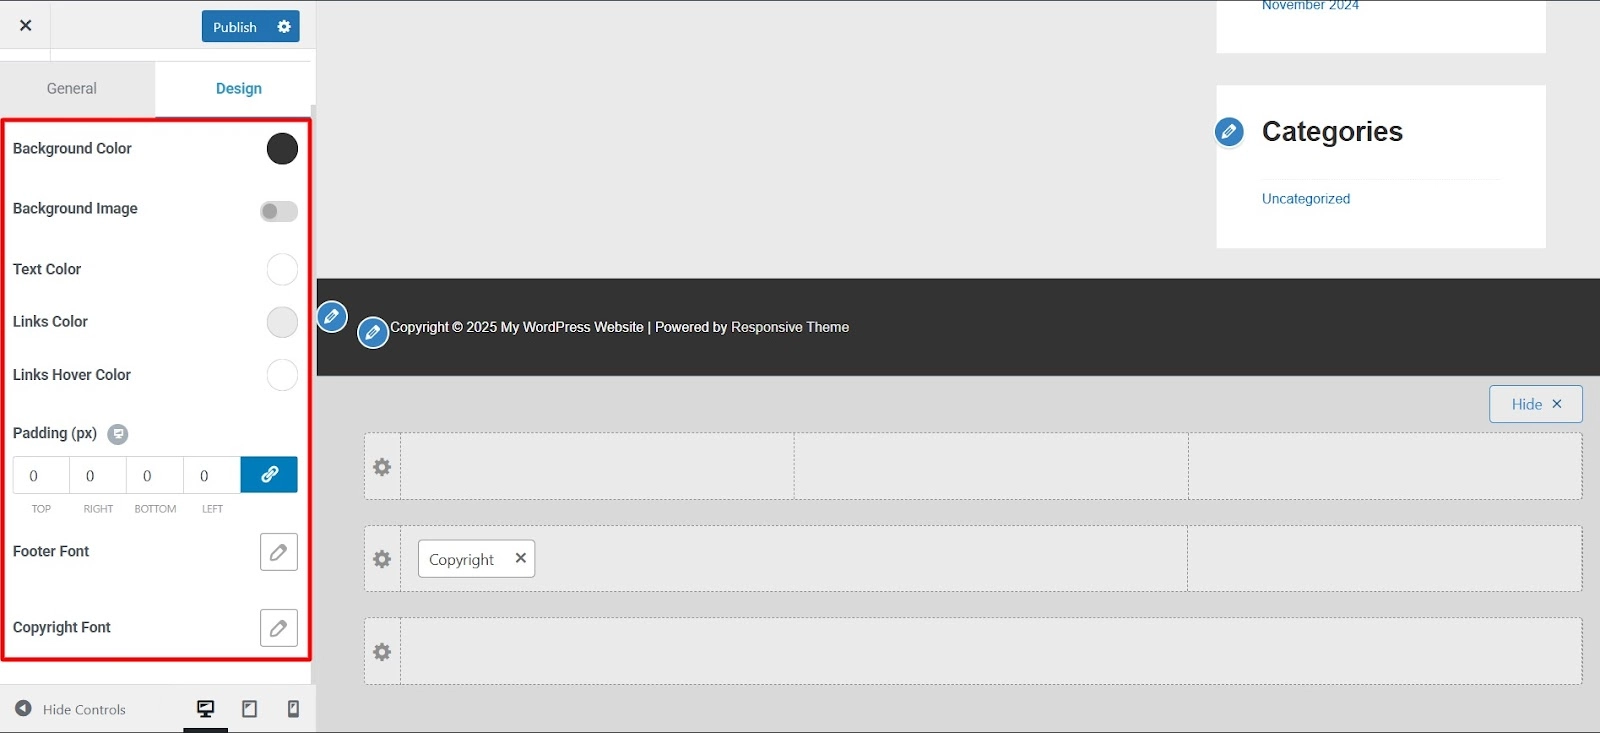
Customizing footer
  • Background Color: Change the footer’s background color.
  • Background Image: Upload an image to be used as the footer’s background.
  • Text Color: Modify the text color for improved readability.
  • Links Color: Adjust the color of links in the footer.
  • Links Hover Color: Change how links appear when hovered over.
  • Padding: Add spacing around the footer content to improve visual appeal.
  • Footer Font: Customize the font style used in the footer.
  • Copyright Font: Change the font style for copyright text.

Visual Footer Builder #

Similar to the Header, the Visual Footer Builder is divided into three distinct sections:

1. Primary Footer – The middle section is the main footer area.

2. Above Footer – The upper section is often used for adding subscription forms or call-to-action buttons.

3. Below Footer – The lower section typically contains copyright information and contact details such as an address, phone number, email, and company registration number.
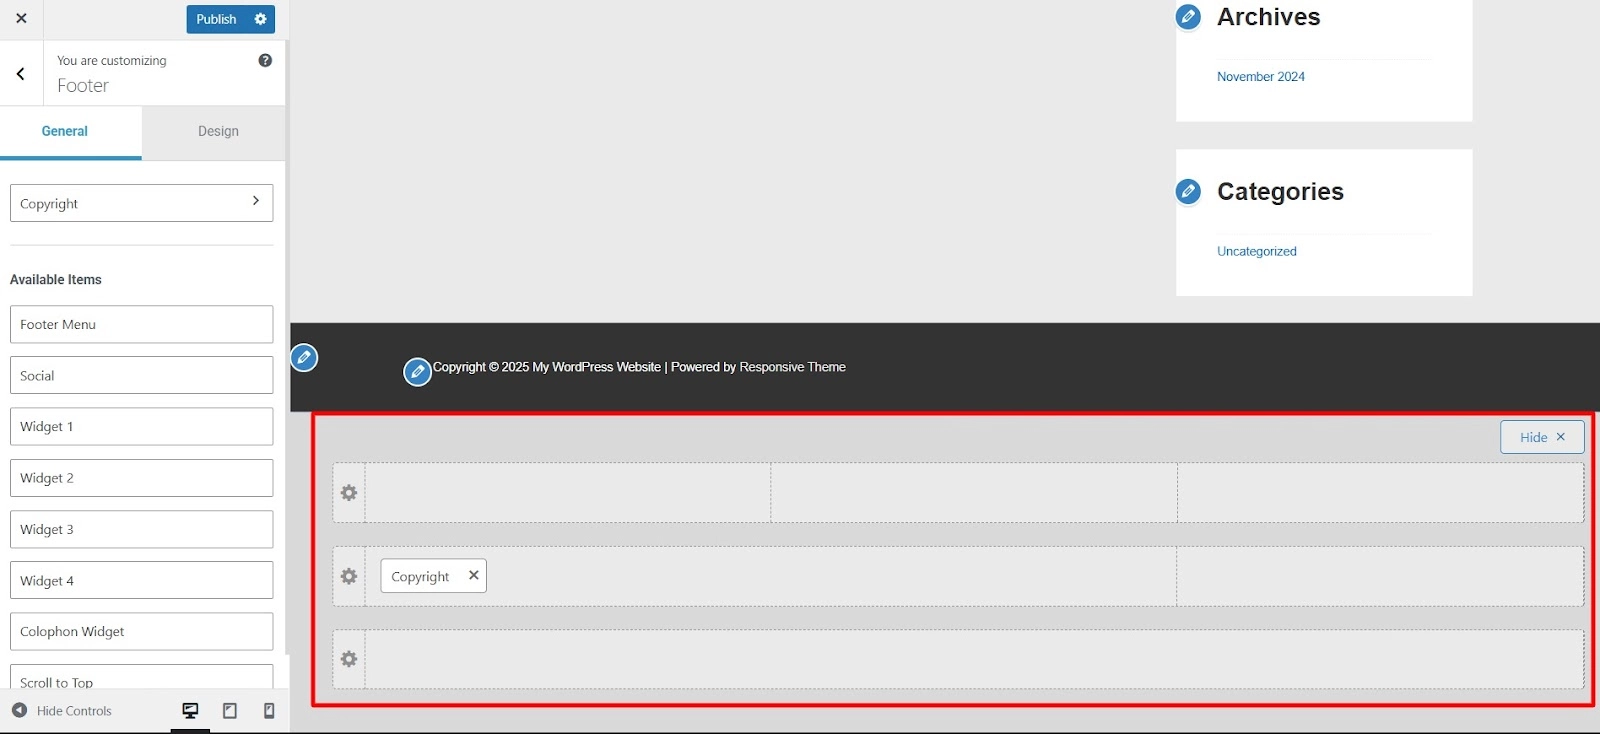
Visual Footer

To customize each footer section, click on the “Settings” icon on the left side of the respective sections.

Finalizing Your Footer #

Once you’ve made your desired changes:

  1. Review the live preview to ensure your footer appears as expected.
  2. Click Publish to save your modifications.
  3. Refresh your website to see the updated footer in action.

Following these steps, you can create a professional and functional footer using the Cyberchimps Responsive Theme in WordPress. 

A well-optimized footer enhances user experience and provides essential information at a glance, making it a valuable part of your website’s design.

Updated on June 8, 2025

What are your Feelings

  • Happy
  • Normal
  • Sad
Share This Article :
  • Facebook
  • X
  • LinkedIn
  • Pinterest
Create a Header Using Responsive Theme’s Header BuilderResponsive Theme Typography Presets

Powered by BetterDocs

Leave a Reply Cancel reply

Your email address will not be published. Required fields are marked *

*

*

Table of Contents
  • Implementing a Footer Using the Cyberchimps Responsive Theme
    • Prerequisites
    • Accessing the Footer Customization Options
    • Understanding the Footer Builder
    • Adding the Copyright Section
    • Styling the Copyright Section
    • Customizing Footer Design
    • Visual Footer Builder
  • Finalizing Your Footer

Our Products

Responsive Paid Plan

Responsive Addons for Elementor

Starter Templates

Responsive Blocks

WP Legal Pages

WP Adcenter

GDPR Cookie Consent

Powered by Responsive WordPress theme

RESOURCES

Responsive Platform

Learn Elementor

Download Free Theme

Brand Assets

Testimonials

Compare Astra/Kadence

TrustPilot

CCPA

Video Tutorials

FEATURES

WooCommerce

Header Footer Builder

Company

About

Pricing

Blog

Affiliate Program

Contact Us

Terms of Service

GDPR Privacy Policy

GDPR Cookie Policy

Support

Login

What’s New

Documentation

Request Support

Video Tutorials

Refund Policy

Service

Discount Coupon

Bug Bounty Program

Copyright © 2010-2025 CyberChimps  

Top
  • Constructive Blocks
    • Advanced Heading Block
    • Section Block
    • Advanced Columns Block
    • Pricing List Block
    • Pricing Table Block
    • Flip Box Block
    • Info Block
    • Image Slider Block
    • Post and Page Grid Block
    • Post Carousel Block
    • Icon List Block
    • Table of Content
    • Team Block
    • Shape Divider Block
    • Masonry Block
    • Portfolio Block
    • Accordion Block
    • Divider Block
    • Video Popup Block
    • Card Block
    • Spacer Block
    • Google Map Block
    • Block Quote
    • Expand
    • Image Hotspot
    • Instagram Feed Block
    • Image Boxes Block
    • Testimonial Block
    • Advanced Text Block
    • Testimonial Slider Block
    • Feature Grid Block
    • Inline Notice Block
    • WP Search Block
    • Social Share Block
    • Tabs Block
    • Progress Bar Block
    • Call/Mail Button
    • Anchor Block
    • Gutenberg Image Block – Responsive Block
    • Contact Form 7 Styler
  • Timelines
    • Count Up
    • Gutenberg Countdown Block
    • Content Timeline
    • Post Timeline Block
  • CRO
    • Multi Buttons Blocks
    • Call To Action Block